Last Updated on January 24, 2024 by teamobn

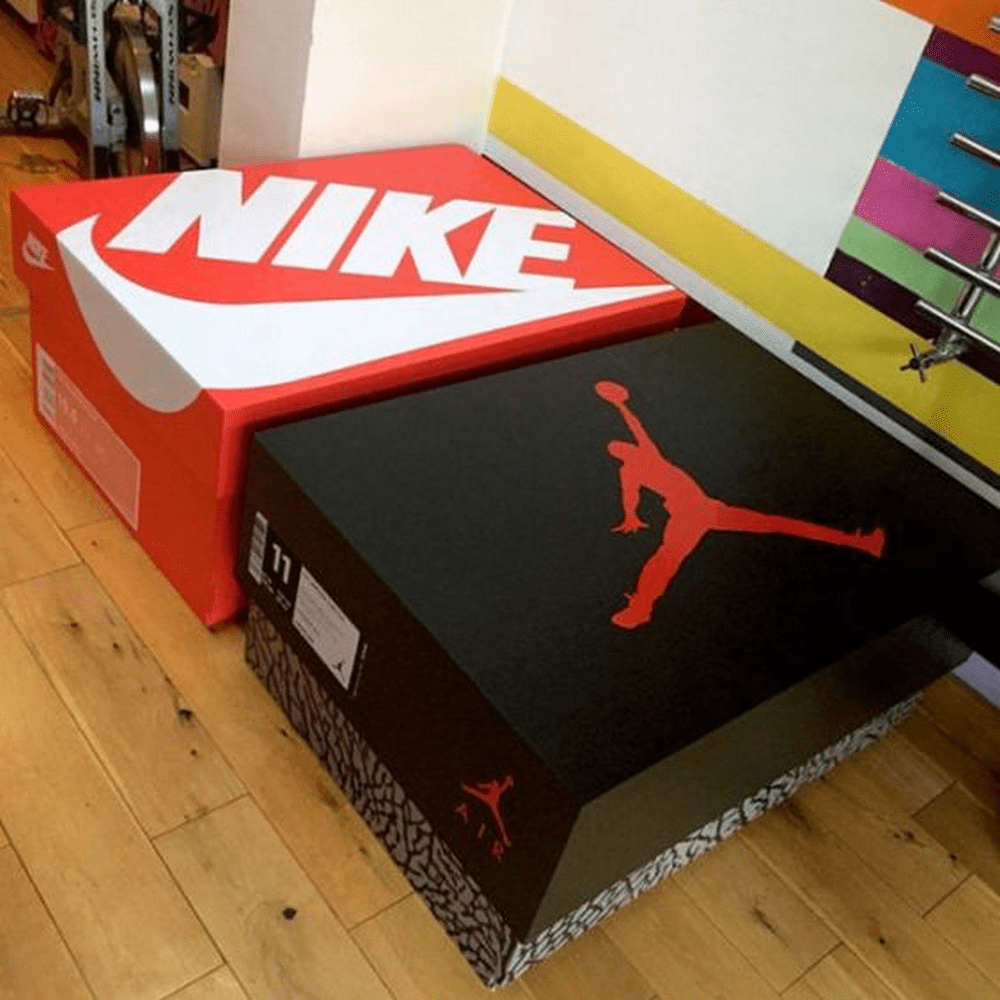
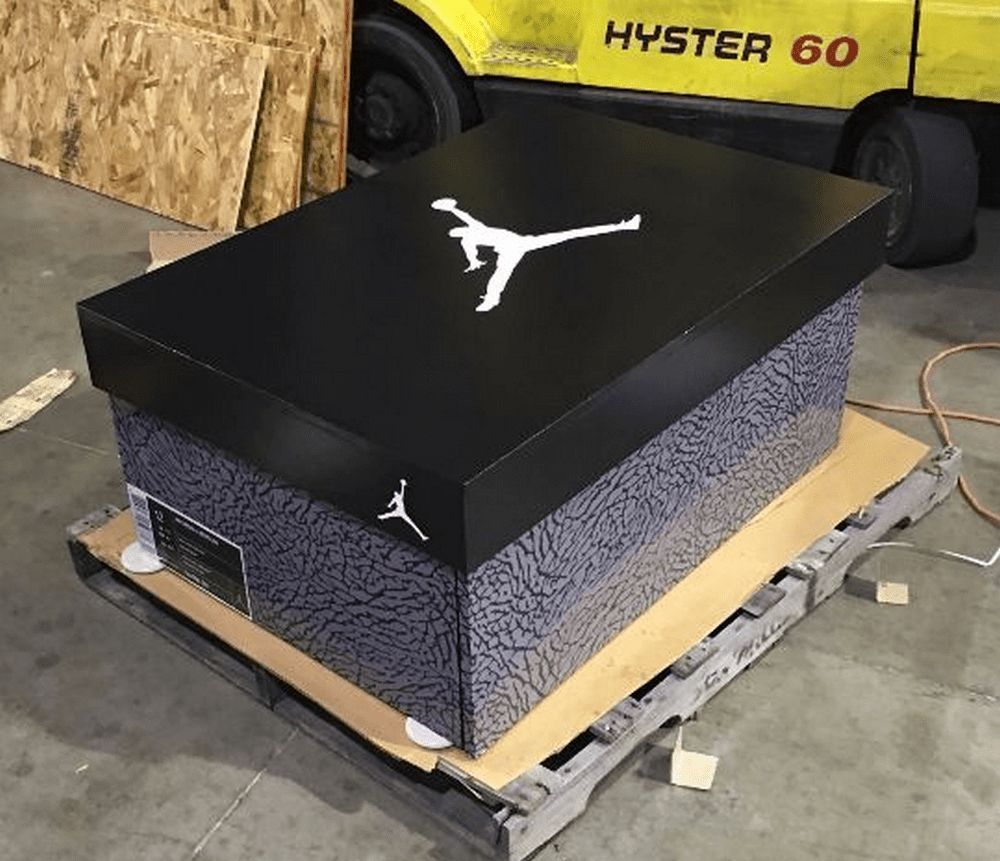
If you’re a big fan of Nike, this giant shoe box project is for you.
There are thousands of do-it-yourself projects available online and in stores. But some turn out to be more popular than others, including a giant shoe box. These projects have been shared millions of times on social media, and people are raving about them. So, what makes these projects so popular? There are a few factors that can contribute to a project’s popularity.
First, the project must be relatively easy to complete. It shouldn’t require a lot of time or special skills. Second, the project should be affordable. It should use inexpensive materials that are easy to find. Third, the project should have a high “wow” factor. One particular project in mind is the giant shoe box. It’s so trendy that even celebrities have them.

However, you need not spend a lot on these giant shoe boxes which are mainly used for storage. Now we can see why people like them. It’s a piece of furniture that’s fashionable and functional – and we love functional decorative pieces, right?
But not everyone is a fan of the shoe box trend. Some people find them an eyesore and argue that they take up too much space. But if you have a small home or apartment, then a shoe box can be a great way to save space. And if you love shoes, then a giant shoe box can be a great display of your collection.
If you’re a big fan of high-end fashion brands like Louboutin or Gucci, you can replicate their iconic shoe boxes and create giant versions. The project requires some woodworking skills, but it’s not rocket science. This is definitely something worth doing if you want to add a touch of luxury to your home.
The size of your giant shoe box will depend on the size that you want. However, we recommend that you choose a size that is large enough to comfortably fit all of your shoes. Otherwise, you may have to cram up and be uncomfortable when storing your shoes in the box. Not to mention, a smaller box may not fit all of your shoes, and you’ll have to take them out anyway. So save yourself the trouble and choose a size that will comfortably fit all of your shoes.
Contents
- 1 Building a Giant Shoe Box
- 2 Comparing Materials for Durability and Cost in Giant Shoe Box Construction
- 3 Budget-Friendly Tips for Building a Giant Shoe Box
- 4 Frequently Asked Questions About Building a Giant Shoe Box
- 4.1 What materials are best for building a giant shoe box?
- 4.2 How can I save money while building a giant shoe box?
- 4.3 Can I build a giant shoe box if I’m new to DIY projects?
- 4.4 Is treating plywood or MDF for a giant shoe box necessary?
- 4.5 How can I make my giant shoe box unique?
- 4.6 What tools do I need to build a giant shoe box?
- 4.7 How do I ensure my giant shoe box is durable?
- 4.8 Can I build a giant shoe box to match my home decor?
- 4.9 How long does it take to build a giant shoe box?
- 4.10 Is it cheaper to build or buy a giant shoe box?
- 5 Conclusion
Building a Giant Shoe Box
Materials:
- Plyboard
- Wood glue
- Screws
- Piano hinge
- Drawer runners
- Sticker decals
- Lacquer finish
- Paint
Tools:
- Table saw
- Drill with a drill bit
- Pencil
- Clamps
- Sander
Cut list for this giant shoe box:
For the BOX:
- Base (length = 100cm , width = 70cm)
- Top (length = 103cm , width = 73cm)
- Back (length = 97cm , width = 45cm)
- Sides 2 pcs (length = 70cm, width = 45cm)
- Back lip (length = 103cm, width = 14cm)
- Side Lips 2 pcs (length = 70cm, width = 140cm)
For the Drawers:
- Base 2 pcs (length = 97cm, wdth = 65cm)
- Sides 4 pcs (length = 65cm, width = 14cm)
- Front 2 pcs (length = 97cm, width = 21.5 cm)
- Top Drawer lip (length = 103cm, width = 14 cm)
Instructions:
Step 1: Design and Measurements
- 1.1. Sketch the design of your giant shoe box.
- 1.2. Measure and mark the plyboard for the base, sides, back, lid, and drawers.
- 1.3. Ensure all measurements are accurate for a snug fit.
Step 2: Cutting the Plyboard
- 2.1. Use the table saw to carefully cut the plyboard following your measurements.
- 2.2. Sand the edges of each piece to smooth out rough areas.
Step 3: Assembling the Box
- 3.1. Apply wood glue to the edges of the base piece.
- 3.2. Attach the sides and back to the base using clamps.
- 3.3. Drill pilot holes and secure the structure with screws.
- 3.4. Make sure the box is square and sturdy.
Step 4: Attaching the Lid
- 4.1. Attach the piano hinge to the lid and the back of the box.
- 4.2. Ensure the lid opens and closes smoothly.
Step 5: Installing the Drawers
- 5.1. Assemble the drawers following the same process as the box.
- 5.2. Attach drawer runners to the sides of the box and the drawers.
- 5.3. Ensure the drawers slide in and out effortlessly.
Step 6: Finishing Touches
- 6.1. Sand the entire shoe box for a smooth finish.
- 6.2. Apply paint as desired. Let it dry completely.
- 6.3. Apply a lacquer finish for durability and shine.
- 6.4. Add sticker decals for customization.
Step 7: Final Assembly
- 7.1. Once everything is dry, assemble all parts together.
- 7.2. Check all moving parts again to ensure smooth operation.
Click on any image to start the lightbox display. Use your Esc key to close the lightbox.



Comparing Materials for Durability and Cost in Giant Shoe Box Construction
When building a giant shoe box, choosing the right material is crucial. The material affects durability, cost, and the overall look of your giant shoe box. Here, we compare popular materials to help you make an informed decision.
Plywood: Affordable and Durable
Plywood stands out as a leading material for constructing a giant shoe box. Its popularity stems from several key attributes. Firstly, plywood is known for its strength. It comprises multiple layers of wood veneers, making it robust and sturdy. This attribute is especially important for a giant shoe box, which might need to support a significant amount of weight from numerous pairs of shoes.
In addition to its strength, plywood is also celebrated for its affordability. Compared to other wood materials, plywood offers a cost-effective solution without compromising on durability. This makes it an excellent choice for those wanting to build a giant shoe box on a budget.
Ease of use is another significant advantage of plywood. It’s a versatile material that can be cut and shaped with standard woodworking tools. This makes it a go-to choice for DIY enthusiasts looking to create a custom giant shoe box. Its surface can be easily sanded, painted, or varnished, allowing for a range of finishes to match any decor style.
However, it’s important to note that while plywood is a durable option, it may have limitations in moisture resistance. If the giant shoe box is likely to be exposed to damp conditions, additional treatments or sealants may be necessary to protect the plywood and extend the life of the shoe box.
MDF: Smooth Finish but Less Durable
Medium-density fiberboard (MDF) is another popular choice for building a giant shoe box, particularly for those prioritizing a smooth, paintable surface. The primary advantage of MDF in constructing a giant shoe box lies in its affordability. Generally cheaper than plywood, MDF allows for a cost-effective approach to your DIY project.
The surface of MDF is notably smooth and even. This quality makes it an excellent choice for those who plan to paint their giant shoe box. MDF’s surface can easily be primed and painted, offering a flawless finish tailored to any color scheme or design. This feature particularly appeals to those who want their giant shoe box to have a polished, custom look.
However, when considering MDF for your giant shoe box, it’s important to understand its durability. MDF is less robust than plywood, making it less suitable for heavy-duty use. Its composition, primarily made from fine wood particles and resin, can be more susceptible to damage under weight or stress. This means a giant shoe box made from MDF might not withstand the same weight as one made from sturdier materials like plywood.
Moreover, MDF requires more maintenance when used for a giant shoe box. It is more prone to swelling and warping if exposed to moisture, so it’s crucial to ensure that the MDF is properly sealed, especially if the shoe box is placed in damp areas. Regular checks and maintenance may be necessary to keep the giant shoe box in good condition.
Reclaimed Wood: Eco-Friendly and Unique
Reclaimed wood is an increasingly popular choice for building a giant shoe box with an eco-friendly and unique twist. This material stands out for its sustainability, as it involves repurposing wood from old structures, ships, barns, or furniture. You’re creating a unique piece and contributing to environmental conservation by choosing reclaimed wood for your giant shoe box.
The distinct appeal of reclaimed wood lies in its unique characteristics. Each piece of reclaimed wood tells a story, often displaying textures, colors, and patterns you cannot find in new wood. This individuality can add significant character and rustic charm to your giant shoe box, making it not just a storage solution but a conversation piece.
However, there are a few considerations to keep in mind with reclaimed wood. Firstly, it can be more expensive than other materials like plywood or MDF. The cost is often attributed to sourcing, cleaning, and preparing the wood for reuse. Additionally, the availability of reclaimed wood can vary, making it a bit more challenging to source compared to more conventional materials.
Another important factor is the durability of reclaimed wood, which can vary greatly depending on its previous life and how it was preserved. Some reclaimed wood may have been exposed to the elements for decades, potentially affecting its strength and longevity. Inspecting and choosing still structurally sound pieces for your giant shoe box project is crucial.
Making the Right Choice
Selecting the perfect material for your giant shoe box project is a decision that hinges on your specific requirements and budget. Each material option – plywood, MDF, and reclaimed wood – has unique advantages, catering to different needs and preferences.
Selecting the right material ensures your giant shoe box meets your expectations in durability and cost. Consider these options carefully for your next DIY project.
Budget-Friendly Tips for Building a Giant Shoe Box
Building a giant shoe box doesn’t have to strain your wallet. With smart planning and some creative approaches, you can construct a durable and stylish giant shoe box while keeping costs low. Here are budget-friendly tips to guide you through the process.
Opt for DIY Tools and Techniques
Investing in expensive tools for a one-time project isn’t practical. Borrow tools from friends or rent them from local hardware stores. Utilize basic DIY skills and techniques, which can be learned through online tutorials. This hands-on approach saves money and adds a personal touch to your giant shoe box.
Simplify the Design
Opting for a simple design can significantly reduce costs when building a giant shoe box. Complex designs often require special tools, materials, and a higher level of craftsmanship, which can add to the expense. You can avoid these additional costs by focusing on a straightforward, functional design.
A minimalist approach to your giant shoe box doesn’t mean compromising on style. A sleek and uncomplicated design can often be more visually appealing and easier to integrate into your existing decor. Moreover, a simpler design makes the construction process easier, especially for those new to DIY projects. This approach ensures that your giant shoe box is practical and aesthetically pleasing without expensive detailing.
Hunt for Deals and Discounts
Being savvy about where and when you purchase materials for your giant shoe box can lead to significant savings. Regularly check local hardware stores and online retailers for sales, discounts, or promotions. Purchasing materials in bulk can also be more cost-effective, especially if you plan on building multiple giant shoe boxes or have other projects in mind.
Additionally, consider using reclaimed materials or remnants from previous projects. Not only are these options often cheaper, but they also add a unique and personalized touch to your giant shoe box. Reclaimed wood, for instance, can provide a rustic and eco-friendly element to your project. Staying alert to these opportunities and being flexible with your material choices can greatly reduce the overall cost of your giant shoe box.
Recycle and Repurpose
Utilizing your existing materials is a creative and environmentally friendly way to build your giant shoe box. Look around your home for old furniture or wood that can be repurposed. An old shelf, table, or cabinet can be transformed into parts of your giant shoe box. This recycling approach not only saves money but also contributes to sustainability. It prevents waste and gives a new life to items that might otherwise be discarded.
Additionally, incorporating these pre-owned items into your giant shoe box adds a story and personal history to the piece, making it more meaningful and unique. You can turn existing resources into a functional and stylish giant shoe box with creativity and basic DIY skills.
Do Your Painting and Finishing
Taking on the painting and finishing of your giant shoe box can lead to substantial cost savings. Professional finishing services can be pricey, but you can achieve similar results with some effort and guidance.
Numerous online tutorials and videos are available to guide you through the process, teaching you techniques for a professional-looking finish. These resources often include tips on the best types of paint, how to apply it evenly, and how to add special effects if desired.
By doing this work yourself, you save money and gain the satisfaction of completing the project with your personal touch. Furthermore, this approach allows you to customize your giant shoe box precisely to your taste, choosing the colors and finishes that match your style and home decor.
Plan and Budget Beforehand
Careful planning and budgeting are crucial in preventing overspending on your giant shoe box project. Start by listing all the materials and tools you will need. This list helps get a clear picture of the required items and avoid purchasing unnecessary or redundant materials.
Once you have your list, research the prices and set a realistic budget for your project. This budget should include a little extra for unforeseen expenses that may arise.
Sticking to this budget is key. Getting carried away with additional features or more expensive materials is easy, but keeping to your initial plan helps control costs. This planning phase ensures that you stay within your financial means and helps organize your project, making the building process smoother and more efficient.
By following these tips, building a giant shoe box can be both an affordable and fulfilling project. You can create a functional and stylish storage solution without breaking the bank. Creativity and planning can go a long way in keeping costs down.
Frequently Asked Questions About Building a Giant Shoe Box
What materials are best for building a giant shoe box?
Plywood is a great choice for durability and affordability. MDF is cost-effective and offers a smooth finish for painting. Reclaimed wood is ideal for an eco-friendly and unique look.
How can I save money while building a giant shoe box?
To save money, choose affordable materials like plywood or MDF, simplify your design, look for sales and discounts, recycle and repurpose old furniture, and do your painting and finishing.
Can I build a giant shoe box if I’m new to DIY projects?
Absolutely! Choose a simple design and use online tutorials for guidance. Start with basic tools and techniques, and don’t hesitate to seek advice from DIY communities or local hardware stores.
Is treating plywood or MDF for a giant shoe box necessary?
Yes, especially if the giant shoe box will be placed in areas prone to moisture. Use appropriate sealants or paints to protect the material and extend the life of your shoe box.
How can I make my giant shoe box unique?
Customize your shoe box with paint, decals, or unique hardware. Consider using reclaimed wood for a one-of-a-kind look, or add features like a bench top or display shelves.
What tools do I need to build a giant shoe box?
Basic tools like a saw, drill, screwdriver, sander, and clamps are typically needed. You might also need paintbrushes and other finishing tools, depending on your design.
How do I ensure my giant shoe box is durable?
Use sturdy materials like plywood and ensure all joints are securely fastened. Properly seal and finish the exterior to protect against wear and tear.
Can I build a giant shoe box to match my home decor?
Yes, choose paint and finishes that complement your existing decor. Adjust the size and design of your shoe box to fit seamlessly into your space.
How long does it take to build a giant shoe box?
The time varies based on the complexity of the design and your DIY experience. Simple designs might take a weekend, while more elaborate ones could take longer.
Is it cheaper to build or buy a giant shoe box?
Generally, building your giant shoe box can be cheaper than buying a pre-made one, especially if you use budget-friendly materials and do the work yourself.
Conclusion
Do you love shoes? Do you love giant things? Well, now you can combine your two loves with this video on how to build your own giant shoe box! With just a few supplies and some elbow grease, you can have your very own shoe box that’s big enough to store all of your shoes, or even use it as a makeshift closet! So what are you waiting for? Watch the video and get started on your own giant shoe box today!

