Last Updated on June 27, 2024 by teamobn

Tools make our lives a whole lot easier. But some tools need another tool to work perfectly. My husband loves to make wooden sculptures to de-stress.
One of his most commonly used tools is a chisel. Because he uses them so regularly, it’s important that the tools are kept sharp. This means that he has to sharpen them on a regular basis.
Good quality tools can be a big investment, but if you take good care of them, they last longer and return the favour. You can extend the life of your tools by regularly cleaning and oiling them, and by storing them properly. Taking good care of your tools pays off in the long run, both in terms of their longevity and their performance.
It is important to keep your tools clean and well-maintained in order to save time and money. Properly maintained tools also make your projects and jobs much easier. In order to keep your tools in good condition, it is important to clean them after each use.
You should also regularly inspect your tools for damage or wear and tear. If you notice any damage, make sure to repair it and do something with the tool as soon as possible. By taking proper care of your tools, you can extend their life and avoid having to replace them as often.
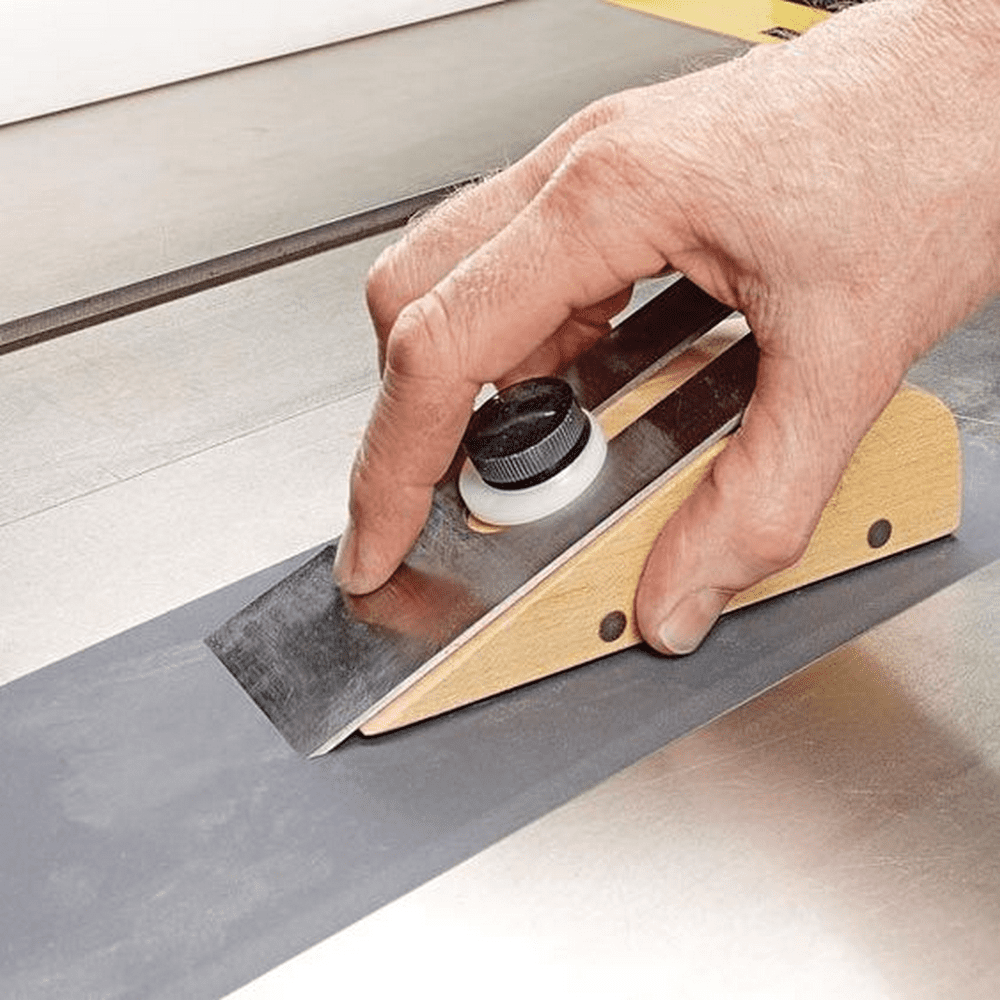
My husband recently discovered that there’s a better way to hold a chisel in place while sharpening it. After doing some research, he found that he could make one himself with some basic materials. This saved him money and allowed him to customize it to his own needs.
The project was actually quite simple. I don’t think it cost him anything at all, since he used materials that he already had laying around his shed. It’s always impressive to see someone take on a project like this and come out successful. Good for him for having the vision and skill to complete it!
He now uses the magnetic honing guide almost every week and has even made some for his friends who have all come to love them as well. This is a great DIY project that anyone can easily do. Not to mention, it’s always more satisfying to use something you made yourself. So next time you’re in need of a honing guide, remember – why buy when you can make it?
If you’re interested to make your own magnetic honing guide for your chisels, you can find a great tutorial by heading to the link below. This guide will walk you through the process step-by-step, so you can get started honing your chisels like a pro in no time.
You’ll need a few tools and supplies before you get started, including a set of chisels, a set of Neodymium magnets, a small plastic wheel with a metal base plate, and some super glue. Once you have everything you need, simply follow the tutorial below and you’ll have your very own magnetic honing guide in no time.
Continue reading on how to make a magnetic honing guide below.
Contents
Building a Magnetic Honing Guide
Materials
- 8 pcs – 10×1.5mm Neodymium magnets
- Small plastic wheel with a metal base plate
- Water
- Alcohol pad/swab
- Super glue
Tools
- Metal file
- Bench vise
- Sharpening stone
Instructions
Step 1: Prepare the Base Plate
- Clean the Metal Base Plate: Use an alcohol pad/swab to thoroughly clean the metal base plate. This removes any grease or dirt, ensuring a strong bond with the magnets.
- Dry the Base Plate: Allow the base plate to air dry completely after cleaning.
Step 2: Arrange the Magnets
- Plan the Layout: Arrange the Neodymium magnets on the base plate in two parallel rows, ensuring even spacing. This arrangement will provide a strong and balanced magnetic field for holding the chisel.
- Mark the Positions: Lightly mark the positions of the magnets on the base plate with a pencil or a fine marker to ensure they stay aligned during gluing.
Step 3: Attach the Magnets
- Apply Super Glue: Apply a small amount of super glue to the back of each magnet. Be careful not to use too much glue, as it can squeeze out and interfere with the placement.
- Place the Magnets: Carefully place each magnet onto the marked positions on the base plate. Press down firmly to ensure good adhesion.
- Let the Glue Set: Allow the glue to set according to the manufacturer’s instructions. Typically, this takes a few minutes, but for maximum strength, it’s best to let it cure for several hours or overnight.
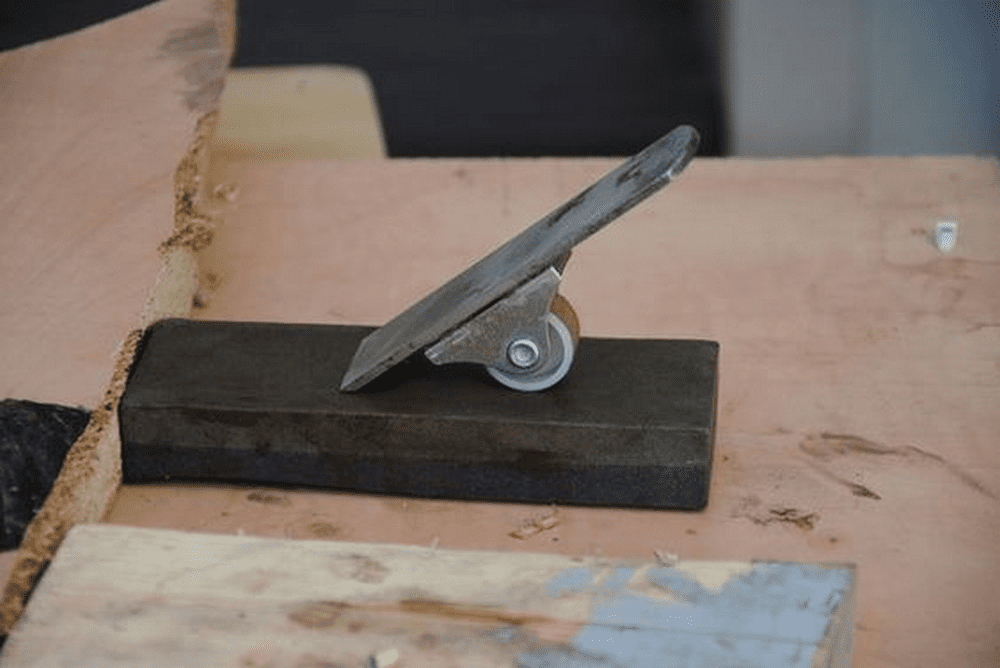
Step 4: Shape the Plastic Wheel
- Secure the Wheel: Place the plastic wheel in the bench vise, ensuring it’s held securely but not so tight that it deforms or cracks.
- File the Edges: Use the metal file to smooth any rough edges or imperfections on the plastic wheel. This step ensures that the wheel rotates smoothly when the honing guide is in use.
Step 5: Assemble the Honing Guide
- Attach the Base Plate to the Wheel: Use super glue to attach the metal base plate (with the magnets) to the flat side of the plastic wheel. Ensure the base plate is centered to keep the guide balanced.
- Let the Assembly Cure: Allow the entire assembly to cure for several hours to ensure all glued parts are securely bonded.
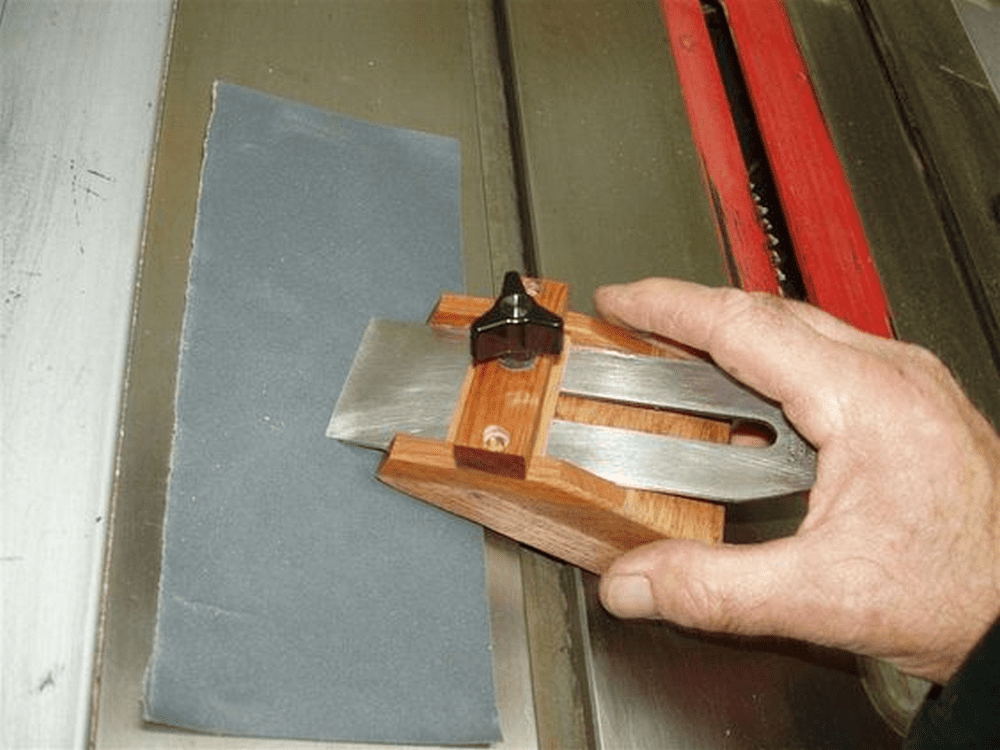
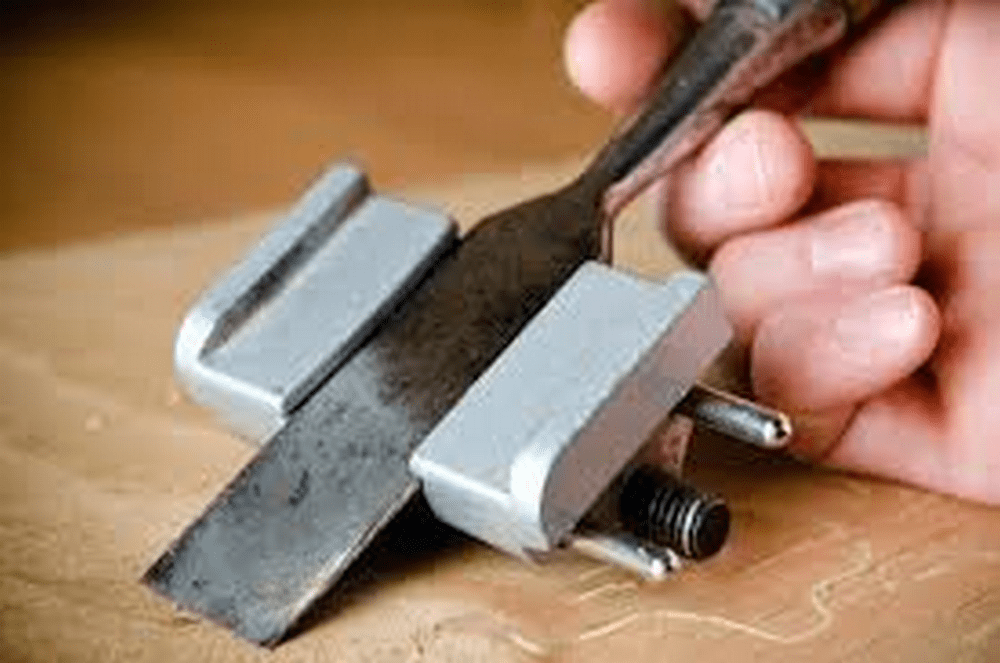
Step 6: Test the Honing Guide
- Prepare a Chisel: Clean the chisel with water and an alcohol pad/swab to remove any dirt or oil.
- Attach the Chisel to the Guide: Place the chisel on the magnetic base plate. Ensure it is held securely by the magnets.
- Test the Movement: Roll the honing guide back and forth on the sharpening stone. The plastic wheel should provide a smooth, consistent movement, allowing for precise sharpening.
Step 7: Sharpening Process
- Set the Angle: Adjust the angle of the chisel on the sharpening stone as needed to achieve the desired bevel.
- Sharpen the Chisel: Move the honing guide back and forth across the sharpening stone, maintaining consistent pressure. Check the edge regularly to ensure even sharpening.
- Final Touches: Once the chisel is sharpened to your satisfaction, remove it from the honing guide and clean both the chisel and the guide.
Click on any image to start the lightbox display of magnetic honing guides. Use your Esc key to close the lightbox.


Get more step-by-step instructions here…
Here’s a quick video…
Understanding the Importance of a Honing Guide
Maintaining the sharpness of your chisels and hand planes is crucial for any woodworking project. A honing guide ensures precision and consistency when sharpening your tools. This section delves into why a honing guide, especially a magnetic honing guide, is essential for woodworkers.
Ensuring Consistent Sharpening Angles
A honing guide helps maintain a consistent angle during the sharpening process. Without it, achieving the perfect bevel can be challenging and may lead to uneven edges. A magnetic honing guide, in particular, holds the tool firmly in place, allowing for precise and repeatable sharpening angles. This consistency is vital for maintaining the integrity and performance of your chisels and hand planes.
Enhancing Tool Longevity
Regular and accurate sharpening with a honing guide extends the life of your tools. By using a magnetic honing guide, you ensure that your chisels and hand planes are sharpened evenly, preventing unnecessary wear and tear. Properly sharpened tools are less prone to damage and require less frequent replacements, saving you money in the long run.
Improving Work Efficiency
Sharp tools are essential for efficient woodworking. Dull edges can lead to increased effort, reduced accuracy, and potential mistakes in your projects. A magnetic honing guide makes the sharpening process quicker and more effective, ensuring that your tools are always in optimal condition. With sharp tools, you can work more efficiently and achieve better results in less time.
Safety Considerations
Using a honing guide, such as a magnetic honing guide, enhances safety in your workshop. Sharp tools are safer to use because they require less force, reducing the risk of slips and accidents. Additionally, a honing guide keeps your hands away from the sharpening stone, minimizing the chance of injury during the sharpening process.
Versatility and Ease of Use
A magnetic sharpening guide is convenient and adaptable. It is a useful tool for any woodworker since it can fit different chisel and hand plane sizes. The magnetic element makes it easier to hold onto your instruments and makes sharpening them easier. A magnetic honing guide gives woodworkers of all skill levels the assistance they need to effortlessly attain professional-grade sharpness.
To sum up, an essential tool for preserving the performance and sharpness of your hand planes and chisels is an honing guide. Enhanced safety, effectiveness, and precision are provided by the magnetic honing guide in particular, which makes it a great option for woodworkers of all experience levels.
Conclusion
Making a magnetic honing guide on your own is an easy and affordable DIY. When sharpening your chisels and hand planes, this tool improves accuracy and productivity. Building it yourself gives you a greater sense of satisfaction and guarantees that your tools will last a long time.