Last Updated on February 27, 2024 by teamobn
A large rotisserie BBQ pit for a large gathering! Learn how to build this DIY project in your backyard for some delicious turkey and other BBQ favourites!
Don’t be fooled by the word ‘large’! This DIY rotisserie pit is a dry-fit project which makes it easy to build. Yes, that means no mortar. 🙂
And with that said, it is also a low-maintenance outdoor cooker. You can easily replace broken blocks if needed. You can also relocate the BBQ pit anytime and anywhere you want!
Plans are provided by the owner-builder below, and you can use them as a reference for building a rotisserie BBQ pit in your yard. The design is simple, so you shouldn’t have any trouble scaling it to fit your space!
Contents
Building a Rotisserie BBQ Pit
Click on any image to start the lightbox display. Use your Esc key to close the lightbox.
Materials
FOR THE BBQ BODY:
- 25 pieces – 8″ x 8″ x 16″ Standard Blocks
- 15 pieces – 8″ x 8″ x 16″ Cap Blocks (or standard)
- 4 pieces – 8″ x 8″ x 8″ Half Blocks
- 22 pieces – 12″ x 12″ Patio Stones (optional)
- 4 to 8 pieces – Wood/Metal Stakes
- Flagging Tape or String
FOR THE PIT:
- 16′ x 12″ Wide Expanded Steel (optional)
- 6 to 8 pieces – 24″ Rebar (optional)
- 2 to 3 Cubic feet – Sand or Gravel
- 2 pieces – 4′ x1.5″ Metal Pipe
FOR THE TOP / LID:
- Food-grade steel drum
- 20′ x 1.5″ angle iron (bed frames are great)
- Wooden hockey stick
- 4 pieces – 5″ x 5/16″ Bolts (with nuts & washers)
- 2 pieces – 2′ x 1/2″ Threaded Rod (with nuts & washers)
- 7′ x 12″ (1/8″ thick) Steel Plate
- High-heat Flat-black BBQ Spray Paint
FOR THE GRILL (optional):
- Expanded Steel 30″ x 48″
- 2 pieces – 1″ x 64″ Steel Pipe
Tools
- Shovel
- Gloves
- Hammers
- Long Level
- Short Level
- Safety Glasses
- Measuring Tape
- Old Chisel or Axe
- Permanent Marker
- Carpenters Square
- Hand-held Grinder
- Metal Cutting Discs
- Masonry Cutting Discs (optional)
- Wheelbarrow (optional)
- Friendly Welder Person
Steps
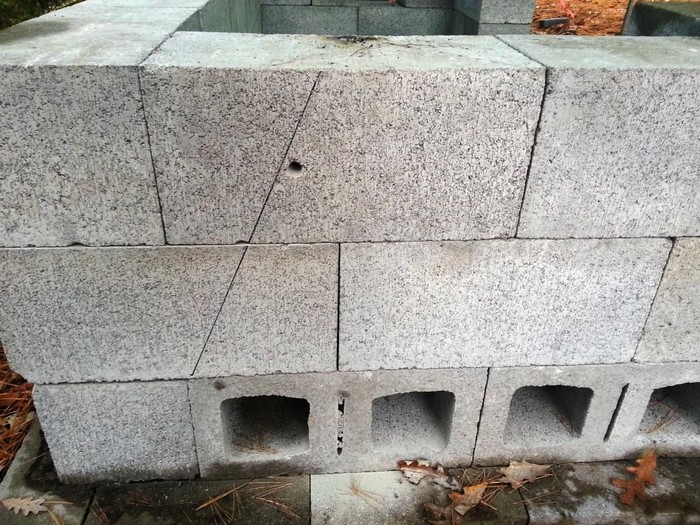
Using standard concrete blocks – aka “Cinder Blocks” – the design is easily scaleable. Make your rotisserie BBQ pit any size you want. The blocks are found at most hardware stores (Home Depot, Lowes, etc.) but I was able to save money by buying “seconds” from a wholesale distributor at $2.00 apiece here in Ontario, Canada.
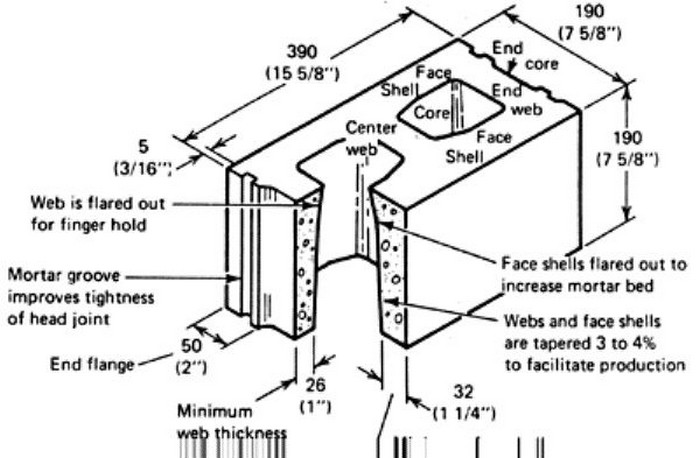
The standard block is usually sold as 8″ x by 8″ by 16″. This is not quite true. The specs refer to a block in a completed wall WITH mortar. The block itself is actually closer to 7.5″ x 7.5″ x 15.5″. I also chose blocks with squared/finished ends for the corners. I was happily surprised to find “cap” blocks for the top surfaces.
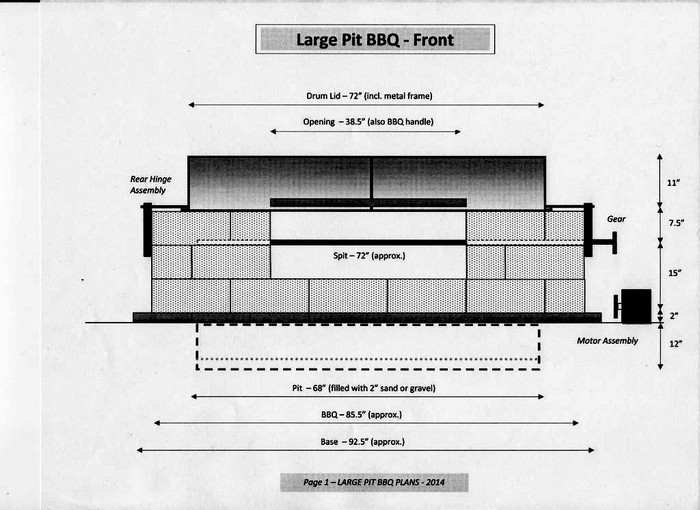
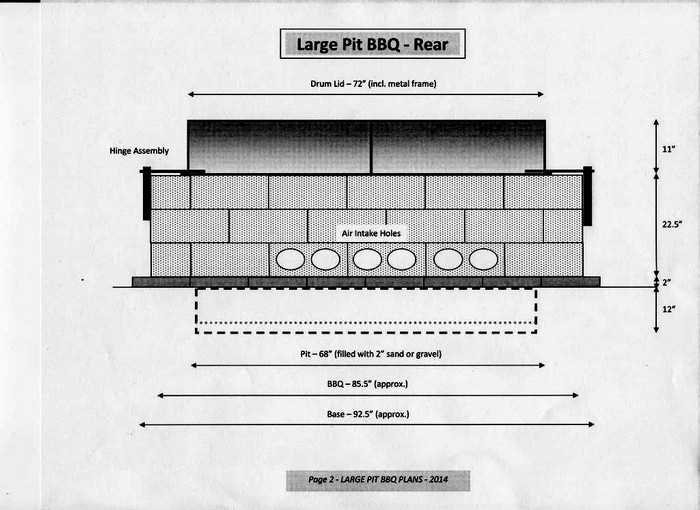
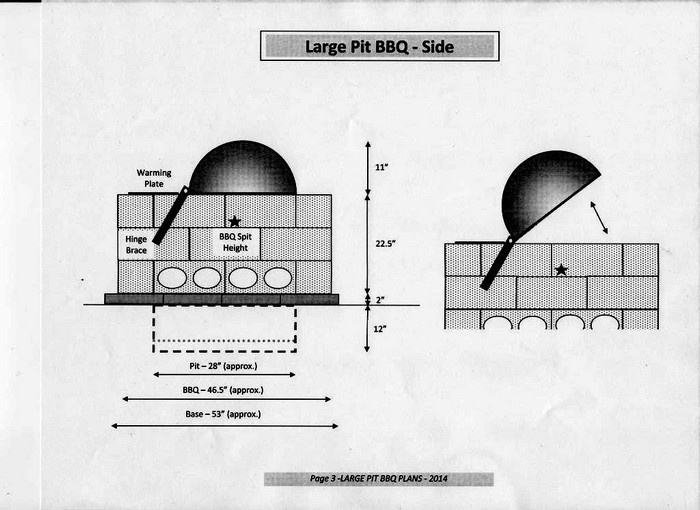
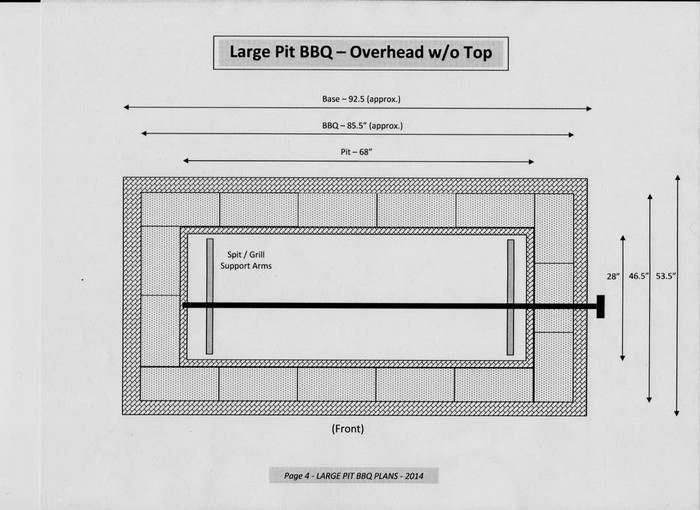
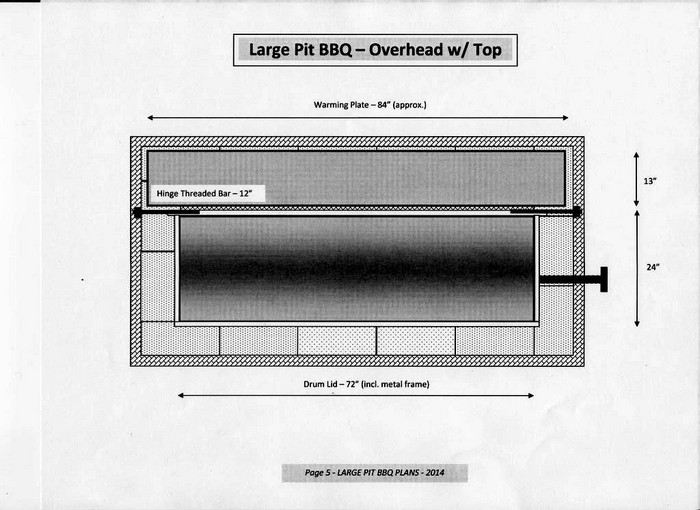
Here are my rudimentary blueprints:
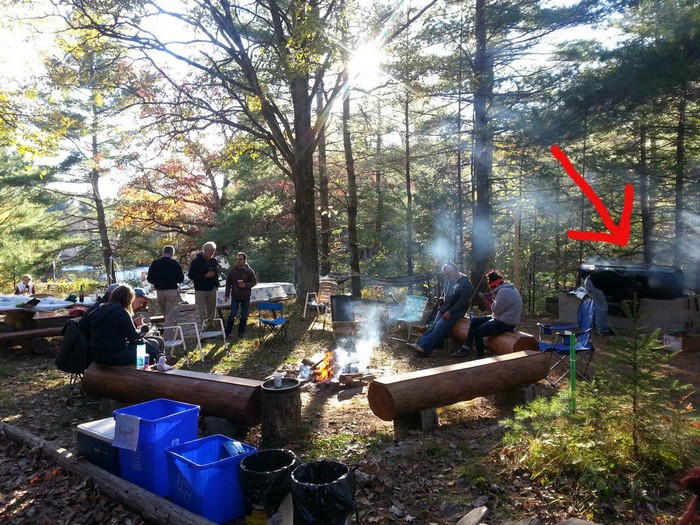
We gave the location quite a bit of thought before assembling the rotisserie BBQ pit. Remember that the rotisserie BBQ pit will be giving off a lot of smoke and heat once it’s fired up. We chose a convenient spot that was a safe distance from trees and play areas. If you use an electric motor you will also want to be located near an outlet.
As this is a rotisserie BBQ pit we had to consider tree roots. They are difficult to dig through (!) and also pose a fire hazard. The fire could get into the roots and smoulder underground for an extended time, making its way back to the tree eventually. I suggest having buckets of water around when the BBQ pit is fired-up… just in case.
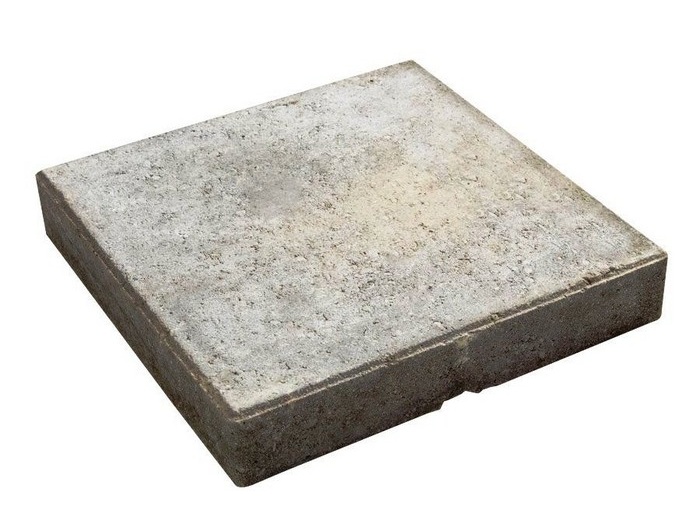
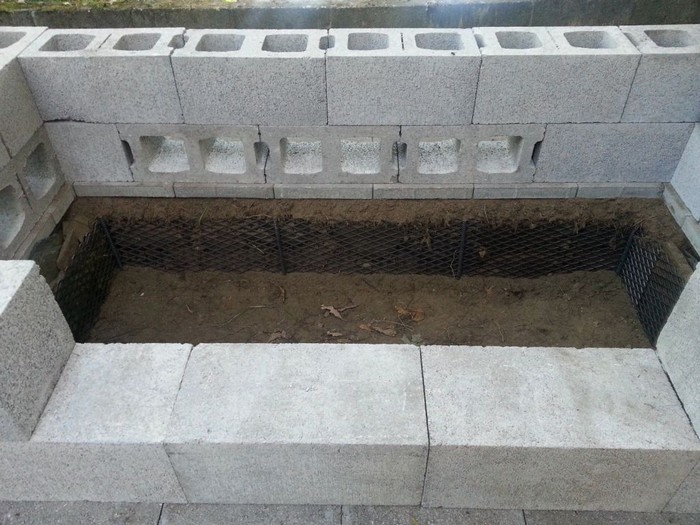
FYI – concrete blocks are HEAVY. Each block weighs 40-50 lbs, so forty of them will weigh a lot! A solid foundation is absolutely critical. After levelling the ground we decided to first lay down 12″ x 12″ patio stones to help distribute the weight and keep the bricks from sliding into the hole.
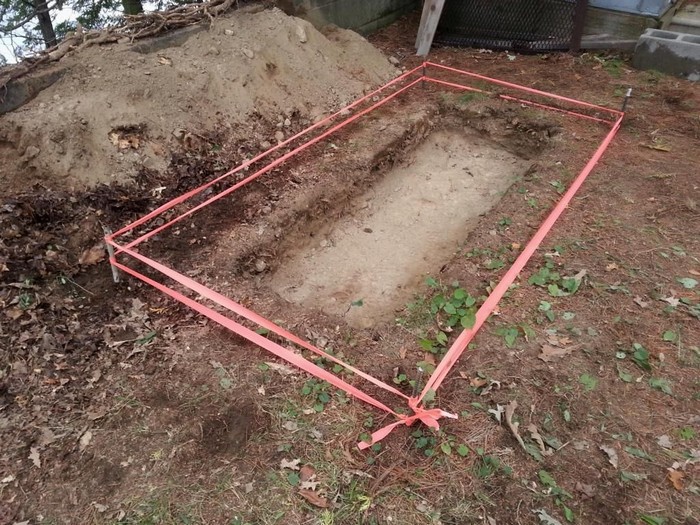
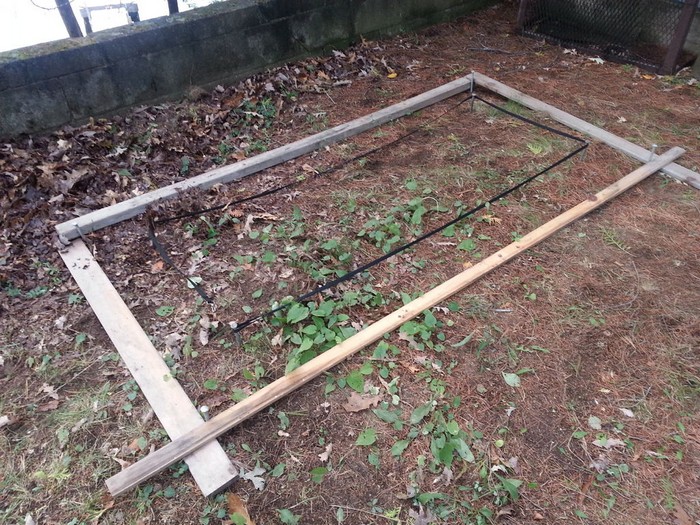
We measured the area and used stakes with flagging tape to mark the outside perimeter of the patio stones. NOTE: It would have been wiser to wait until AFTER laying the patio stones before digging the one-foot pit. We dug first and made the hole too large by mistake. Doh!
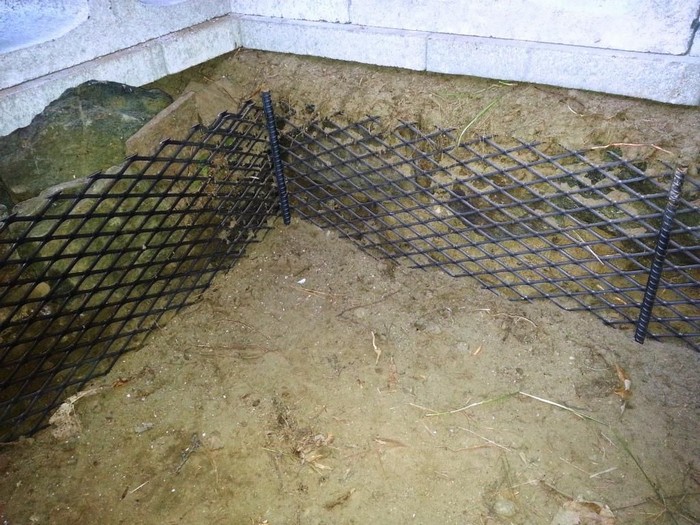
To keep the soil in place we used 12″ strips of expanded metal held in place with 2 ft rebar stakes. We also added thin, flat rocks behind the metal screen – cause it just seemed like the right thing to do.
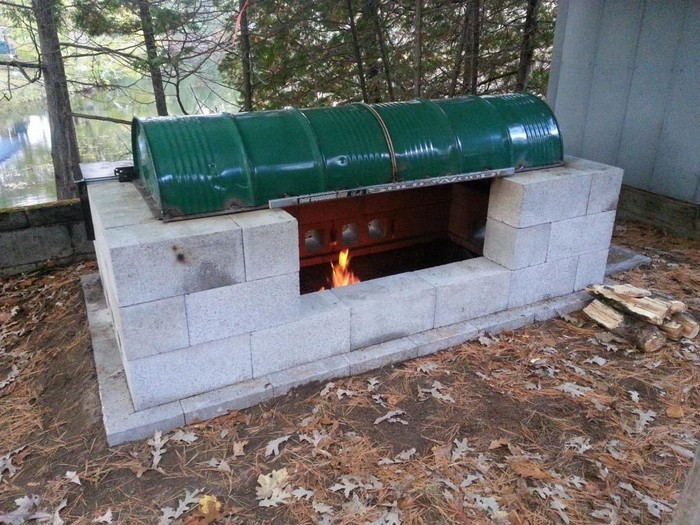
Now you can lay the blocks tightly against each other, checking for level (and square) often. Many of our blocks had little bumps and “extra bits” that had to be teased off with a hammer & an old axe. Lay some of the 1st-row blocks sideways to allow for air to feed the flames.
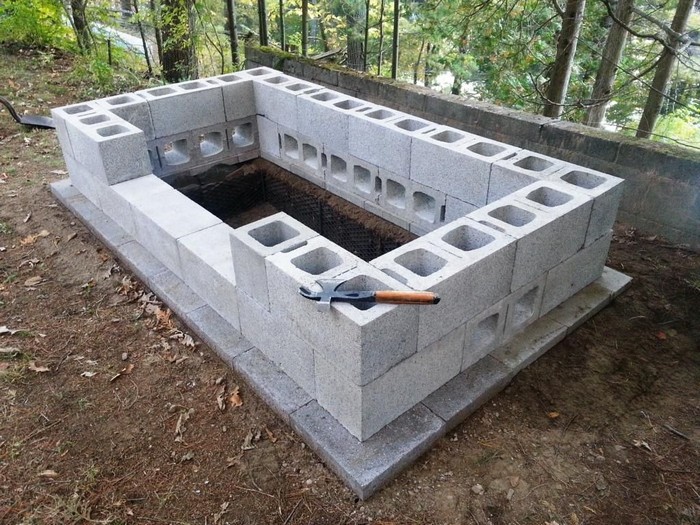
In some spots, we needed “half blocks” to complete a row. In other areas, we used “cap blocks” which have a finished surface over the holes (not solid top to bottom). They were almost the same cost and gave it a more polished look IMHO.
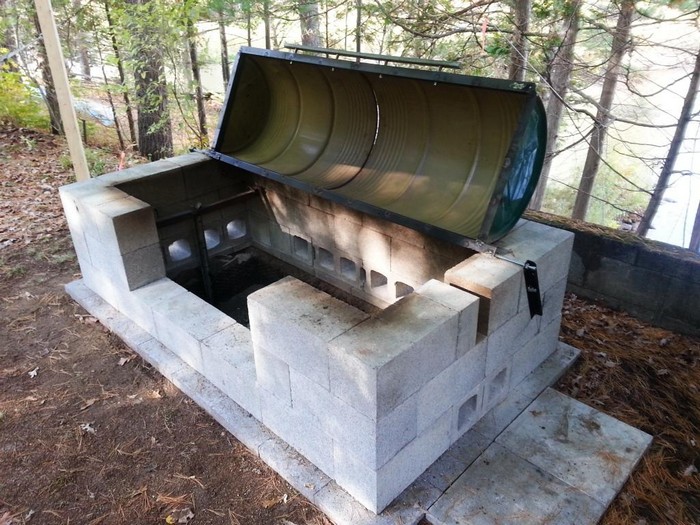
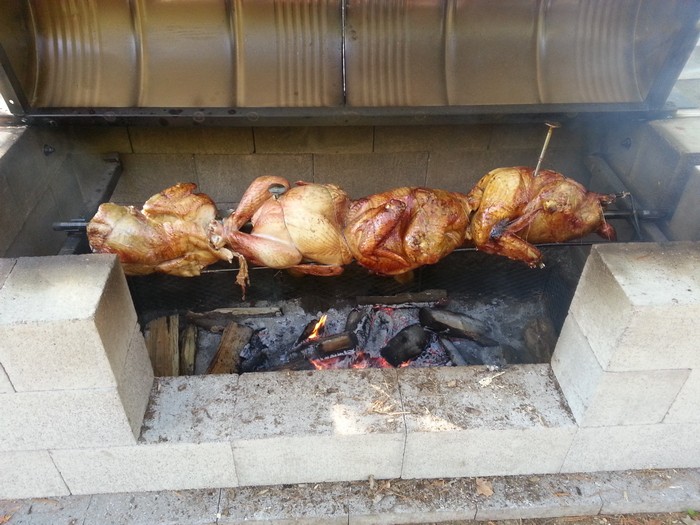
On top of the patio stones, we put down 3 rows of cinder blocks. On one end of the 3rd row, we judiciously placed a half block to leave a gap for the spit to come through. Using supports (next step) the spit should come out just above, but not touching, the 2nd row of blocks.

After putting 2″ of sand on the bottom of the pit we ended up with 25″ height from ground to spit. This seemed adequate and the amount of cooking heat can ultimately be controlled by the size of the fire and the opening of the lid.
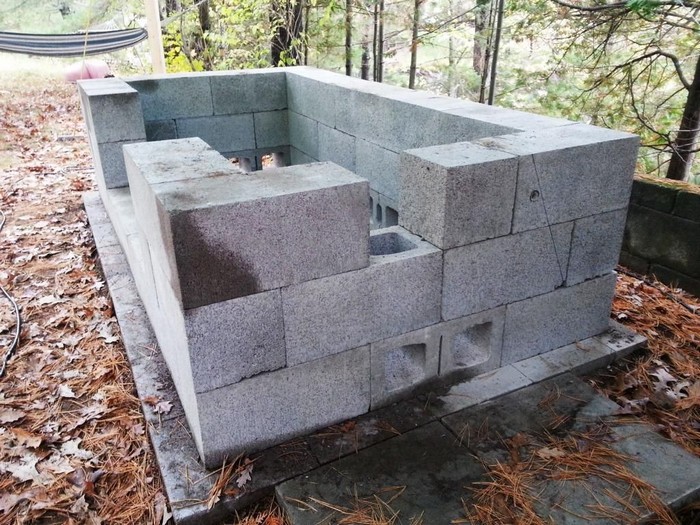
We also measured for a 1/2″ hole to be drilled in the top row of blocks on either end. This is used to mount the hinge brackets on either side.

For the BBQ pit, we used an 8-foot black steel pipe with a few holes drilled along the length. A gear was welded to one end. To support the rotisserie BBQ pit we used a 1.5″ pipe and hammered it 24″ into the ground at both ends of the BBQ pit. On the tops of these pipes, we welded horizontal arms at the desired height, and “v” brackets to hold the rotating pipe.
We could have simply supported a single rotisserie pipe but we wanted the option of adding other things later, such as a grill. For this, we welded horizontal steel arms to the support pipe, and more “v” brackets to support additional pipes.
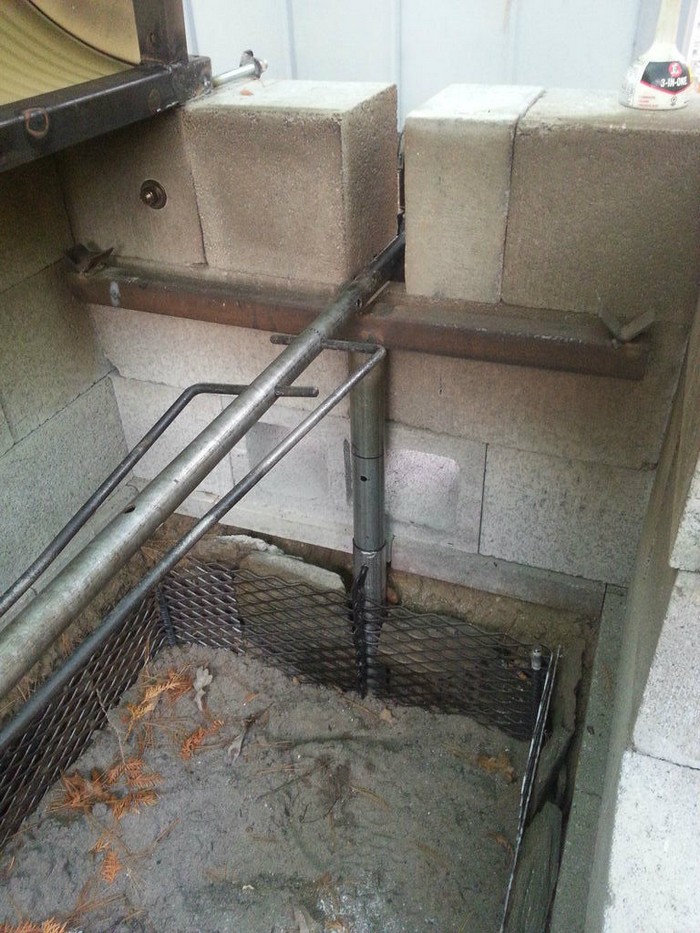
Note that we made the height adjustable by sliding two sizes of pipe inside one another. This will allow the grill to be lowered for traditional campfire cooking, or raised for warming pots and plates. We carefully drilled matching holes through the pipes so that a long pin or bolt can be inserted at various heights.
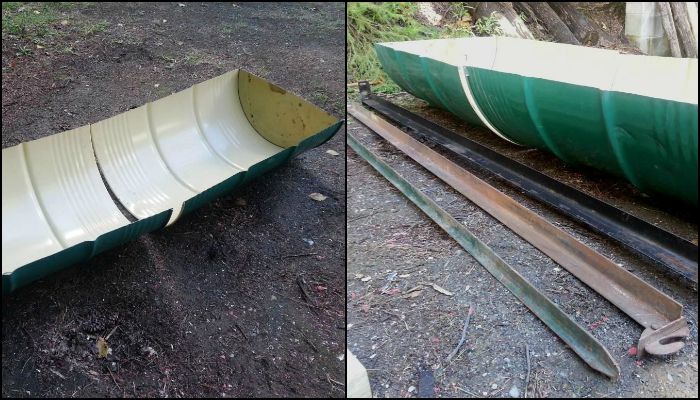
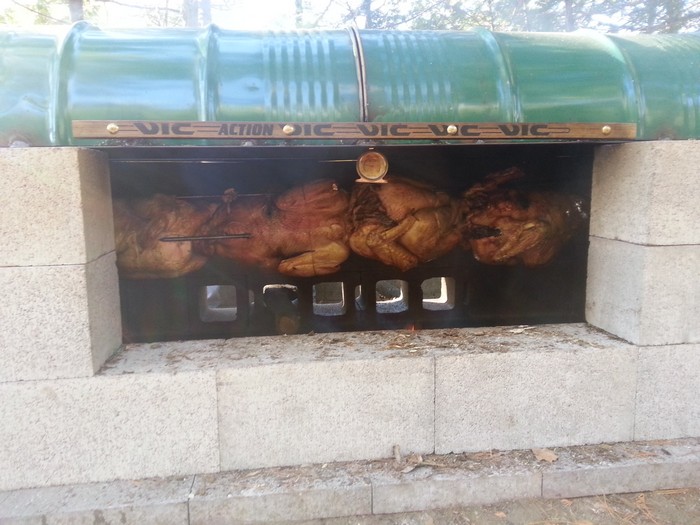
I don’t weld, but thank goodness for friends who do. (You’re the best Larry!) We used an old food-grade drum (cut in half length-wise), some scrounged bed-frame angle iron, and a 1/2″ threaded rod to whip up this hinged lid.

My advice would be to measure often here. We just barely managed to cover the length of the BBQ pit opening, but it worked! With some patience, we made it square and then used a hockey stick for a handle, spaced away from the BBQ with 5″ bolts and copper pipe. The caution here is that the handle can get a little toasty when there’s a roaring fire.
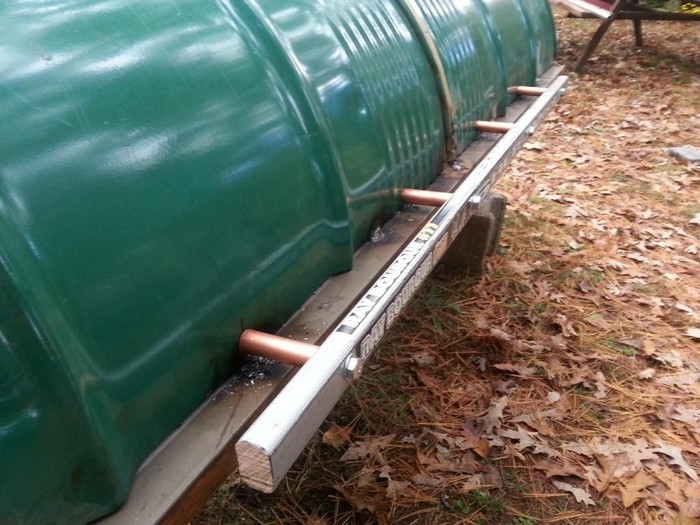
A ‘secret’ feature of this BBQ is the adjustable warming plate. The steel drum wasn’t wide enough front-to-back so we added a 12″ wide steel plate on the back.

This makes a great surface for keeping dishes & plates warm while dinner is cooking. It can be moved to allow for more or less smoke to escape too.

To make the lid rotate we welded 12″ lengths of threaded rod to the back of the lid (on the angle iron bracing).

This is then fed into vertical hinge brackets on the side of the cinder blocks and secured with bolts, allowing for a fully open BBQ pit when needed.

It probably goes without saying that no one wants to BBQ pit with toxic vapours floating around. For that reason, we had a really good & hot fire in the BBQ pit prior to using it for any kind of cooking. It burned off all the various finishes, though surprisingly, the exterior drum paint was hardly affected.

To protect the steel from rust I’ve been told to use “High-Heat” flat-black paint on the exterior surfaces. Other internal parts can be protected with repeated applications of Canola oil which has a higher smoke point than most other oils.

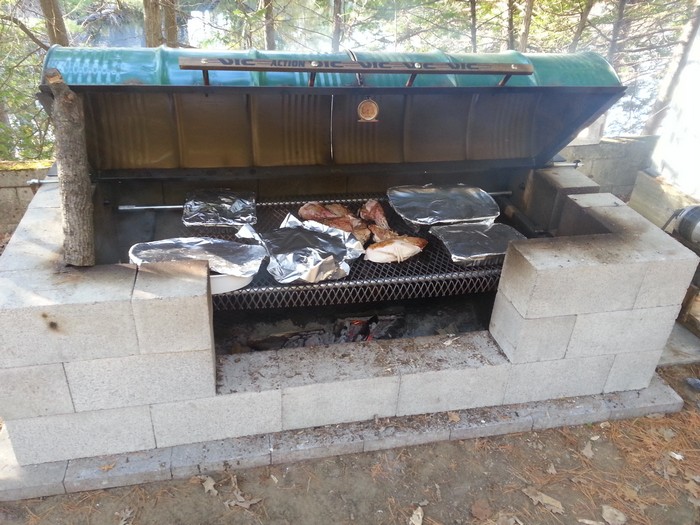
And here’s the finished product in use. We spear the turkeys length-wise and then use large steel ‘nails’ through holes in the spit to keep the meat from spinning freely. Wrap it all securely with stainless wire and foil, and even more, wire, to keep it a tight-knit bundle of goodness.

Our 20 lbs birds took about 6 hours of cooking, removing the foil near the end for an hour of browning. Note that we sometimes supplement the fire with charcoal briquettes for a quick and long-lasting heat source.

After the turkeys and rotisserie are removed two more pipes can be laid down on the support arms and a grill placed on top to keep food warm.
That’s how we did it… Now go try it yourself… Good luck!
Thanks to
Safety Considerations for Your Rotisserie BBQ Pit
Creating a rotisserie BBQ pit in your backyard is an exciting project that promises delicious rewards. However, ensuring the safety of everyone involved and nearby is paramount. Whether you’re a seasoned DIY enthusiast or a first-timer, being aware of safety considerations is crucial to enjoying your rotisserie BBQ pit to the fullest.
Below, we delve into key safety tips that align with using and maintaining a rotisserie BBQ pit, ensuring that your culinary adventures remain enjoyable and hazard-free.
Location and Placement
Selecting the right location for your rotisserie BBQ pit is the first step in ensuring safety. It’s essential to place the pit at a safe distance from your home, trees, and any flammable structures to prevent fire hazards.
Ideally, choose an open area where smoke can dissipate easily without causing discomfort or health issues to your family or neighbors. Additionally, consider wind direction and ensure that your pit is positioned so that the smoke does not blow directly into living areas or become a nuisance.
Fire Safety
When operating your rotisserie BBQ pit, always be prepared for any fire-related emergencies. Keeping a fire extinguisher, sand bucket, or water hose nearby is a wise precaution. Never leave the pit unattended while in use, as wind conditions can change and escalate a small fire into a larger, uncontrollable one. Be mindful of local fire regulations and advisories, especially during dry seasons when the risk of wildfires is higher.
Material Handling
The materials used in the construction of your rotisserie BBQ pit, such as cinder blocks and metal pipes, can be heavy and cumbersome. Proper lifting techniques should be employed to avoid injury, and if possible, work with a partner when moving heavy components.
Additionally, when cutting metal or masonry. Always wear protective gear, including safety glasses, gloves, and ear protection to guard against flying debris and loud noise.
Ventilation and Air Supply
Adequate ventilation is crucial for both the efficiency of your rotisserie BBQ pit and the safety of those gathered around it. Ensure that the design includes sufficient air intake and exhaust to maintain a steady, controlled fire. This not only aids in better cooking results but also prevents the buildup of dangerous carbon monoxide.
Regular Maintenance
Routine maintenance of your rotisserie BBQ pit is essential to ensure its longevity and safety. Inspect the structure regularly for any signs of wear, cracks, or instability, especially before large gatherings.
Replace or repair any damaged parts promptly to prevent accidents. Additionally, after each use, thoroughly clean the pit to prevent the buildup of grease and food particles, which can become fire hazards.
Child and Pet Safety
Finally, always be aware of the presence of children and pets around the rotisserie BBQ pit. Establish a safety perimeter and educate them on the dangers of getting too close to the fire or cooking area. Consider implementing barriers or gates for added safety during use to prevent accidental burns or injuries.
By adhering to these safety considerations, you can enjoy the benefits of your rotisserie BBQ pit with peace of mind, knowing that you’ve taken the necessary steps to ensure a safe and pleasant experience for everyone involved. Happy grilling!
Maintenance and Upkeep of Your Rotisserie BBQ Pit
Maintaining and upkeeping your rotisserie BBQ pit is vital to ensuring its longevity and performance. A well-maintained pit not only guarantees safety during use but also enhances the flavor and quality of the food prepared. Regular maintenance tasks can prevent potential hazards and ensure that your rotisserie BBQ pit remains a centerpiece of your outdoor cooking experiences for years to come.
Here, we outline essential maintenance and upkeep tips to help you get the most out of your rotisserie BBQ pit.
Regular Cleaning
One of the most critical aspects of maintaining your rotisserie BBQ pit is keeping it clean. After each use, allow the pit to cool down before removing ash and food residues. Use a wire brush to scrub the grates and interior surfaces, ensuring that all grease and food particles are removed. This not only helps in preventing flare-ups and smoke-tainted flavors but also extends the life of your pit. For thorough cleaning, dismantle the removable parts and soak them in soapy water before scrubbing and rinsing.
Inspect and Tighten Components
Regularly inspect your rotisserie BBQ pit for any loose components, such as screws, nuts, and bolts. The continuous exposure to high temperatures and the elements can cause these parts to loosen over time. Tightening these components ensures the structural integrity of your pit, preventing wobbles and potential collapses during use.
Protect from the Elements
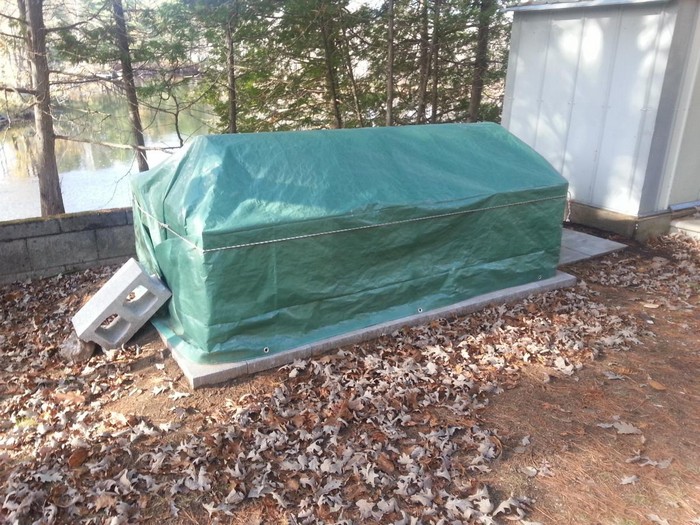
When not in use, protect your rotisserie BBQ pit from the elements to prevent rust and weather damage. If possible, store it in a shed or garage. If outdoor storage is your only option, invest in a high-quality, waterproof cover. This simple step can significantly extend the lifespan of your pit by guarding against moisture, sun damage, and rust.
Season the Grates
Seasoning the grates of your rotisserie BBQ pit is crucial for preventing rust and creating a non-stick cooking surface. After cleaning, coat the grates lightly with cooking oil and heat the pit for about 15-20 minutes. This process helps to create a protective barrier that enhances the durability of the grates and improves the quality of your cooking.
Check for Rust and Corrosion
Periodically inspect your rotisserie BBQ pit for signs of rust and corrosion, particularly in areas that are frequently exposed to heat and moisture. Early detection and treatment can prevent the spread of rust, which can compromise the structural integrity and safety of your pit. Use a wire brush to remove surface rust, and apply a high-temperature resistant paint to protect exposed metal surfaces.
Monitor Airflow and Ventilation
Ensure that the airflow and ventilation systems of your rotisserie BBQ pit are always clear and functioning correctly. Proper airflow is essential for controlling temperature, ensuring efficient fuel use, and preventing dangerous carbon monoxide buildup. Regularly check the vents and air intakes for blockages and clean them as necessary to maintain optimal performance.
Update and Upgrade
Lastly, consider updating and upgrading parts of your rotisserie BBQ pit as needed. Replacing worn-out components or adding new features can enhance your cooking experience and extend the usability of your pit. Upgrades like improved rotisserie motors, more durable grates, or enhanced temperature control systems can make your BBQ pit more efficient and enjoyable to use.
These maintenance and upkeep tips keep your rotisserie BBQ pit in top condition. Regular care not only preserves your investment but also ensures that each BBQ session is safe, efficient, and utterly satisfying.
Conclusion
Constructing a rotisserie BBQ pit offers unparalleled benefits for outdoor cooking enthusiasts, from the joy of building with your own hands to the satisfaction of cooking delicious meals for large gatherings. It becomes a centerpiece of backyard entertainment, combining the pleasures of DIY projects with the tangible rewards of culinary exploration. The process and result underscore the value of craftsmanship and the delight of sharing good food with friends and family.
To further elevate your barbeque game, check out our BBQ smoker project next!