Last Updated on March 8, 2024 by teamobn
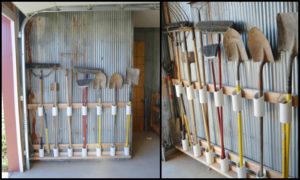
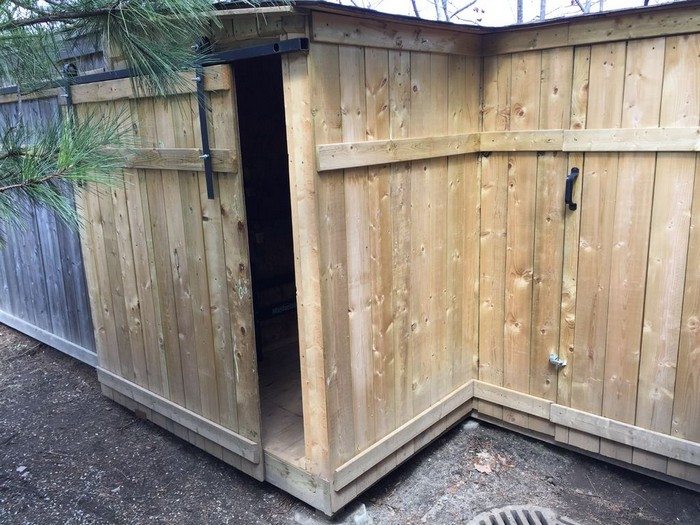
There’s nothing worse than trying to get large, heavy or awkward things through a standard shed door. The very purpose of a shed is to provide a dedicated space for the storage of gardening equipment, power tools, outdoor furniture, and more, but these items aren’t always in neat, compact packages. Instead, they can come in all dimensions, from long-handled rakes to wide lawnmowers, from tall ladders to broad workbenches.
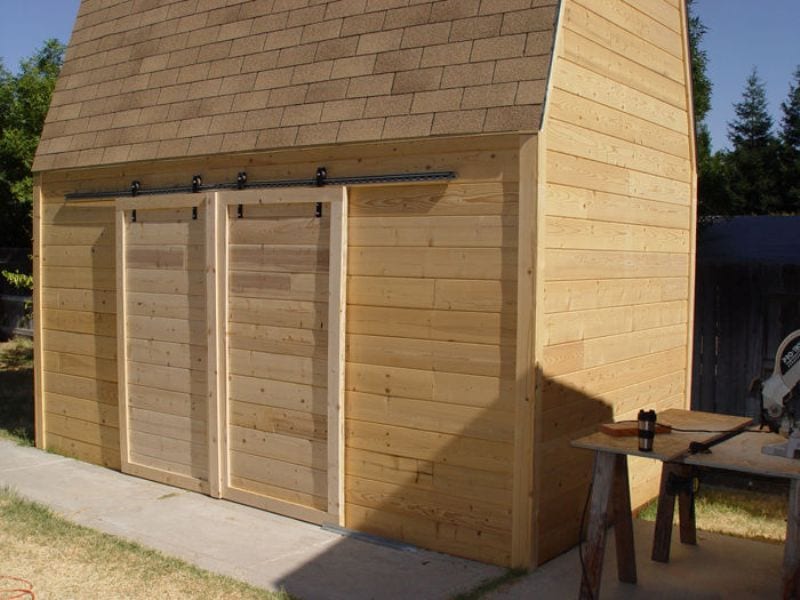
These sliding barn doors will certainly help with access issues.
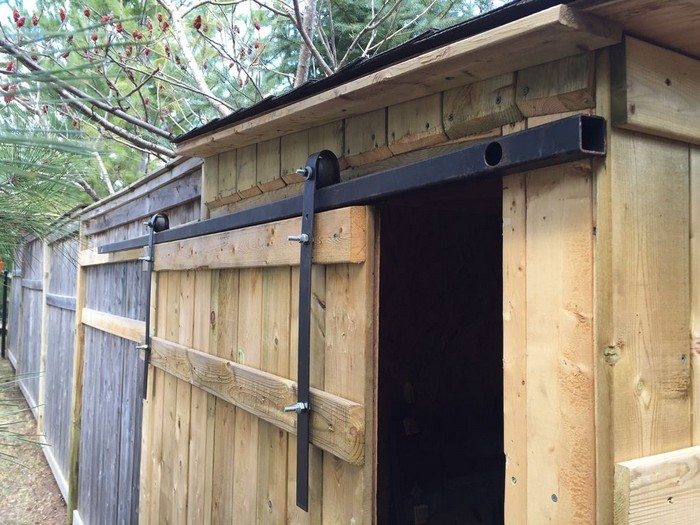
Sliding barn doors are perfect for storage sheds. They can even make your shed look like a purpose-built barn that fits right in your backyard. You can also design your sliding barn door to fit your function and aesthetic needs.
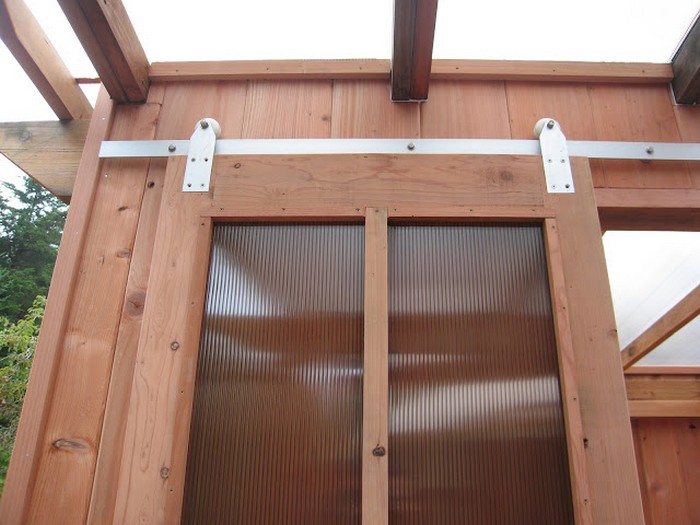
What’s great about this barn door setup is that the hardware is made from skateboard wheels. Yes, ordinary, off-the-shelf, skateboard wheels are way cheaper than store-bought sliding barn door hardware. This barn door is very easy to build too and only requires basic tools.
Click on any image to start the lightbox display. Use your Esc key to close the lightbox.

Contents
How to Build DIY Sliding Barn Doors From Skateboard Wheels
Picture this: the smooth, effortless glide of a sliding barn door, not on traditional tracks, but instead, propelled by repurposed skateboard wheels. It’s quite impressive, isn’t it?
So, embark on a journey where the world of skateboarding collides with the rustic charm of sliding barn doors. Get ready to roll into an exciting project that promises a blend of functionality, style, and a dash of rebellious spirit.
It’s time to learn how to build your very own DIY sliding barn doors from skateboard wheels – a project that will have your home sliding into a new realm of creativity and uniqueness.
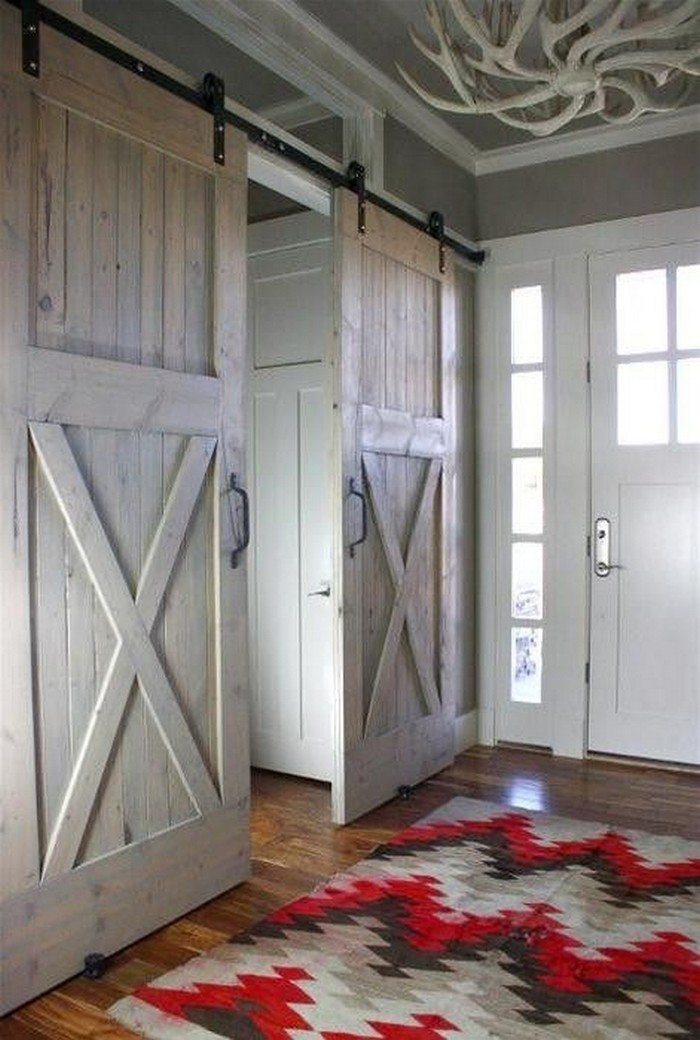
Sliding Barn Doors
Designing sliding barn doors can be an exciting endeavour, blending functionality with aesthetics to create a unique and stylish feature for your home. From choosing the right materials to selecting hardware and finishes, every decision plays a crucial role in shaping the final look and feel of your barn doors.
In this guide, we’ll explore the key elements of designing sliding barn doors and provide tips for creating a stunning and functional addition to your space.
1. Materials Selection: The first step in designing sliding barn doors is selecting the right materials. While traditional barn doors were typically made from wood, modern options offer a variety of materials to choose from, including reclaimed wood, metal, glass, and even composite materials.
Consider the style of your home and the desired aesthetic when selecting materials. Reclaimed wood can add warmth and character, while metal offers a sleek and contemporary look.
2. Hardware and Track Systems: The hardware and track system play a crucial role in the functionality of sliding barn doors. Choose high-quality hardware that can support the weight of the doors and withstand frequent use.
Options include classic barn door hardware with exposed rollers and tracks, as well as modern concealed track systems for a sleeker look. Pay attention to details such as finish and style to ensure they complement the overall design of your doors.
3. Door Configuration and Sizing: Determine the configuration and sizing of your sliding barn doors based on the space available and your specific needs. Single barn doors are ideal for smaller openings or accents in larger spaces, while double barn doors can create a dramatic focal point and offer wider access.
Measure the opening carefully to ensure a proper fit and consider the clearance required for smooth operation.
4. Design Details and Finishes: Once you’ve selected the materials and hardware, it’s time to focus on design details and finishes. Consider adding features such as crossbars, windows, or decorative hardware to enhance the visual appeal of your barn doors. Choose finishes that complement your existing decor, whether it’s a rustic weathered look or a sleek modern finish.
5. Integration with Existing Decor: Sliding barn doors can seamlessly integrate with your existing decor, adding character and charm to any space. Consider how the design of your doors will complement other elements in the room, such as flooring, wall colour, and furniture.
Whether you’re going for a cohesive look or a bold contrast, make sure your barn doors enhance the overall aesthetic of the space.
6. Functionality and Accessibility: While aesthetics are important, don’t overlook the functionality and accessibility of your sliding barn doors. Ensure that they operate smoothly and can be easily opened and closed without obstruction. Consider factors such as door handles and locks to ensure ease of use and security.
7. Professional Installation: Finally, consider hiring a professional installer to ensure that your sliding barn doors are installed correctly and safely. A skilled installer can handle the complexities of mounting hardware, adjusting tracks, and ensuring proper alignment for smooth operation.
Additionally, professional installation can help prevent damage to your doors and surrounding walls.
Designing sliding barn doors requires careful consideration of materials, hardware, sizing, design details, and integration with existing decor. By following these tips and focusing on both aesthetics and functionality, you can create stunning sliding barn doors that enhance the beauty and functionality of your home.
Whether you’re adding a rustic touch to a farmhouse kitchen or a modern accent to a contemporary living space, sliding barn doors offer endless design possibilities.
Materials
- Skateboard Wheels and Bearings
- Galvanized Steel Rails
- Long 1×1 Angle Iron
- 2 pieces 4’ long 1-1/2” x 1/8” Flat Stock Steel
- Nuts, Bolts and Washers
- Extra pieces of Wood
Tools
- Clamps
- Jig Saw
- Drill Press (you can also use a Hand Drill if your hands are strong and steady enough)
- Hammer
- Carpenter’s Level
- Tape Measure
- Carpenter’s Level
Steps

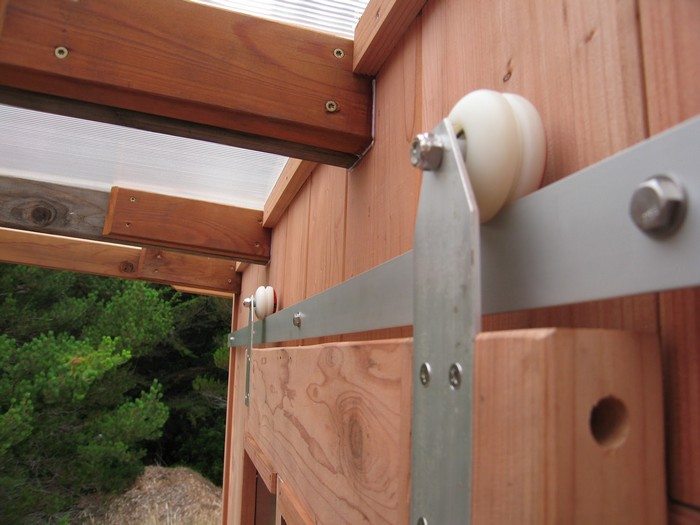
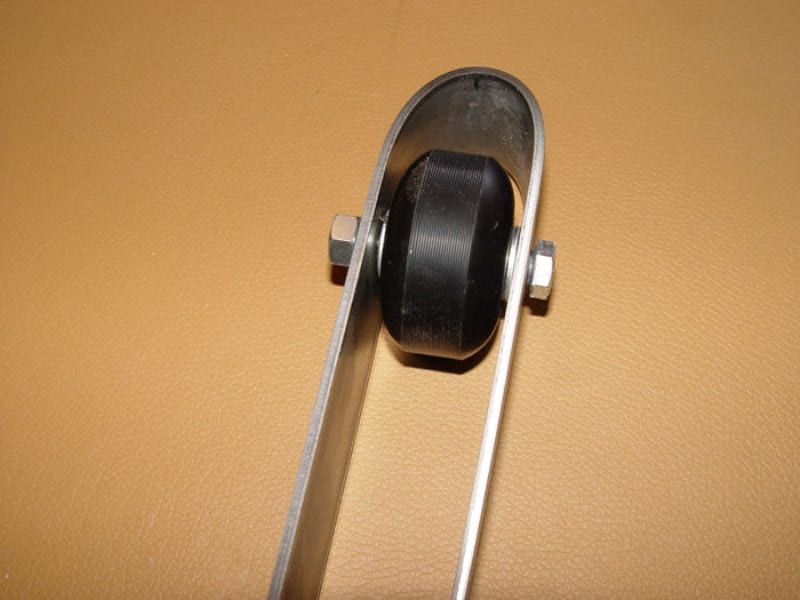
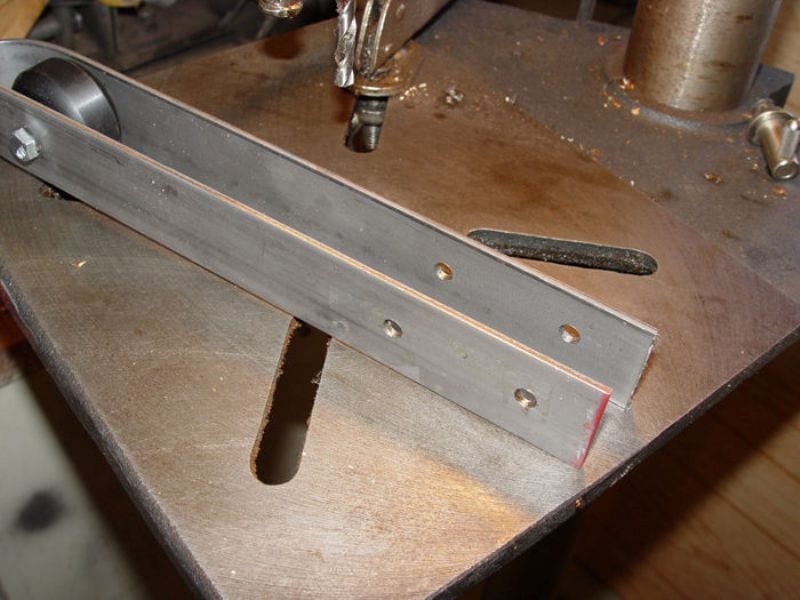
1. Cut the flat stock steel into half to make four 24-inch strips. Then bend them into U shapes using a 1-inch steel rod clamped on the table. See the picture below. Grab both ends of the steel and pull upwards. The flat stock will bend relatively easily.
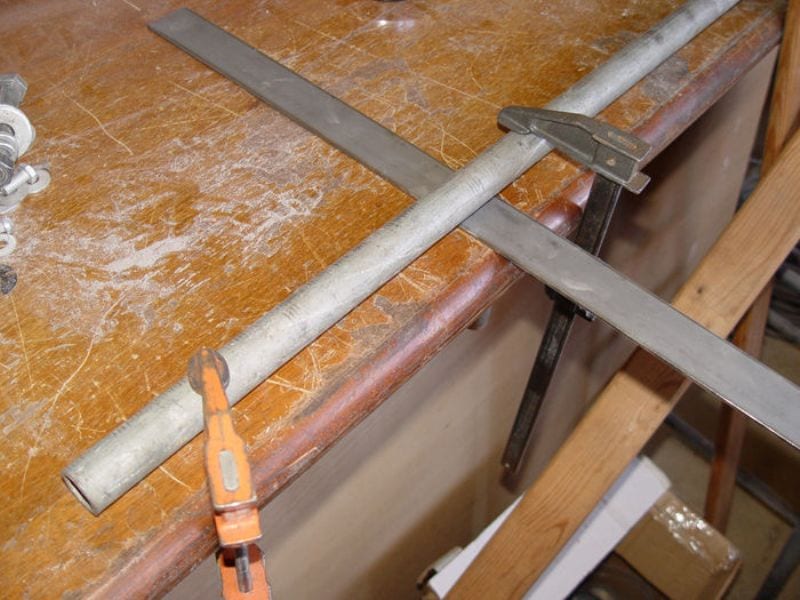
2. Use a hammer to bend the part near the pipe even more since you will need a tight curve creating about only 1-1/4 inches of space between the two sides of the flat steel.
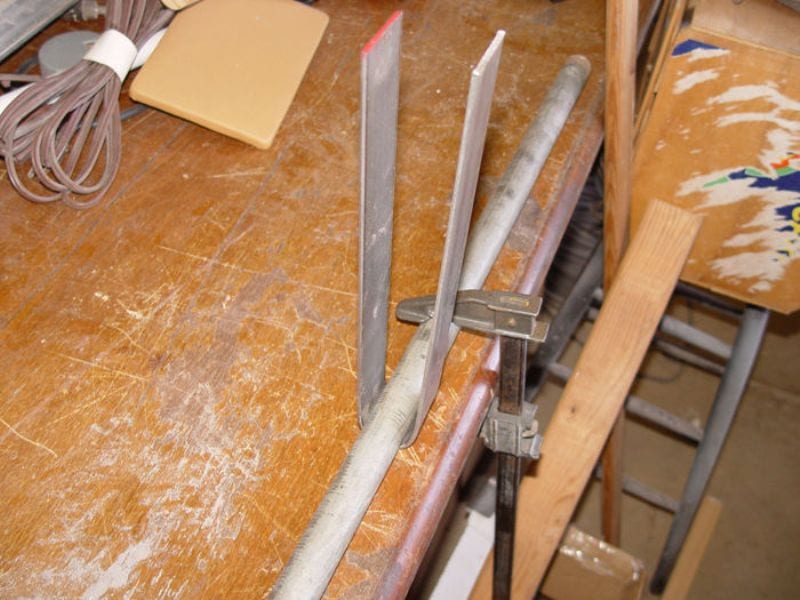
3. Put a skateboard wheel in between to make sure the space provided allows the wheel to move. Also, mark the steel where the axles will be.
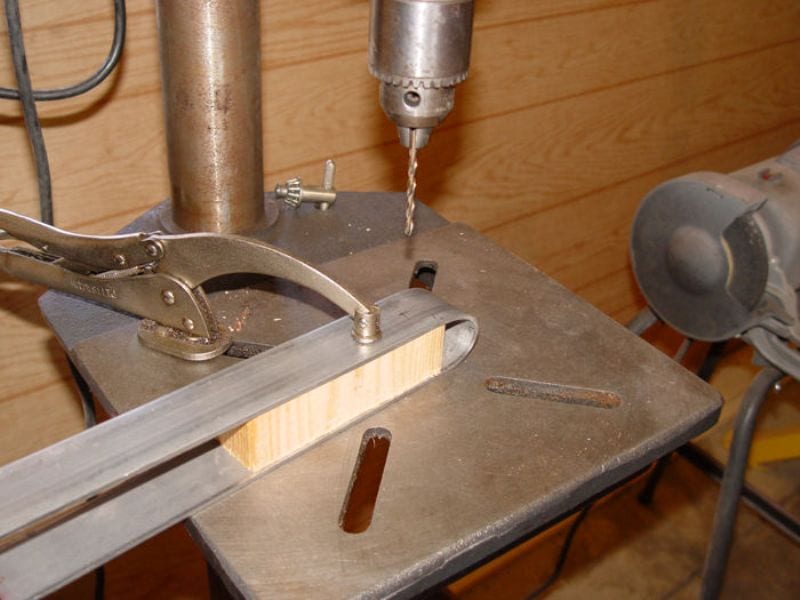
4. Cut a small piece of 1-1/4″ thick wood and place it in between the steel to serve as support while you drill pilot holes on the mark that you made. Then replace your drill bit with a 5/16″ to drill final holes for mounting the axle.
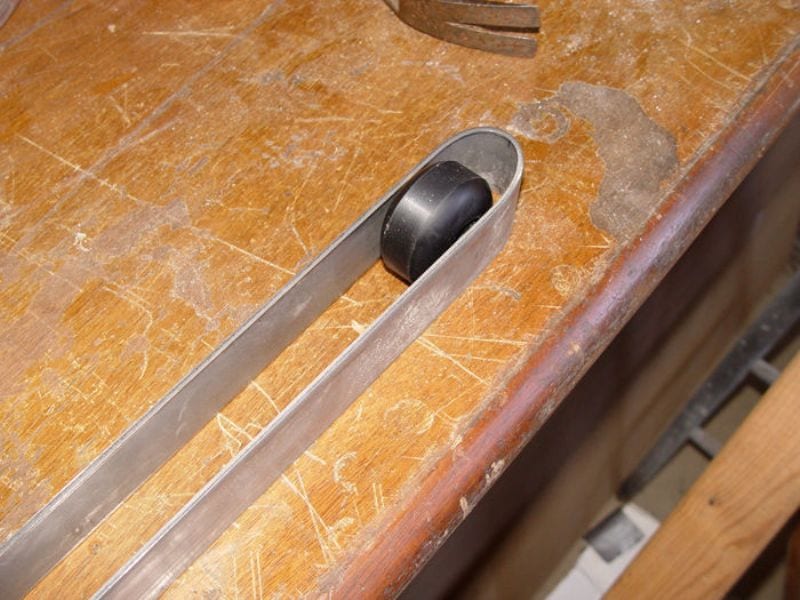
5. There’s no exact measurement for drilling the holes in the steel. As long as the wheel can rotate properly without touching the bent part of the steel, it would be fine. Place washers in between the sides of the steel and the wheel so that the two would not come in contact when you screw down the bolt.
You may have to make some trial and error with different sizes of washers to determine the right one – consider the thickness of your barn door.
6. Bore two openings at either extremity of the flat steel. The precise placement of these openings will be contingent upon the specific door you are working with, but ensure that they are positioned securely within the door’s robust section.
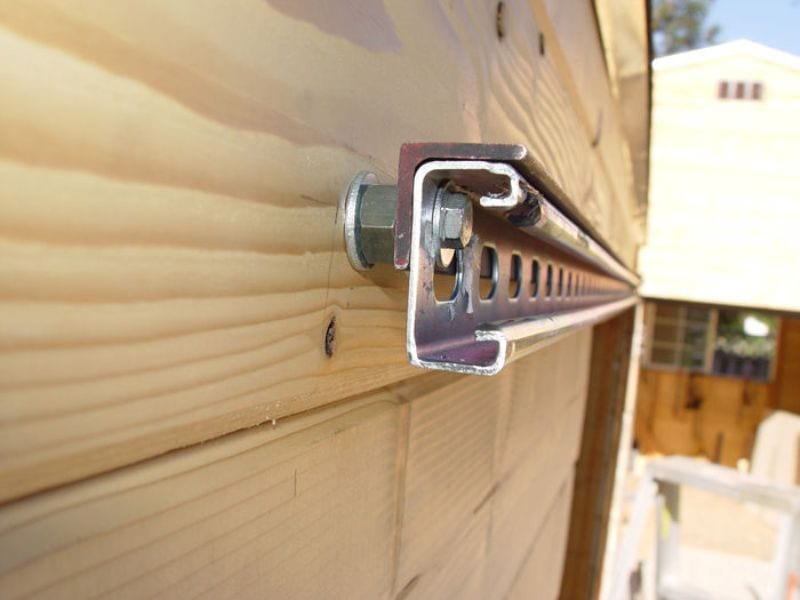
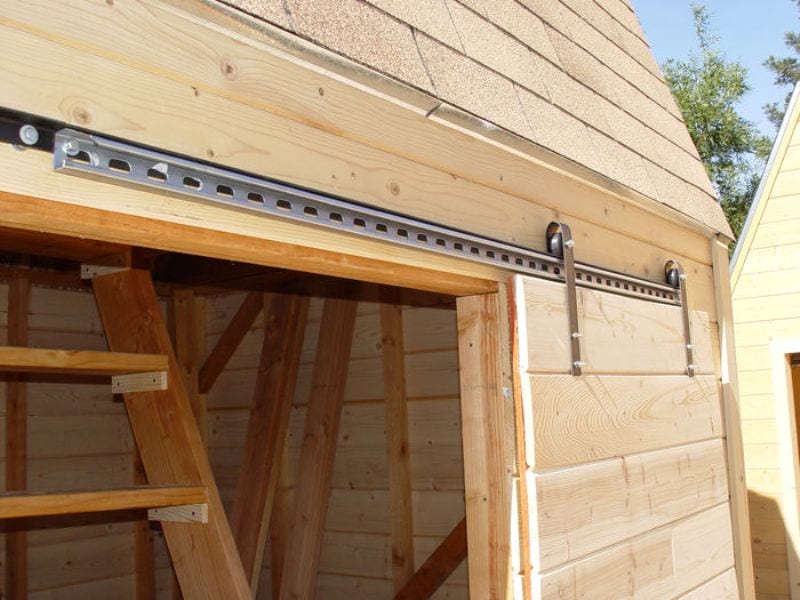
This is what the galvanized steel rail looks like. The length of your railing would depend on the width of your door. If for example, your door has a 6′ width/opening, then you would need 12′ of this – double the size.

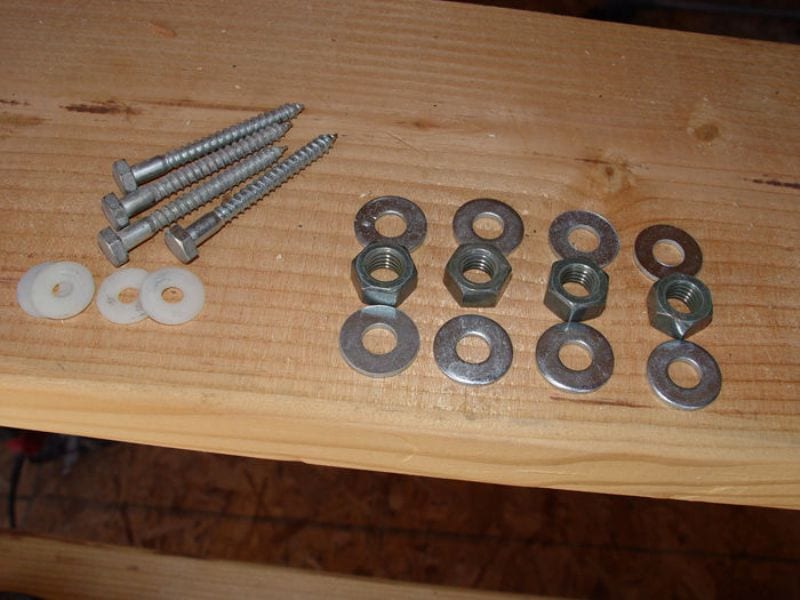
7. Mount the rail on the surface using 3″ lag bolts, steel washers and 11/16th nuts.
In this photo, you’ll see that an angle iron is placed on top of the rail.
8. To properly determine the location of the rail, place any kind of 1/2-inch thick spacer on the floor of your door opening. Set your door on the spacer and mark the top edge of your door on the surface where you will be mounting the rail. Then measure another 1/2″ to mark where the edge of the railing will be. Use a carpenter’s level to draw a straight line along the surface. It should be equal to the length of your railing.
To attach the door, temporarily clamp it at the opening of the door or have someone hold it in place while you slip two hangers/rollers in place. Mark the holes from the end of the flat steel on your door surface.
Drill the holes in the door and then screw them together with the hangers/rollers using nuts and bolts. Slide the door to make sure there aren’t any installation issues. Take note that the end lag bolt that holds the rail serves as your stopper.
9. Lastly, to keep the door vertical and to prevent it from swaying during strong winds, install an angle iron on the floor as shown in the picture.

Thank you dewey302 for sharing insights into this project.
Safety Precautions to Consider
When embarking on a DIY project to install sliding barn doors in your home, safety should be your top priority. From selecting materials to installation and maintenance, it’s essential to take precautions to prevent accidents and ensure a smooth and hazard-free experience. Here’s an in-depth guide to safety precautions for sliding barn doors:
1. Material Selection: Start by choosing high-quality materials that are suitable for your project. Opt for sturdy wooden panels for the door itself, ensuring they are free from defects like warping or splintering.
Additionally, select durable hardware such as robust track systems and reliable door handles. Avoid using materials that are prone to corrosion or damage, as this can compromise the structural integrity of the doors.
2. Tool Safety: Familiarize yourself with the proper use of tools and equipment before starting the installation process. Ensure that all tools are in good working condition and use them according to manufacturer instructions. Keep blades sharp and blades properly adjusted to minimize the risk of accidents.
3. Protective Gear: Always wear appropriate protective gear when working on your sliding barn doors. This includes safety goggles to protect your eyes from dust and debris, work gloves to shield your hands from splinters and sharp edges, and ear protection if using power tools in enclosed spaces.
4. Work Area Preparation: Set up your work area in a well-ventilated space with adequate lighting. Clear the area of clutter and ensure that there are no tripping hazards. If working outdoors, take precautions to protect yourself from the elements, such as wearing sunscreen and staying hydrated.
5. Lifting and Carrying: Sliding barn doors can be heavy, especially when made from solid wood panels. Use proper lifting techniques to avoid strain and injury. Lift with your legs, not your back, and enlist the help of a friend or family member when moving large or heavy components.
6. Electrical Safety: If your project involves the use of power tools or electrical equipment, take precautions to prevent electrical hazards. Ensure that power cords are in good condition and free of damage, and use ground fault circuit interrupters (GFCIs) when working in wet or damp environments.
7. Fire Safety: Be mindful of fire hazards when working with wood and power tools that generate heat. Keep flammable materials away from heat sources and have a fire extinguisher nearby in case of emergencies. If working with stains, paints, or other flammable chemicals, use them in a well-ventilated area and follow manufacturer guidelines for safe use and disposal.
8. Installation Safety: When installing the sliding barn doors, take precautions to prevent accidents and injuries. Ensure that the door tracks are securely mounted to the wall studs or support structure and that the doors slide smoothly along the tracks. Use appropriate hardware and fasteners, and double-check that all components are properly aligned and secured.
9. Regular Maintenance: Once your sliding barn doors are installed, perform regular maintenance to ensure they remain safe and functional. Inspect the tracks, rollers, and hardware periodically for signs of wear or damage, and replace any worn or damaged components promptly. Keep the tracks clean and free from debris to prevent sticking or jamming.
10. Child Safety: If you have children in your home, take extra precautions to ensure their safety around sliding barn doors. Install door stops or bumpers to prevent the doors from swinging too far and causing injury, and educate children about the potential dangers of playing near the doors.
By following these safety precautions throughout the process of selecting, installing, and maintaining sliding barn doors, you can minimize the risk of accidents and injuries. Remember to work carefully and methodically, and don’t hesitate to seek professional assistance if you encounter challenges beyond your expertise.
With proper safety measures in place, you can enjoy the beauty and functionality of sliding barn doors in your home with peace of mind.
Creative DIY Barn Doors
This creative DIY project is all about transforming traditional sliding barn doors into a unique and stylish design using repurposed skateboard wheels. By combining the rustic charm of barn doors with the urban coolness of skateboard wheels, you can create a functional and aesthetically appealing home decor element.
This project promises to infuse your living space with a touch of creativity, rebellious spirit, and a distinctive, eye-catching design that sets your home apart. Also, consider the significant cost savings associated with choosing this DIY venture.
Are you ready to make your own skateboard sliding doors?
Frequently Asked Questions
1. Are skateboard wheels durable enough for sliding barn doors?
Yes, skateboard wheels are often made from high-quality materials like urethane or polyurethane, which are durable and long-lasting. They can withstand the weight of the doors and provide smooth, reliable movement along the tracks.
2. How do you choose the right skateboard wheels for your sliding barn doors?
Look for skateboard wheels that are designed for durability and smooth rolling. Consider factors like wheel diameter, durometer (hardness), and bearing quality. Larger diameter wheels and softer durometer wheels tend to provide smoother movement.
3. Do you need to modify the skateboard wheels for use in sliding barn doors?
Depending on the design of your sliding barn doors and the skateboard wheels you choose, you may need to make modifications. This could involve attaching brackets or mounts to the wheels to secure them to the door panels or tracks.
4. Can you use any type of door panels with skateboard wheels?
Skateboard wheels can typically be used with a variety of door panel materials, including wood, metal, or composite materials. However, heavier door panels may require larger or more durable wheels to support the weight and provide smooth movement.
5. How do you install skateboard wheels on your sliding barn doors?
The installation process may vary depending on the specific design of your sliding barn doors and skateboard wheels. In general, you’ll need to attach brackets or mounts to the door panels and then secure the skateboard wheels to these mounts. Follow the manufacturer’s instructions for proper installation.
6. Are there any safety concerns with using skateboard wheels for sliding barn doors?
When using skateboard wheels for sliding barn doors, ensure that they are securely attached and properly aligned to prevent accidents or injuries. Regularly inspect the wheels and tracks for signs of wear or damage, and replace any worn or damaged components promptly.
7. Can you use skateboard wheels for outdoor sliding barn doors?
While skateboard wheels are designed for outdoor use and can withstand exposure to the elements, they may not be ideal for all outdoor applications. Consider factors like weather resistance, durability, and maintenance requirements when choosing skateboard wheels for outdoor sliding barn doors.