Building an Upcycled Wooden Ice Chest Cooler Plans

Last Updated on April 25, 2025 by teamobn

Rustic Fridge Cooler

Now, this is the best DIY rustic cooler project to do when you need a ‘new’ one already. Why? Because it has a lot more features than all the other outdoor coolers out there!

Wooden Ice Chest Cooler plans make use of an old, non-working fridge and pallets, meaning it can be a very inexpensive project if you have free access to these materials. If not, try Craigslist and ask local pallet suppliers. That will surely still be easy on your pocket. ?

Though it seems like a big upcycling project, anyone can finish the rustic cooler project even in just one weekend. You don’t need to be a professional, and you don’t need very special building tools and equipment for the entire process.

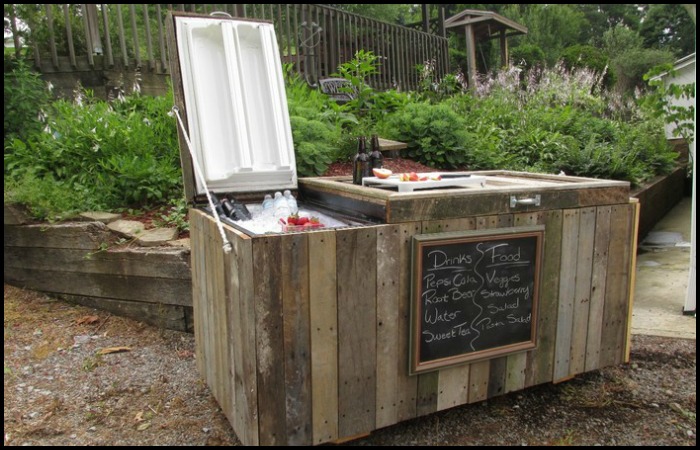
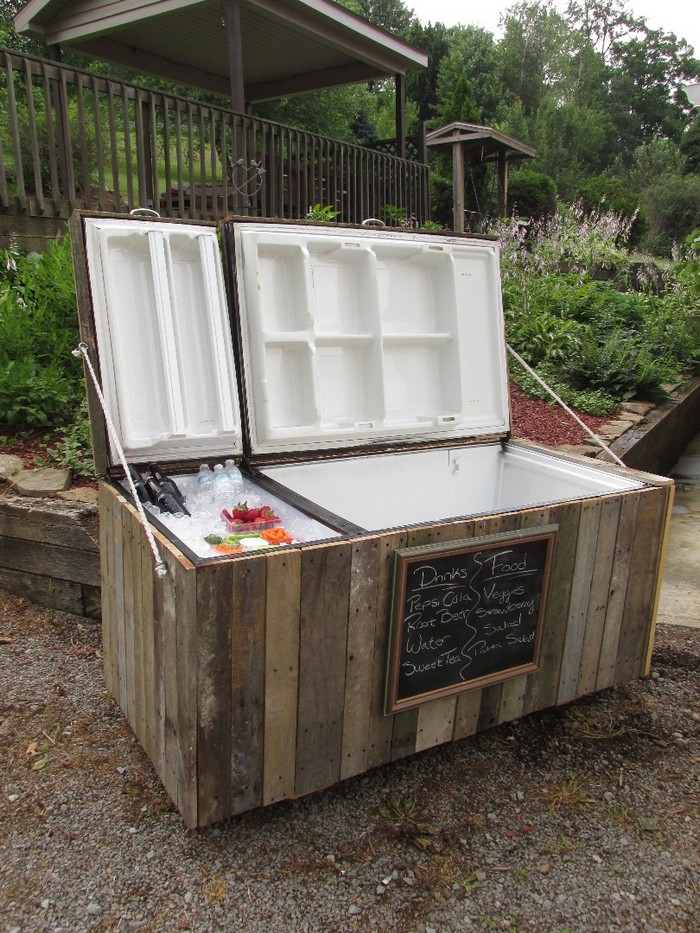
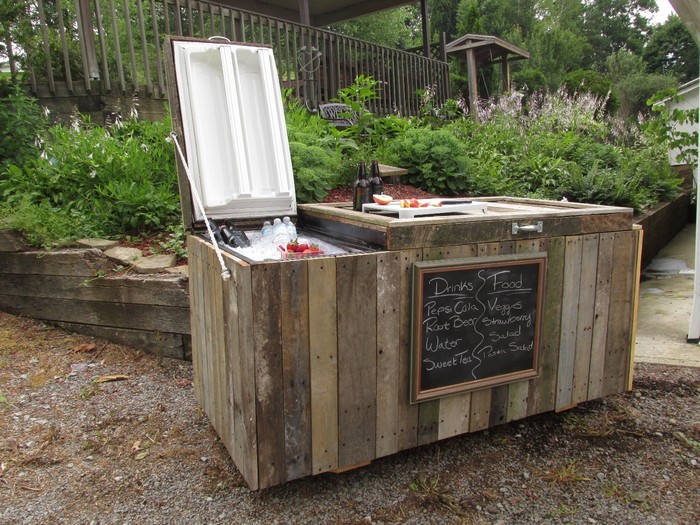
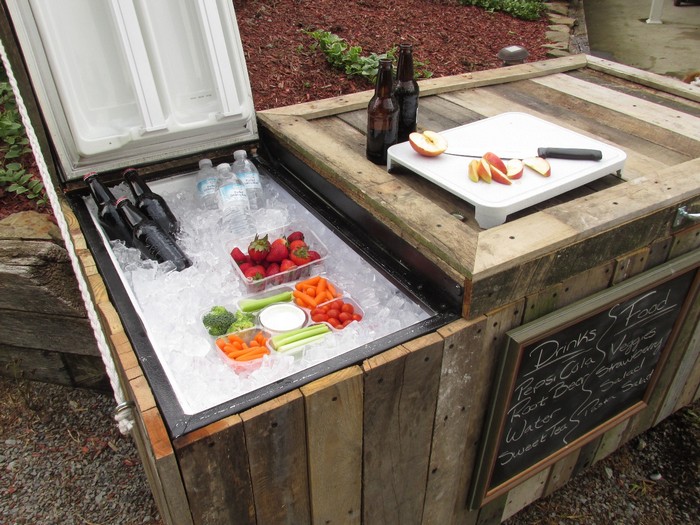
What’s great about this DIY rustic cooler is that you have the option to use the small compartment for little gatherings, or the large one for really big parties. The small rustic cooler also works great for chilling some salad, fruits, and other food, while you use the bigger compartment for all the drinks.

If you’re not using the big compartment, you can use the rustic cooler’s lid as a counter for preparing food or as an extra table!

And you don’t have to worry about cleaning the cooler afterwards. This tutorial also discusses how to provide good drainage for easy cleaning and maintenance.

Old Fridge Rustic Cooler

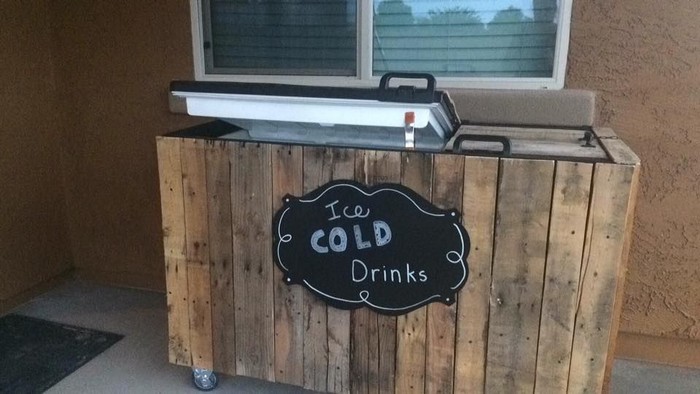
Just add wheel casters on your rustic cooler for easy moving anywhere in your backyard. Then add a blackboard menu so that guests readily know what’s inside. And there you have it, the perfect outdoor rustic cooler that is also a great conversation starter with guests!

Building Wooden Ice Chest Cooler Plans

You’ll need these materials:

  • Old Refrigerator
  • Pallets
  • 2 x 4 Lumber
  • Screws
  • Caulking
  • Liquid Nails
  • Wheel Casters
  • PVC / Brass Fittings
  • Rope
  • Eye Bolts / Hooks
  • Black Spray Paint

And these tools:

  • Cordless Drill
  • Chop Saw
  • Circular Saw
  • Sander
  • Caulking Gun
  • Pry Bars
  • Hammer

[adinserter block=”11″]

Steps:

Rustic Fridge Cooler

Breaking down the pallets can be a bit of a challenge considering how well they’re put together.

Rustic Fridge Cooler

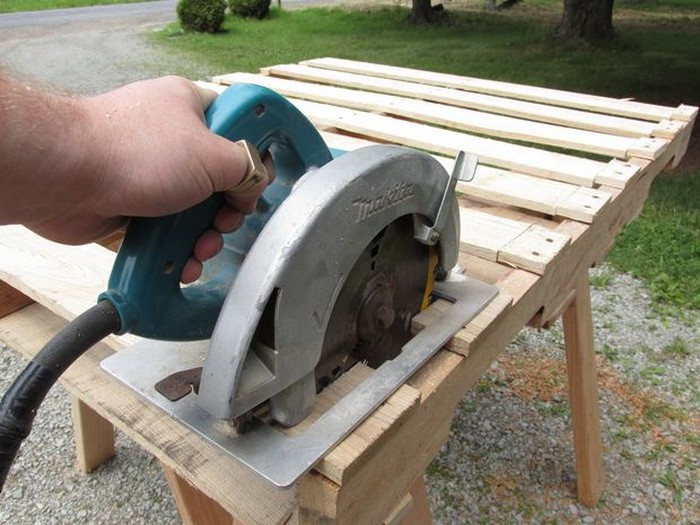
The method that seems to work the best for me is to cut through the deck boards where they attach to the side stringer boards of the pallet.

Rustic Fridge Cooler

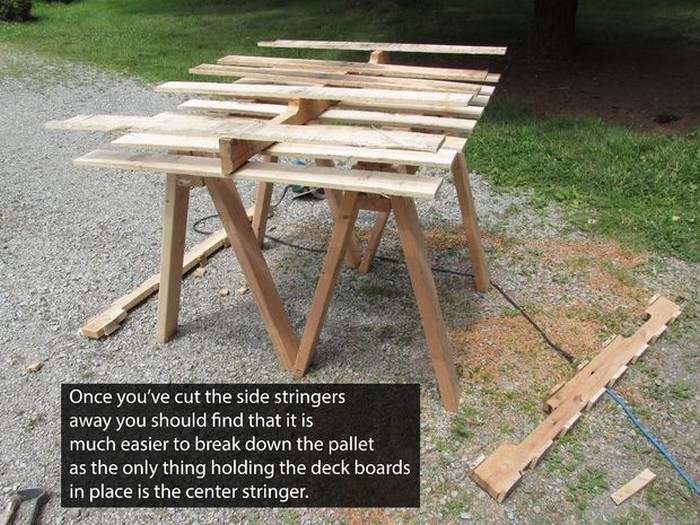
This leaves only the middle stringer and the deck boards attached and with a bit of leverage and some hammering you can easily separate the deck boards for use in your project.

Rustic Fridge Cooler

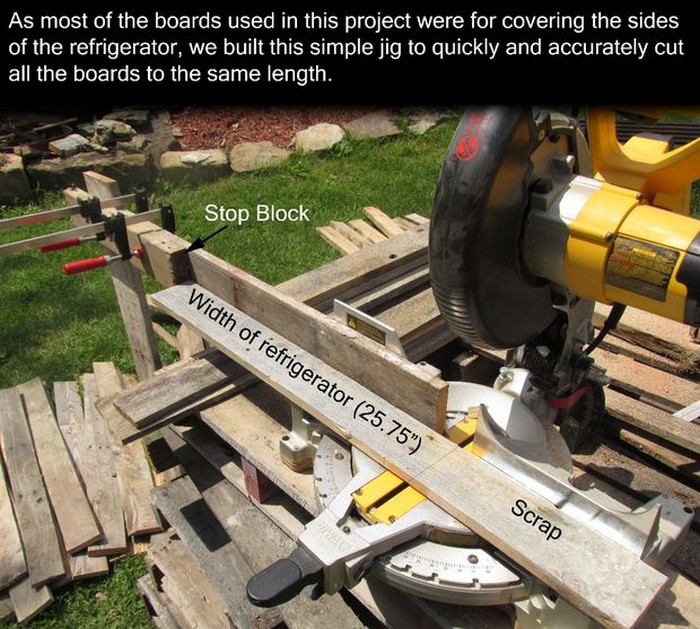
Once the pallets were dismantled, the next step was to process the deck boards so that they were 25.75″ long (the width of the refrigerator. To do this we assembled a quick jig for the cop saw that allowed us to index the boards to the correct length quickly so that all of the wood could be processed as efficiently as possible.

We also left a few deck boards uncut so that they would be long enough to use for trim pieced in a later step.

Rustic Fridge Cooler

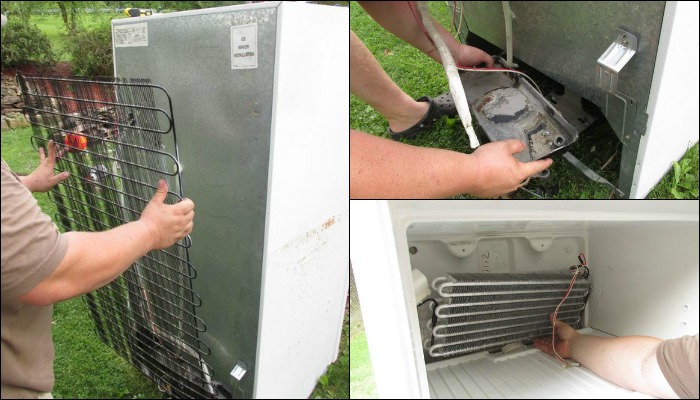
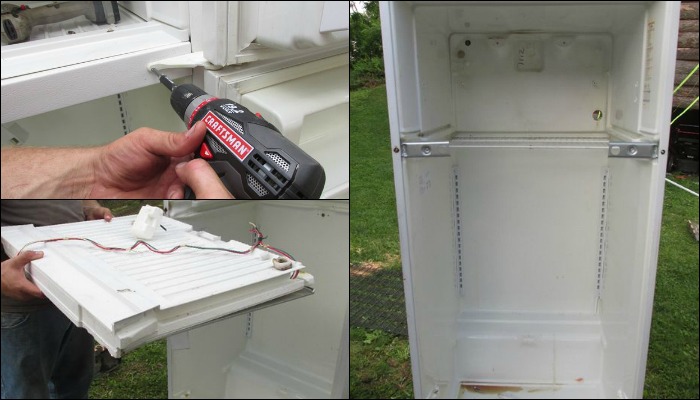
Dismantling the refrigerator is a pretty straightforward process, basically, just take out the screws and most of the electronics and shelving pull right out.

One very important thing to be aware of though is the Freon lines. It is illegal to cut Freon lines and allow the gas to escape into the atmosphere! Getting caught doing so will warrant a hefty fine, and moreover, it’s just a bad idea as you’re polluting the air and the environment.

Rustic Fridge Cooler

In our situation, the refrigerator we used was left in the basement of my sister’s newly purchased house and the previous owners decided for some reason to cut the lines before leaving so we didn’t have to contend with Freon removal.

However if you’re thinking about tackling this rustic cooler project and don’t already have a busted Freon-free refrigerator at your disposal fear not, there are safe ways to deal with the Freon. Check out the links below to learn how to safely remove Freon from your refrigerator. I think these guides were built for the purpose of scraping the refrigerator for metal, but they’ll work just fine for this project too:

Once you have the refrigerator stripped down you’re ready to start the next step: Painting!

Fridge Cooler

Painting the refrigerator isn’t a necessary step, the reason we chose to do it was because the bright white enamel of the refrigerator was very visible where the unfinished edged of the pallet boards came together and the white showing through the boards made the project look very unfinished.

If you’re lucky enough to have a black refrigerator for this project then you can skip this step otherwise, grab a sander to rough up the surface of the refrigerator and about 4 cans of flat black spray paint and get to work.

Fridge Cooler

Note: Try to avoid spraying the gaskets that seal the refrigerator doors. The paint may cause the gaskets to seal less effectively making your refrigerator/cooler less effective.

Fridge Cooler

Note: Don’t worry too much about getting a perfect coat of paint. Most of the refrigerator is going to be covered by wood. The only goal of the paint is to cover up the thin spaces that will be visible where the pallet boards don’t quite meet. The last picture on this step of this rustic cooler project is the finished paint job we moved forward with and as we can see, it isn’t all that pretty.

Fridge Cooler

With the refrigerator painted black, the next step was to start covering the sides, top, and bottom of the refrigerator with reclaimed pallet wood. We started by laying out the cut pallet boards to see how they would fit together on the side of the refrigerator.

Making them fit together, and making everything look good, took a bit of time as some of the pallet boards had to be fit together like puzzle pieces.

Fridge Cooler

Once everything looked good we started attaching the boards using a combination of liquid nails and 1 1/4″ wood screws. The screws were long enough to go through the outer casing of the refrigerator, but not so long that they would puncture the inside rustic cooler compartment, the screws also provided clamping pressure to ensure a good bond between the liquid nails, wood, and refrigerator.

Fridge Cooler

The top and sides of the refrigerator were very easy to cover with wood, (the only small hang-up was accommodating the door hinge on the top of the refrigerator which required a bit of router work to make one of the boards fit properly).

Fridge Cooler

The bottom of the refrigerator proved to be a little more work as we had to frame some parts of it in with 2″X 4″s before we could add the pallet wood siding.

Fridge Cooler
Fridge Cooler

Covering the doors of the rustic cooler with wood is pretty similar to covering the sides with the only real difference being that it takes a bit more craftsmanship to keep everything looking nice.

Rustic Fridge Cooler

We started by covering the edges of the doors, cutting the pieces so that they were 3/4″ wider than they needed to be. This extra width worked to hide the cut edges of the 3/4″ thick pallet boards that were used to cover the front faces of the doors of our rustic cooler project.

Rustic Fridge Cooler

Lastly once the front faces and edges were covered, trim boards were added along the edges of the doors to give everything a finished appearance.

Rustic Fridge Cooler

One of the most important considerations when building this rustic cooler was a way to make it portable so that it could be taken to different parties or events as needed.

Rustic Fridge Cooler

On that end, there is an under-structure made of 2″ X 4″s that supports the weight of the rustic cooler and also provides mounting points for casters.

Rustic Fridge Cooler

One of the bigger challenges of this project ended up being waterproofing. Believe it or not, refrigerators are not built to be waterproof when laid horizontally, there are holes for wiring, holes for attaching ice makers, and apparently, just some holes for no other reason than to make the process of waterproofing a refrigerator just a little bit harder.

Rustic Fridge Cooler

Nevertheless, with a little time and a lot of caulking we were able to seal everything up nice and tight. The smaller holes were easily sealed with a dab or two of caulking, the larger holes required a combination of PVC plugs and caulking, and the largest hole ended up being used to create a really handy drain so that the rustic cooler can be emptied of melted ice and water by the twist of a handle.

Once everything was sealed and the caulking was given sufficient time to cure, the cooler was filled with water to check for leaks, any leaks found were fixed with more caulking and once everything was watertight the cooler was almost ready for use.

Rustic Fridge Cooler

With all the major work done, the last step of the project is to give the cooler a little character and charm. Heavy-duty handles were added to both the cooler bay lids to make them easier to open.

Rustic Fridge Cooler

Rope catches were added to keep the lids from opening too far, and a chalkboard was added to the front to let people know what would be available inside the cooler.

Rustic Fridge Cooler

This was a really fun project to work on. And it has already proven to be a useful addition to our summer evening cookouts and other parties. Not to mention that it is also a great conversation piece, and really catches people off guard when they open the cooler to find what used to be a refrigerator.

Thanks to  for this great project!

Wooden Ice Chest Cooler Plans Gallery

Click on any image to start the lightbox display. Use your Esc key to close the lightbox.8-)

Essential Features to Include in Your Wooden Ice Chest Cooler Plans

When planning your outdoor entertainment area, including a functional and attractive wooden ice chest cooler can enhance both the atmosphere and convenience of your gatherings. Carefully crafted wooden ice chest cooler plans ensure that your DIY project not only looks great but also meets all your practical needs. Incorporating essential features into your design will guarantee your cooler remains a beloved addition to your patio or backyard for many seasons. Here are several features you shouldn’t overlook when creating your wooden ice chest cooler plans.

Integrated Drainage System

One of the most critical elements in any wooden ice chest cooler plans is an efficient drainage system. Installing a built-in drainage spigot or plug at the cooler’s base ensures easy removal of melted ice and accumulated water. This simple addition prevents stagnant water, reduces mess, and significantly simplifies cleaning and maintenance. Consider using brass or stainless-steel fittings, as they provide durability and resist corrosion over time.

Robust Insulation

Effective insulation is crucial in all wooden ice chest cooler plans. Adequate insulation keeps beverages and food chilled longer, allowing you to relax without frequent refills of ice. Utilize materials such as foam insulation boards or spray foam within the walls of your wooden cooler. Quality insulation significantly boosts the cooler’s thermal efficiency, making your project practical and energy-saving, especially during hot summer months.

Mobility and Convenience

Mobility can greatly enhance the usability of your wooden ice chest cooler. Including heavy-duty casters or wheels in your wooden ice chest cooler plans allows for easy relocation within your outdoor space or even transportation to parties elsewhere. 

Opt for locking wheels to ensure stability once you’ve positioned the cooler. Adding durable handles or rope grips further increases ease of movement, making your cooler both portable and practical.

Functional Accessories

Personalizing your cooler with functional accessories not only adds character but also increases practicality. Your wooden ice chest cooler plans should include handy additions such as built-in bottle openers, storage compartments for utensils or condiments, and even side shelves for serving space.

Consider attaching a small chalkboard or dry-erase menu board to inform guests of available refreshments or snacks. Thoughtful additions like these transform your cooler from merely functional to delightfully versatile.

By thoughtfully integrating these essential features into your wooden ice chest cooler plans, you’ll create a stylish, efficient, and user-friendly centerpiece for your outdoor entertainment. The careful design ensures your cooler not only meets practical requirements but also becomes a memorable focal point at every gathering.

Conclusion

Turning an old fridge into a wooden ice chest cooler is a creative and environmentally friendly method to improve your outdoor parties. Careful design and the appropriate elements will help you to quickly build a fashionable, useful cooler that dominates your patio or garden. These wooden ice chest cooler plans will help you to transform a basic upcycling project into an extraordinary discussion starter.

YOU MIGHT ALSO LIKE

|

Search All Projects:

Your details will never be shared with any third party. Unsubscribe at any time with a single click.

The posts on this site sometimes contain an affiliate link or links to Amazon or other marketplaces. An affiliate link means that this business may earn advertising or referral fees if you make a purchase through those links.