Last Updated on March 4, 2024 by teamobn
A music wall is a wall that is specifically designed to display musical instruments. Music walls can be found in both homes and businesses, and they are a great way to show off your musical instrument collection. If you are a musician, a music wall can be a great way to show off your instruments and your skills. If you are a music lover, a music wall can be a great way to display your collection and show your support for your favourite musicians.
Looking for a fun and creative way to display your kids’ love of music? Why not try making a DIY music wall? Little kids love to explore and be more active outdoors. You’ve got to give them something really fun and entertaining, like this DIY outdoor music wall!
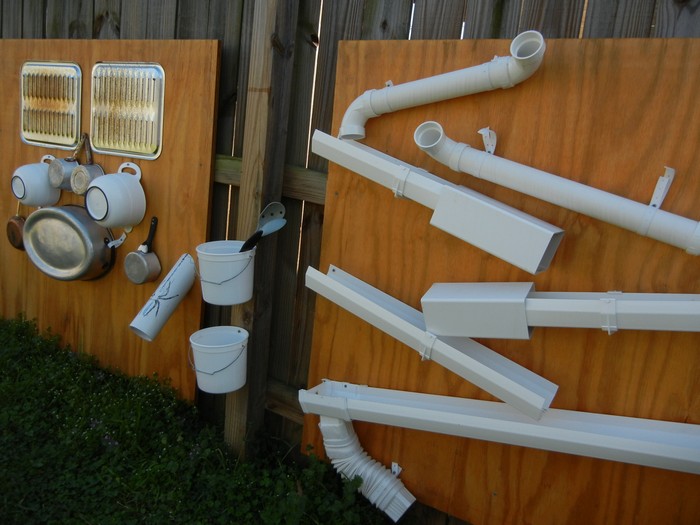
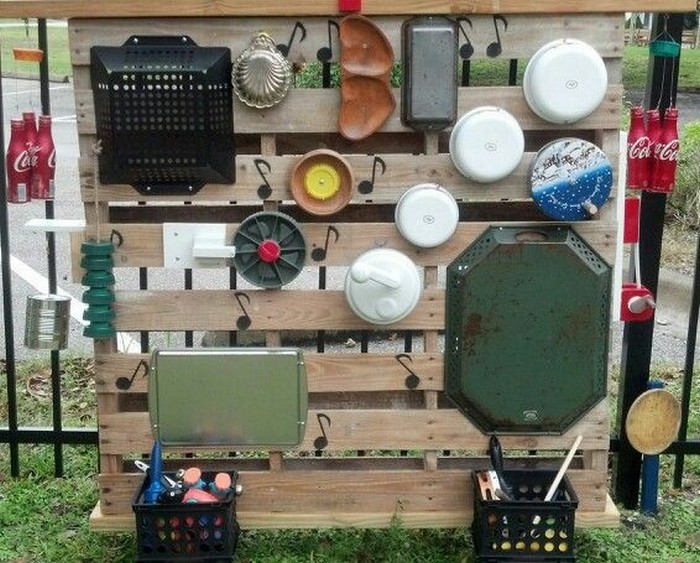
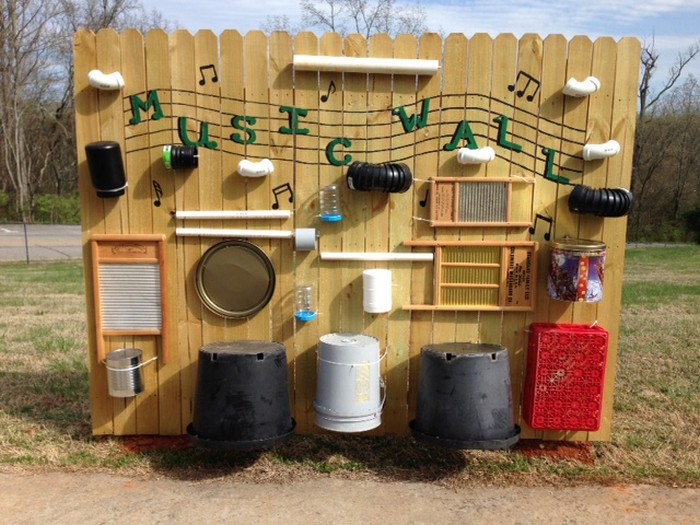
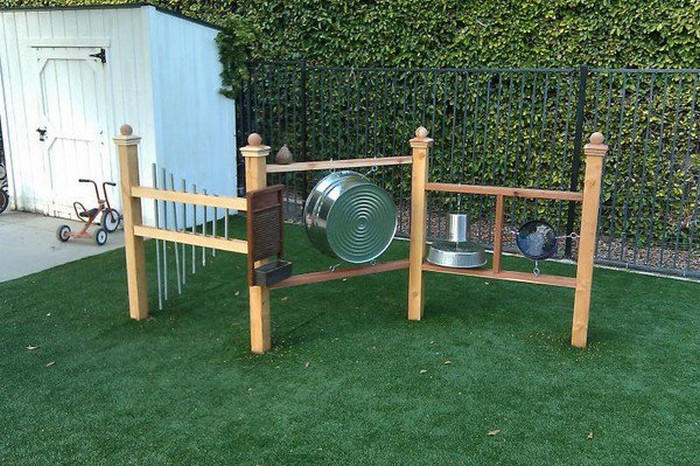
When it comes to creating an outdoor music wall or sound wall, there are a few different options to consider. One is to simply use your existing fence. Another option is to build something to mount the musical instruments on, such as a 2×12 timber. You can also buy pegboards or other items like a pallet.
Whichever route you decide to go, the important thing is to make sure that the wall is sturdy and can support the weight of the instruments. Additionally, you’ll want to make sure that the instruments are properly secured so that they don’t fall and cause damage.
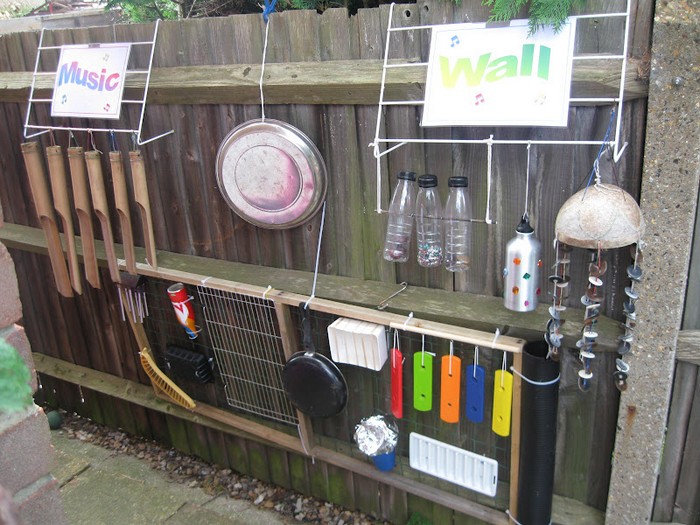
This DIY play equipment is inexpensive and easy to assemble. Anything that makes a good sound when hit by the ‘drum stick’ can be mounted on this wall. This is a great way to entertain children of all ages, and it can be customized to suit any budget.
One easy way to get started with upcycling is to simply search through your old items and recycling bin. You don’t need to go out and buy new materials – you can repurpose what you already have! You can even use scrap PVC pipes from a previous DIY project or parts of a broken musical instrument or toy to create a fun and unique xylophone. By simply attaching the pipes to a board or stand, you can create a beautiful and one-of-a-kind instrument that will be sure to impress your friends and family.
This is a great way to give new life to old items and reduce your impact on the environment. There are endless possibilities when it comes to upcycling. You can get creative and make something completely unique. Upcycling is a great way to get creative, save money, and help the environment all at the same time.
By securing all of the equipment together in your music wall, you’ll create a safe and fun environment for your little ones to explore the world of music. Plus, they’re sure to love playing with all of the different instruments!
Contents
Building a Music Wall
Materials
- 2 x 12 Timber
- 4 x 4 Timber Posts
- Bolts, Screws and Hooks
- Pea Gravel and Soil
- Colander
- Cream (tea) Dispenser
- Gelatin mould
- Broiler Parts
- Drying Rack
- Bell
- Pot lid
- “Drum Sticks” (Whisks, Large Spoons, and Potato Masher)
- Plastic Caddy with Holes (for storing “drum sticks”)
Tools
- Measuring Tape
- Circular Saw
- Spirit Level
- Cordless Drill
Instructions
Step 1: Plan Your Layout
- Decide on the size of your music wall and the arrangement of the musical items.
- Use the measuring tape to mark the length of the 2 x 12 timber, which will serve as the main support for your musical instruments.
Step 2: Prepare the Support Structure
- Cut the 2 x 12 timber to your desired length using the circular saw.
- Cut the 4 x 4 timber posts to the height you want your music wall to be. These will act as the vertical supports.
- Use the cordless drill and bolts to attach the timber posts to each end of the 2 x 12 timber, ensuring they are perpendicular using the spirit level for accuracy.
Step 3: Secure the Music Wall
- Dig holes for the timber posts at your chosen location, deep enough to provide stability.
- Position the structure in the holes and fill around the posts with a mixture of pea gravel and soil to secure it in place.
Step 4: Attach Musical Items
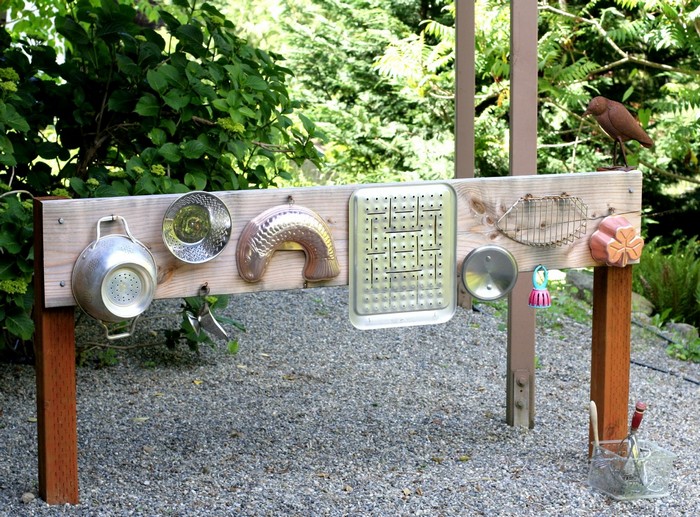
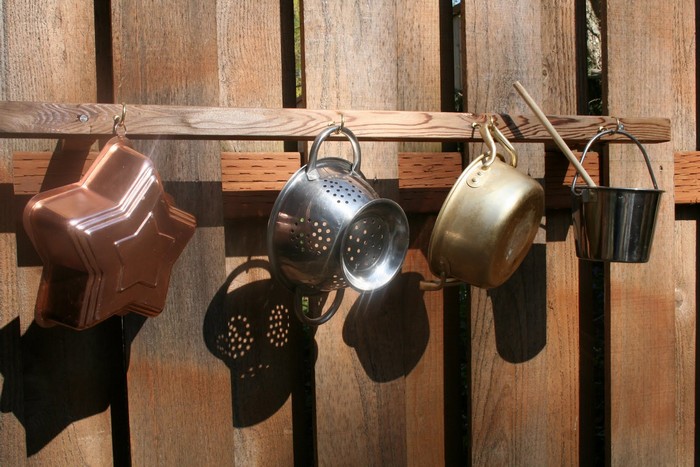
- Arrange your musical items (colander, cream dispenser, gelatin mold, broiler parts, drying rack, bell, pot lid) along the 2 x 12 timber.
- Use the cordless drill to screw in hooks or directly attach items where feasible. Ensure each item is securely fastened and can withstand being hit with the drum sticks.
Step 5: Prepare Drum Sticks Storage
- Attach the plastic caddy with holes to the side of the music wall using screws, providing a place to store the drum sticks when not in use.
Step 6: Test and Adjust
- Test each musical item with the drum sticks to ensure they produce a satisfying sound.
- Adjust the placement or securing method of any items that do not work as expected.
Step 7: Enjoy the Music Wall
- Introduce the music wall to children, showing them how to use each item to make sounds.
- Encourage exploration and creativity as they discover the different sounds they can create.
This music wall not only provides an outlet for musical expression but also recycles materials in a creative way, offering endless entertainment and educational opportunities for children. Enjoy building and playing!
The Educational Benefits of Music Walls for Children
A music wall, often crafted from recycled materials and various musical instruments, is not just a fun outdoor activity but a powerful educational tool. It engages children in a hands-on exploration of sound, fostering a myriad of developmental skills. From enhancing cognitive abilities to improving motor skills and encouraging social interaction, music walls provide a holistic approach to learning through play.
Enhances Cognitive Development
Music walls stimulate children’s cognitive development in several ways. Engaging with different instruments and sounds helps children understand cause and effect, as they see the direct consequences of their actions on the sounds produced. This interaction also boosts problem-solving skills and creativity, as children experiment with producing different sounds and rhythms.
Promotes Physical Development
Playing with a music wall encourages fine and gross motor skill development. Striking, plucking, and banging on various instruments require coordination and control, enhancing hand-eye coordination and dexterity. Furthermore, moving around to reach different parts of the music wall contributes to the development of gross motor skills.
Encourages Emotional and Social Growth
Music walls provide a unique platform for emotional expression. Children can channel their feelings through the sounds they create, learning to communicate emotions in a non-verbal way. Additionally, music walls often become communal spaces where children learn to share, collaborate, and respect others’ turns, promoting social skills and empathy.
Supports Language and Literacy Skills
Interacting with music walls can also support language development. Children learn new vocabulary related to music and instruments, and rhythmic play can enhance phonological awareness, a key component of literacy. Recognizing patterns in music can parallel the recognition of patterns in language and reading.
Cultivates Creativity and Imagination
Music walls offer endless possibilities for creative exploration. Children are not limited by structured play or specific outcomes, allowing them to experiment and use their imagination. This open-ended play encourages innovative thinking and helps children develop a love for music and art.
Fosters a Connection with Nature
By situating music walls outdoors, children naturally connect with their environment. This interaction promotes an appreciation for nature and outdoor play, contributing to a child’s overall well-being and encouraging a healthy lifestyle.
Music walls are much more than just a fun outdoor activity; they are a comprehensive educational tool that supports the holistic development of children. By integrating music walls into play areas, educators and parents can provide children with a stimulating environment that nurtures their growth across multiple domains.
Want to build a music wall for your kids?
Looking for some inspiration for your next outdoor sound or music wall project? Check out our album of some amazing examples! Or, if you’re feeling really motivated, head over to the step-by-step tutorial linked below to learn how to create the featured music wall above. Happy building!
Click on any image to start the lightbox display. Use your Esc key to close the lightbox.![]()


Guide to Selecting Materials for Your Music Wall
Building a music wall involves more than just attaching instruments to a surface. It’s about creating a harmonious and safe environment where children can explore sound and music. The choice of materials plays a significant role in the success of this endeavor. Not only do they need to withstand the elements, but they should also be safe for children to use and interact with.
Durability and Safety
The foundation of creating an engaging and secure musical play space lies in the careful selection of materials, emphasizing durability and safety above all. Materials chosen for this purpose must possess the resilience to endure various weather conditions, be it the scorching sun, heavy rain, or the biting cold, ensuring the structure remains intact and safe for children’s use over time.
This resilience is crucial not only to the longevity of the musical elements but also to the safety and well-being of the young users. Furthermore, the safety of the materials used cannot be overstated. Every item incorporated into the sound garden must be scrutinized for potential hazards.
All materials must be non-toxic, given that children are likely to touch and possibly put them in their mouths. Equally important is the elimination of sharp edges or small, detachable parts that could pose serious injury risks or become choking hazards. The goal is to create an environment where children can freely explore and express themselves through music without the looming worry of injury or harm.
Sustainability
In the pursuit of creating a musical play area, the choice to incorporate recycled or upcycled materials stands as a testament to environmental stewardship and creativity. This approach not only significantly reduces the ecological footprint of the project but also imbues the musical play area with a distinct character and aesthetic appeal.
By repurposing items such as metal pots, plastic containers, and wooden spoons, which might otherwise end up in landfills, the project breathes new life into discarded objects. These materials, often overlooked or deemed as waste, possess untapped potential to produce a wide array of intriguing sounds, adding a rich layer of auditory experience to the music wall.
Moreover, this practice of upcycling serves as an invaluable teaching moment for children, highlighting the principles of sustainability and environmental consciousness. It demonstrates firsthand the possibilities of reimagining and transforming everyday objects into something both fun and educational.
Through this creative endeavor, children learn the importance of resourcefulness and the impact of their actions on the planet. Selecting sustainable materials foster a deeper appreciation for the environment and the concept of sustainability.
Sound Variety
The exploration of sound is a fundamental aspect of creating an engaging music wall. By incorporating a diverse range of materials, you provide children with the opportunity to experience a wide spectrum of sounds, from the deep, resonant tones of large objects to the high, tinkling sounds of smaller, more delicate items.
Metals such as steel and copper are excellent for producing clear, bell-like tones that can captivate and hold the attention of young minds. These materials can be fashioned into chimes, bells, or even makeshift drums that reflect a variety of cultures and musical styles.
Wood, on the other hand, offers a softer, warmer sound that can be soothing and inviting. Wooden planks, logs, or even bamboo can be used to create xylophones or marimbas, each piece producing a different note depending on its size and the type of wood used. The natural variability in wood grain and density contributes to the uniqueness of the sounds produced, making each musical encounter a discovery.
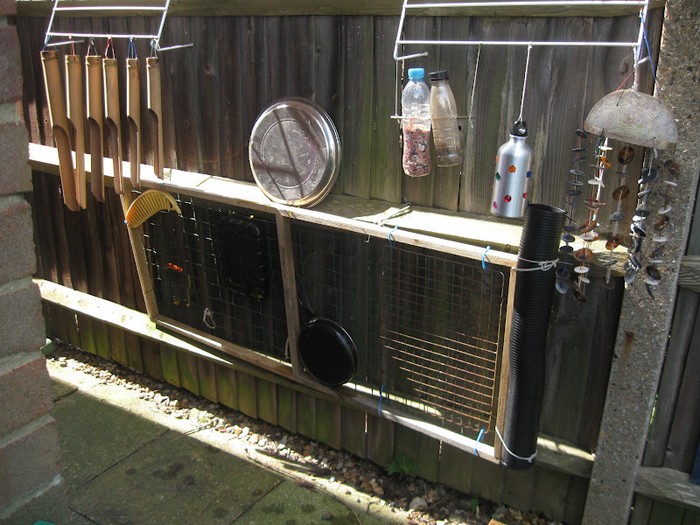
Experimentation is key in achieving a rich tapestry of auditory experiences. By mixing and matching different materials, you can create a playground symphony that encourages children to explore rhythm, melody, and harmony.
The juxtaposition of different sounds – the metallic clang of a repurposed colander next to the hollow thud of a log drum – invites experimentation and creative play, teaching children about the diverse world of music and sound intuitively and enjoyably.
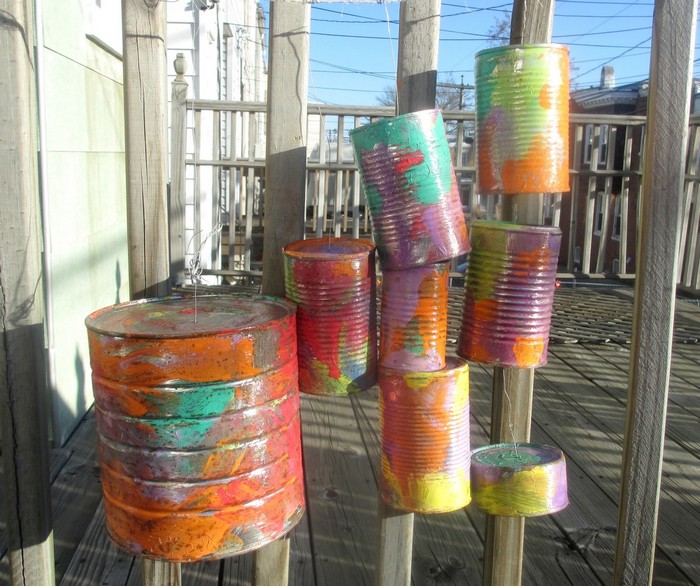
Visual Appeal
The visual design of a music wall plays a crucial role in its appeal and overall success as an interactive learning tool. Children are naturally drawn to vibrant colors and intriguing shapes, which can significantly enhance their engagement and willingness to explore. By incorporating brightly colored materials and items with interesting textures and patterns, you create a piece of art that stimulates the imagination.
Consider painting wooden parts in bold, primary colors or decorating them with patterns and motifs inspired by nature or various cultures. This not only adds visual interest but also introduces children to aesthetic concepts and cultural diversity. Items with natural textures, such as bamboo, can be left unpainted to provide a contrast to the more colorful elements, adding depth and complexity to the visual landscape.
Incorporating objects with unique shapes and functions, such as spiraled metal springs or geometrically shaped metal pieces, can further enhance the visual and tactile experience. These elements invite curiosity and exploration, encouraging children to touch, play, and discover the sounds each item makes.
The visual appeal of the music wall thus becomes an integral part of the learning experience, fostering an environment where sensory exploration and aesthetic appreciation go hand in hand.
Installation Ease
The ease of installation plays a pivotal role in the construction of a music wall, influencing not only the initial setup but also the long-term viability and safety of the project. Selecting materials that can be easily attached to the structure with screws, bolts, or hooks can significantly streamline the assembly process, making it more feasible for educators, parents, and community volunteers to participate.
This approach also allows for flexibility in design. The right items can be rearranged or replaced over time to refresh the musical experience or adapt to the changing needs of users.
To ensure a smooth installation, consider the weight and size of the materials. Heavy or unwieldy items may require additional support structures or mounting hardware, complicating the installation process. Opt for materials that can be securely fastened with simple tools and techniques, minimizing the risk of installation errors or structural failures.
Moreover, the safety of the children who will be using the music wall must be a primary consideration. All materials should be securely attached to prevent them from becoming loose during play. Regular inspections and maintenance are essential to identify and address any potential hazards, ensuring that the music wall remains a safe and enjoyable environment for exploration and learning.
Maintenance
The choice of materials for a music wall also impacts the ease of maintenance, a critical factor in ensuring the longevity and appeal of the installation. Outdoor musical play areas are particularly vulnerable to the elements, including dirt, moisture, and the wear and tear associated with frequent use. Materials that are resistant to weathering and can be easily cleaned will help maintain the aesthetic and functional quality of the music wall over time.
Select materials that can withstand exposure to sun, rain, and temperature fluctuations without deteriorating. Metals that are prone to rust should be treated or painted, while woods may require sealing to prevent rot.
Similarly, non-porous materials like certain plastics can be easily wiped down but should be checked for UV stability to prevent fading and brittleness. The maintenance routine should be straightforward and manageable.
Materials that can be cleaned with simple solutions, such as soapy water, and those that are easily accessible for repair or replacement contribute to the sustainability of the music wall. By choosing durable, low-maintenance materials, you can ensure that the music wall continues to provide a stimulating and safe play environment for children for years to come, with minimal additional investment in time or resources.
Conclusion
Building music walls offers a unique opportunity to blend creativity with learning, providing children with a rich sensory playground that nurtures their developmental needs. Through the thoughtful selection of materials and designs, these structures promote cognitive, physical, and social growth, while also instilling a sense of environmental responsibility and cultural appreciation. Ultimately, music walls stand as a testament to the power of interactive play in fostering exploration, imagination, and a lifelong love for music.
For more creative ways to develop your children’s skills, check out our DIY play spaces next!