Last Updated on January 30, 2024 by teamobn

During winter, heaters are a must to live comfortably in our homes. While there are many different types and models of heaters on the market, it is important to choose one that is right for your home. Some factors to consider when choosing a heater include the size of the room, the type of fuel used, and the level of maintenance required. Fortunately, a DIY solar furnace is a cost-efficient way of heating your home.
The materials for this solar-powered heating system are inexpensive and easy to find. In total, the system costs less than $50 to build. That’s an incredible value for a heating system that can keep your home warm and comfortable all winter long. Plus, the unit runs on solar power, so you’ll save money on your energy bills, too.
This DIY solar water heater is also very simple to build and you can finish the project over the weekend.
Watch the quick tutorial below and see how easy it is to make your own solar furnace.
And while you’re on your quest to keep your home warm and cozy, why not also make these DIY insulated curtains? This will help make your solar furnace even more effective!
Contents
- 1 Benefits of a DIY Solar Furnace
- 2 Safety Precautions for a DIY Solar Furnace
- 3 Maintenance Tips for a DIY Solar Furnace
- 4 FAQ for DIY Solar Furnace
- 4.1 How effective is a DIY solar furnace in heating a home?
- 4.2 What is the cost of building a DIY solar furnace?
- 4.3 Can I install a DIY solar furnace myself?
- 4.4 How long does a DIY solar furnace last?
- 4.5 Do I need a permit to install a DIY solar furnace?
- 4.6 Can a DIY solar furnace work in cold climates?
- 4.7 Is maintenance of a DIY solar furnace difficult?
- 5 Conclusion
Do you think this DIY solar furnace project will work in your area? 🙂
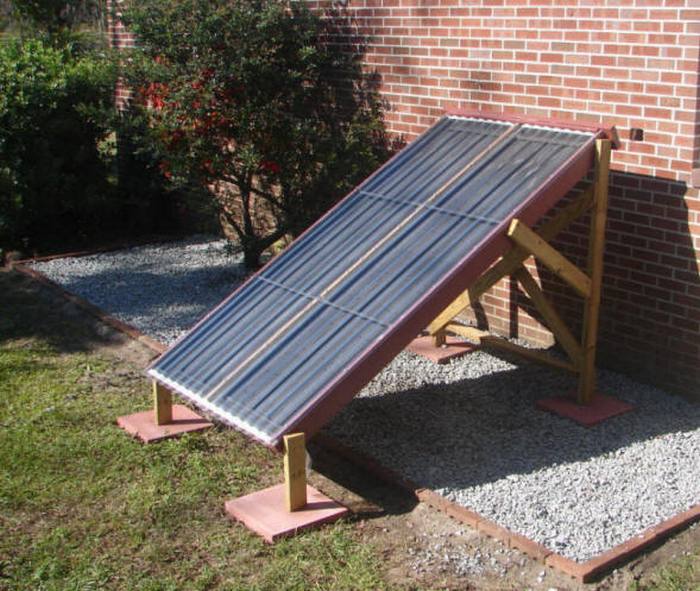
Click on any image to start the lightbox display. Use your Esc key to close the lightbox. ![]()
You’ll need these materials:
- 3′ x 5′ Black Plastic
- 2 Glass Window Panes with Aluminum Frame
- 1/2″ Lag Bolts
- 2″ x 6″ Timber Frame
- ABS Plastic Pipe
- Dryer Vent Hose
- Black Spray Paint
And these tools:
- Measuring Tape
- Drill
- Table Saw
- Staple Gun
Steps:
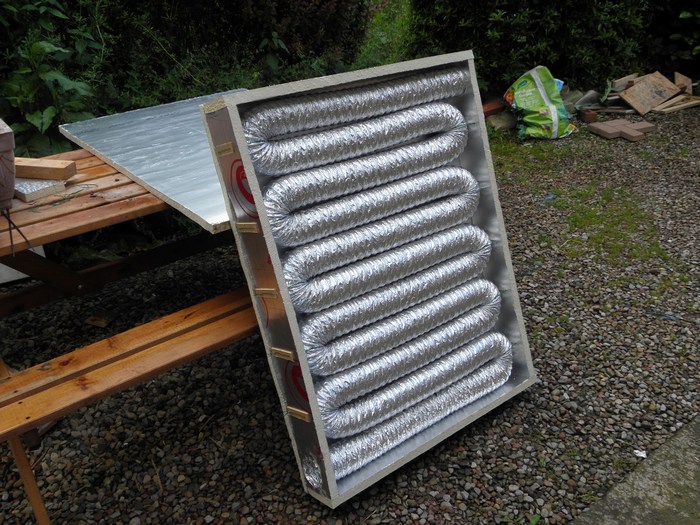
Gather all the materials listed above. Start with your 2×6-inch frame timbers. You can join the timbers together by using the 1/2-inch lag bolts. If you’re using pressure-treated lumber, be sure to use galvanized bolts and washers to avoid staining the lumber.
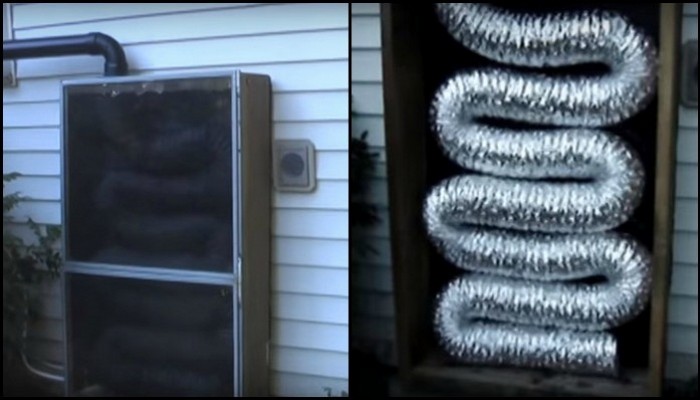
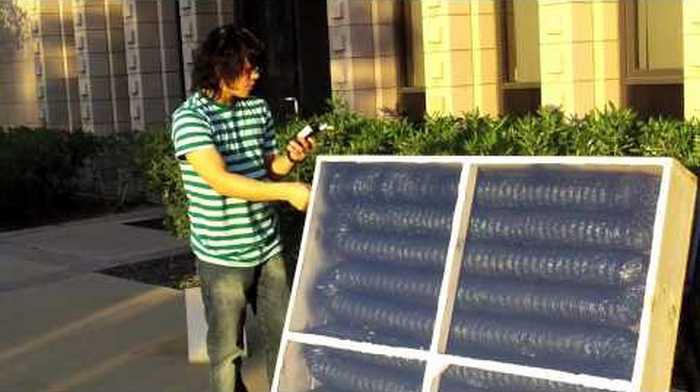
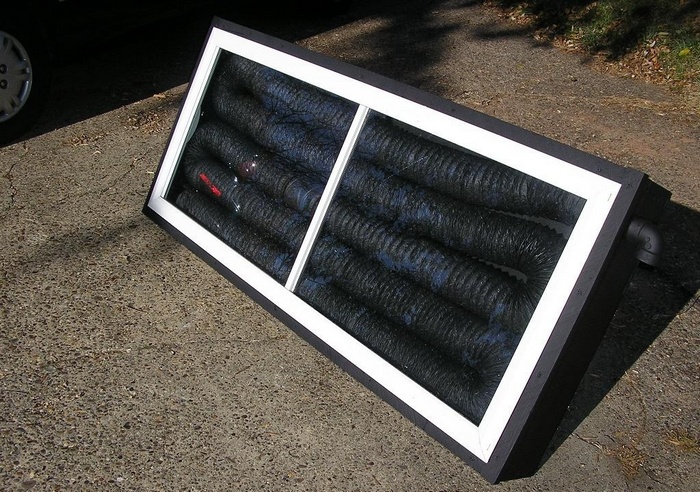
Cover one side with the 3×5-inch black plastic. Then set the glass window panes with an aluminium frame on one side of the frame. Make sure things are lined up well before finalizing and mounting them with lag bolts.
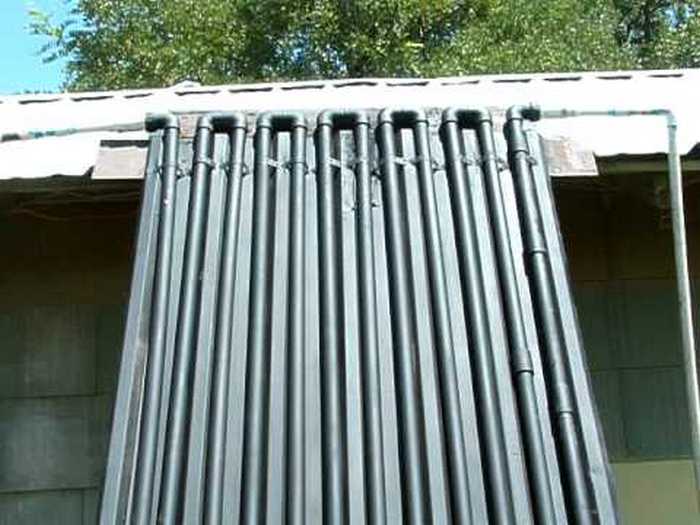
On the top part of the frame, drill a hole that will fit the ABS Plastic. This will serve as the output vent of your solar furnace. Make sure the hole is big enough so that the heat can escape, but not so big that it compromises the structure of the furnace.

The diameter of your plastic ABS should be the same size as your dryer vent hose. These should be angle screws right on top of the unit. Then cut a piece of the pipe through the window.
Next, take your dryer vent hose and insert it into the frame you created earlier. Be careful not to damage the hose as you do this. Secure the hose in place using a fishing line and staples. Make sure the hose is taut and fills the entire space before proceeding. To help absorb the heat from the sun, lightly spray the aluminum frame with black spray paint.
Remember to connect the intake for the solar furnace to the bottom of the house to draw air out. This is an important step in ensuring that the furnace works properly and that your home is heated efficiently.
Benefits of a DIY Solar Furnace
A DIY solar furnace presents a unique opportunity for homeowners to heat their homes effectively while embracing sustainable practices. This innovative heating solution not only offers financial advantages but also aligns with environmental conservation efforts.
Eco-Friendly Heating Solution
A DIY solar furnace is a powerful tool in the fight against climate change. By utilizing renewable solar energy, it significantly cuts down on the carbon footprint of a household.
Traditional heating systems often depend on fossil fuels like natural gas, oil, or coal. These fuels release a substantial amount of greenhouse gases into the atmosphere, contributing to global warming. In contrast, solar energy is clean and abundant.
By harnessing the sun’s power, a DIY solar furnace eliminates the need for fossil fuels, thereby reducing greenhouse gas emissions. This eco-friendly approach to heating not only benefits the environment but also supports the global shift towards renewable energy sources. Adopting such sustainable practices in everyday life plays a crucial role in preserving the planet for future generations.
Cost-Effective Heating
The financial benefits of a DIY solar furnace are substantial, especially in the long term. After the initial investment in materials and setup, the ongoing costs are minimal. The primary resource for a solar furnace, sunlight, is completely free and abundantly available.
This starkly contrasts with conventional heating systems that continually incur costs due to fuel consumption, be it gas, oil, or electricity. With a DIY solar furnace, the reliance on these costly energy sources is greatly reduced, leading to significant savings on energy bills.
Moreover, the maintenance costs for a solar furnace are relatively low. Solar heating systems have fewer moving parts compared to traditional systems, which means less wear and tear and, consequently, fewer repairs. Additionally, the simplicity of the design in many DIY solar furnaces allows for easy repairs and maintenance, often manageable by the homeowners themselves. This further reduces the need for expensive professional services.
Lastly, there are potential financial incentives available for solar energy users, such as tax credits, rebates, and grants. These incentives, offered by various governments and organizations to encourage renewable energy use, can offset the initial setup cost and enhance overall savings.
Enhanced Energy Independence
Achieving energy independence is a significant benefit of installing a DIY solar furnace. This system empowers homeowners by reducing their dependence on external energy sources. Traditional heating solutions often leave households at the mercy of utility companies and the volatile nature of energy markets. Prices for gas, oil, and electricity can fluctuate widely due to various factors, including political climates, global events, and natural resource scarcity.
However, a DIY solar furnace utilizes the sun’s energy, which is both abundant and free. This shift means homeowners are not subject to the unpredictability of energy prices. They can enjoy a constant and reliable source of heat without worrying about the cost implications of increased energy usage, especially during colder months. This level of self-reliance in home heating is not only financially liberating but also provides a sense of security and comfort.
Moreover, the DIY aspect of building a solar furnace further enhances this independence. By taking control of the construction and maintenance of their heating system, homeowners are not reliant on external contractors. This self-sufficiency in managing and understanding their heating system adds an extra layer of independence.
Safety Precautions for a DIY Solar Furnace
When embarking on the project of building a DIY solar furnace, it’s crucial to prioritize safety. Ensuring safe construction and operation of the furnace not only protects you but also ensures the longevity and efficiency of the system.
Handling Materials Safely
When constructing a DIY solar furnace, the proper handling of materials is paramount for safety. Glass panes, aluminum frames, and ABS plastic pipes are common components. These materials can have sharp edges or create hazardous debris during cutting or drilling.
To mitigate these risks, it is essential to wear protective gloves, which will help prevent cuts and scrapes. Additionally, safety goggles are a must to shield your eyes from any particles or fragments that might become airborne during the construction process.
It’s also advisable to work in a well-ventilated area to avoid inhaling any harmful dust. Taking these precautions ensures not only your safety but also the integrity of the materials you are working with.
Safe Installation Procedures
Installing a DIY solar furnace safely is as important as building it. First and foremost, the installation area must be stable and secure. If the installation involves working at heights, such as on rooftops, it’s crucial to use the appropriate safety equipment. This includes harnesses to prevent falls and sturdy ladders to ensure secure access.
Additionally, when mounting the furnace, make sure it’s securely anchored to avoid any potential accidents due to instability. It’s also essential to be aware of and comply with local building codes and regulations. These codes are in place to ensure that all installations are safe and do not pose a risk to the homeowner or the community. Adherence to these regulations not only ensures safety but also helps avoid legal issues that might arise from non-compliance.
Electrical Safety
Dealing with electrical components in a DIY solar furnace requires caution. First and foremost, always disconnect any power sources before beginning work. This prevents the risk of electrical shock or accidents.
It’s important to be familiar with the basic principles of electrical safety. This includes understanding how to safely handle wires, connectors, and any other electrical components involved. If you are not confident in your electrical skills, it’s wise to seek assistance.
Consulting or hiring a professional electrician is recommended. They can ensure that all electrical aspects of the furnace are correctly and safely installed. This not only ensures your safety but also the effective operation of the solar furnace.
Regular Maintenance Checks
Consistent maintenance is crucial for the safe and efficient operation of a DIY solar furnace. Regularly inspect the furnace for any signs of structural damage. This includes checking for cracks, corrosion, or wear and tear. Loose connections can also pose a safety hazard and affect the furnace’s efficiency.
Make sure all connections are tight and secure. Another important aspect is the ventilation system. It should always be clear and functioning properly. Proper ventilation prevents overheating and ensures the furnace operates safely. Periodic checks and maintenance can extend the life of your solar furnace and ensure it continues to operate safely and efficiently.
These safety precautions ensure your DIY solar furnace project is not only successful but also safe for everyone involved. Remember, safety should always be your top priority.
Check on our gallery for more solar furnace ideas you could install in your homes


Maintenance Tips for a DIY Solar Furnace
Maintaining a DIY solar furnace is key to its longevity and efficiency. Regular maintenance ensures the system functions optimally and safely over time.
Regular Cleaning
Maintaining the cleanliness of your DIY solar furnace is vital for its optimal performance. Over time, dust, dirt, and debris can build up on the solar panels and glass panes. This accumulation can significantly hinder the furnace’s efficiency by blocking sunlight. To prevent this, it’s important to regularly clean these surfaces.
Use a soft cloth or sponge to gently wipe down the solar panels and glass panes. A mild detergent mixed with water is usually sufficient for cleaning. It’s important to be gentle and use a non-abrasive cleaning solution to avoid scratching the glass or damaging the solar panels. Scratches can impair the ability of the panels to absorb sunlight efficiently, leading to a decrease in the furnace’s overall performance.
In addition to the panels and glass, pay attention to the frame and other exposed parts of the furnace. Remove any leaves, twigs, or other debris that may have accumulated. Check for any bird nests or insect infestations, especially in less accessible areas.
For optimal results, it’s recommended to clean your solar furnace regularly, depending on your environment. In areas with more dust or pollen, more frequent cleaning may be necessary. By maintaining a clean solar furnace, you ensure maximum absorption of solar energy, thereby enhancing the efficiency and effectiveness of your DIY solar heating system.
Inspecting Components
Regular inspection of all components is critical for the longevity and efficiency of your DIY solar furnace. Over time, different parts of the furnace may experience wear and tear, which can affect its performance.
Start by examining the frame of the furnace. Check for any signs of wear, such as warping or cracking. The frame is crucial for supporting the entire structure, so any weakness can lead to more significant problems. Ensure that all joints and connections are secure and tight.
Next, inspect the insulation. Insulation plays a vital role in maintaining the efficiency of the furnace by keeping the heat in. Look for any areas where the insulation may have degraded or come loose. This can happen due to weather exposure or general aging. Replace or repair any damaged insulation to ensure optimal performance.
The glass panes are another vital component. Carefully inspect them for any cracks or breakage. Even small cracks can significantly impact the efficiency of your solar furnace by allowing heat to escape. Additionally, check the sealant around the panes. Over time, sealant can dry out and crack, which may also lead to heat loss.
Pay attention to the aluminum frame as well. Corrosion can weaken the frame and reduce the structural integrity of your furnace. If you notice any signs of rust or corrosion, take steps to treat and protect the metal. This may involve cleaning the affected area and applying a rust inhibitor or repainting the frame.
Regularly inspecting and promptly repairing or replacing damaged components ensures that your DIY solar furnace continues to operate efficiently and safely. It’s a simple but crucial part of the maintenance routine that can significantly extend the life of your solar furnace.
Checking Ventilation
The ventilation system is a key component in the efficient and safe operation of your DIY solar furnace. Proper ventilation ensures that air circulates effectively, which is essential for the furnace to function correctly.
First, check that all vents are free from obstructions. Leaves, debris, or even bird nests can block vents, hindering airflow. Such blockages can cause the furnace to overheat, reducing its efficiency and potentially causing damage. Regularly clearing these vents is a simple yet crucial task.
Next, assess the airflow within the system. The furnace requires a balance between the intake and exhaust to operate efficiently. Make sure that the intake vents are pulling in enough air and that the exhaust vents are expelling air appropriately. Any imbalance in this system can lead to inefficiencies, such as inadequate heating or excessive strain on the furnace components.
It’s also important to inspect the physical condition of the vents. Look for signs of wear, rust, or damage. Damaged vents can restrict airflow and may need repairing or replacing to ensure optimal functionality.
Lastly, consider the placement of objects around the furnace. Ensure that there’s sufficient clearance around all vents. Furniture, plants, or other objects should not block the vents. Proper clearance ensures unrestricted airflow, which is crucial for the efficient operation of your solar furnace.
Regular checks and maintenance of the ventilation system are essential to prevent overheating and to maintain the overall efficiency of your DIY solar furnace. By ensuring clear and functioning vents, you contribute significantly to the longevity and effectiveness of your heating system.
FAQ for DIY Solar Furnace
How effective is a DIY solar furnace in heating a home?
A DIY solar furnace can be highly effective in heating a home, especially in areas that receive ample sunlight. Its efficiency depends on the design, quality of materials used, and installation. Properly built and installed, it can significantly reduce dependence on traditional heating sources.
What is the cost of building a DIY solar furnace?
The cost of building a DIY solar furnace varies based on the size and materials. Generally, it’s a cost-effective option, often costing less than conventional heating systems. The expense is mainly in the initial setup, with minimal ongoing costs.
Can I install a DIY solar furnace myself?
Yes, with basic DIY skills, you can install a DIY solar furnace. However, it’s important to follow safety guidelines and local building codes. For complex installations or electrical components, consulting a professional is advisable.
How long does a DIY solar furnace last?
The lifespan of a DIY solar furnace depends on the materials used and maintenance. Regular cleaning and component inspections can extend its life. Typically, a well-maintained solar furnace can last many years.
Do I need a permit to install a DIY solar furnace?
Permit requirements for installing a DIY solar furnace vary by location. Check local building codes and regulations. In many cases, a permit may be required, especially for larger installations.
Can a DIY solar furnace work in cold climates?
Yes, a DIY solar furnace can work in cold climates, particularly in sunny conditions. Its effectiveness in extreme cold may vary, so additional insulation or backup heating sources might be necessary.
Is maintenance of a DIY solar furnace difficult?
Maintenance of a DIY solar furnace is generally straightforward. It involves regular cleaning of panels and glass, inspecting components for wear, and ensuring ventilation systems are clear.
Conclusion
A DIY solar furnace offers an innovative, eco-friendly, and cost-effective solution for home heating. Its benefits extend beyond just financial savings to include reduced environmental impact and enhanced energy independence.