Last Updated on March 18, 2024 by teamobn

Do you like the idea of unwinding in your outdoor space after a hard day’s work? Spending outdoor time during the night will be much more enjoyable if a fire pit keeps you warm. This is where a custom cap stone fire pit comes in handy.
Here’s a fire pit project that allows you to personalize the edge. If you haven’t tried making a mosaic before, this could be it.
This weekend’s custom cap stone fire pit project is suitable for those who have smaller outdoor spaces and don’t need to move fire pits from time to time.
Could this be the fire pit for your yard?
Click on any image to start the lightbox display. Use your Esc key to close the lightbox. You can also view the images as a slideshow if you prefer.
Contents
Building a Custom Cap Stone Fire Pit
Materials
- Quikrete ( 2 x 80lb. bags and 2 x 5000 mix)
- Mortar ( 2 bags )
- Bricks ( standard red )
- 2x4s (pallets)
- 55-gallon drum ( cut in half long ways )
- One 4’x8′ sheet of melamine wood (reclaimed scrap from a woodworking shop)
- Large box of 3″ wood screws
- Tube of caulk (silicone)
- Re-mesh and wire
- Broken bottles of your favourite colour (b** light platinum: blue)
- Spent 12 gauge shell casings with plastic cut off
- 67 Camaro emblem
- Gravel for levelling
Tools
- Table saw
- Miter saw
- Trowel
- Wheelbarrow
- Hoe and shovel
- Rubber mallet
- Drill
- Cut off wheel
Instructions
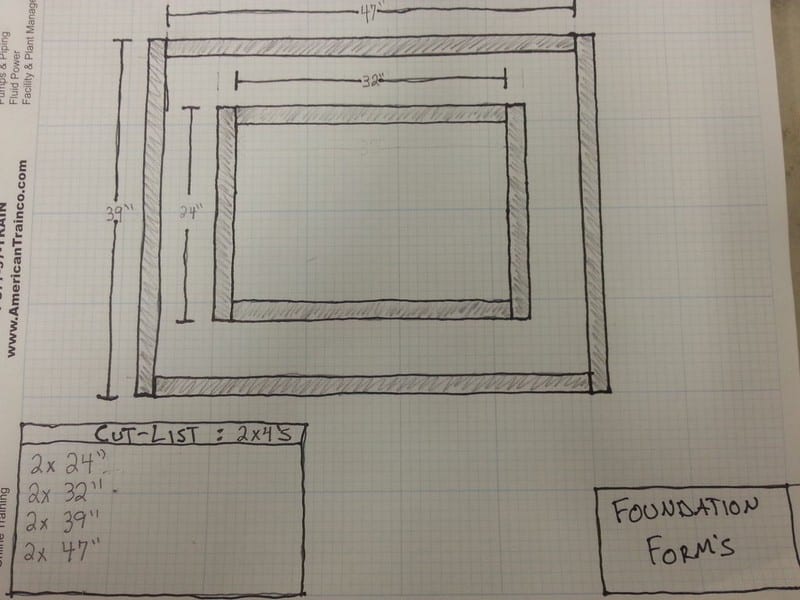
Creating your blueprints. Now that you know what materials you will be using for your custom cap stone fire pit, it’s time to begin putting the design on paper. Since you know the design will be based around a 55-gallon barrel we can begin by drawing the dimensions to scale on graph paper or in a cad program.
The barrel I used for your custom cap stone fire pit has dimensions of 23.5″ x 34.5″, meaning that the foundation’s inside edge needs to be larger than that. Let us start by drawing the 2×4 forms we will be setting in place to pour the foundation.

Foundation blueprints. To create the foundation of your custom cap stone fire pit blueprints, we will start by drawing the actual dimensions of the foundation to scale using graph paper. Next, we will encase the foundation in forms by drawing 2x4s to scale around the inside and outside of the foundation. This way we can double-check our math on what length to cut each 2×4 for your custom cap stone fire pit.
Foundation cut-list:
- 2 x 24″
- 2 x 32″
- 2 x 39″
- 2 x 47″

Capstone blueprints. Creating the custom cap stone fire pit blueprints is almost exactly like the foundation blueprints except that you will cut the inside walls with 45-degree mitres. This is done to keep the water-saturated concrete from swelling the inner layer of wood in the melamine which is basically just compacted sawdust.
Capstone cut-list:
- 2 x 35″ w/45 degree mitre
- 2 x 24″ w/45 degree mitre
- 2 x 37.5″
- 2 x 47″
Now that you have your custom cap stone fire pit blueprints, let us get some real work done. Start by digging out an area about twice the size of your custom cap stone fire pit. Dig down 6 to 8 inches and make sure to inform your neighbors it is not a grave. Try to dig it out somewhat level.
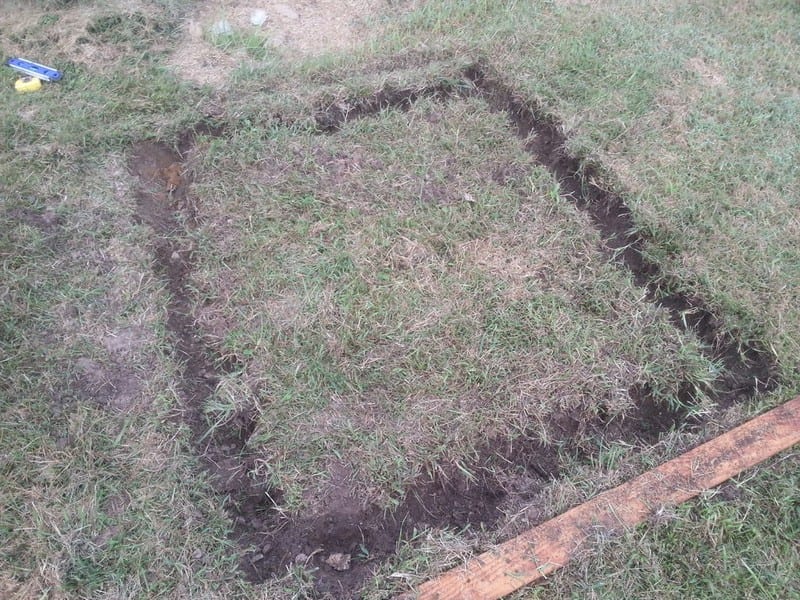
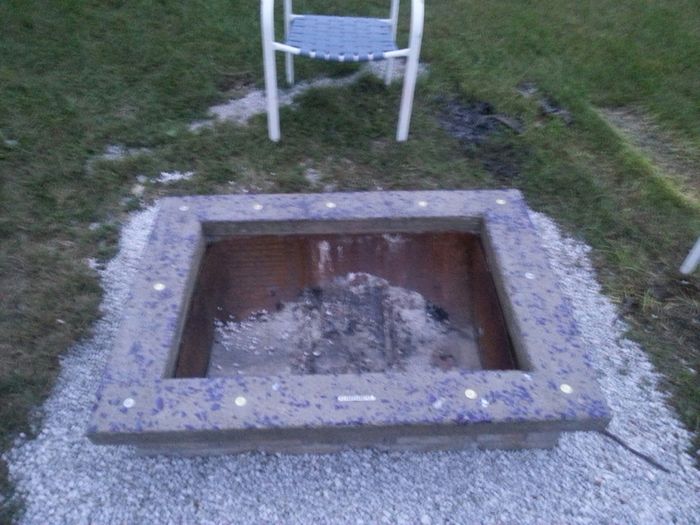
If you purchased gravel now is the time to use it for your custom cap stone fire pit. Pour A 3-ish inch layer of gravel and get it level-ish. Make sure to tamp the gravel down with something I used a hoe. Once you have a level-ish surface it should get you looking somewhat like this:

Now get out your foundation blueprints and cut list and begin cutting your 2x4s to the proper length. Now you can construct two boxes which will create the foundation forms for the concrete. Pay special attention to squareness and levelness while constructing your custom cap stone fire pit forms it will make it easier on you in the long run.
Once the custom cap stone fire pit forms are complete lay them in your dug hole and centre them up. Throw them to each other by measuring the distance between the inside and outside forms in several spots while adjusting them.
Once your custom cap stone fire pit forms are in place level them ( this may be one of the most important steps for your DIY fire pit) make sure that they are not only level but level with one another by placing the level across both forms in several spots. This step may take some time but time well spent here will make it easier for the duration of your DIY custom cap stone fire pit project.

Now it’s time for our first concrete pour for our custom cap stone fire pit. Do a quick search online of what your concrete should look like when it’s ready to pour.
Shovel the concrete into your custom cap stone fire pit form it should take less than two bags. Fill the fire pit forms fully and overflow them, take a scrap piece of 2×4 that’s long enough to span the forms and screed the concrete to the same height as your level forms, creating a level foundation for your project.

Now grab a cold beverage of your choice and kick back in a chair and envision what your man custom cap stone fire pit will look like. Allow a couple of days for dry time.
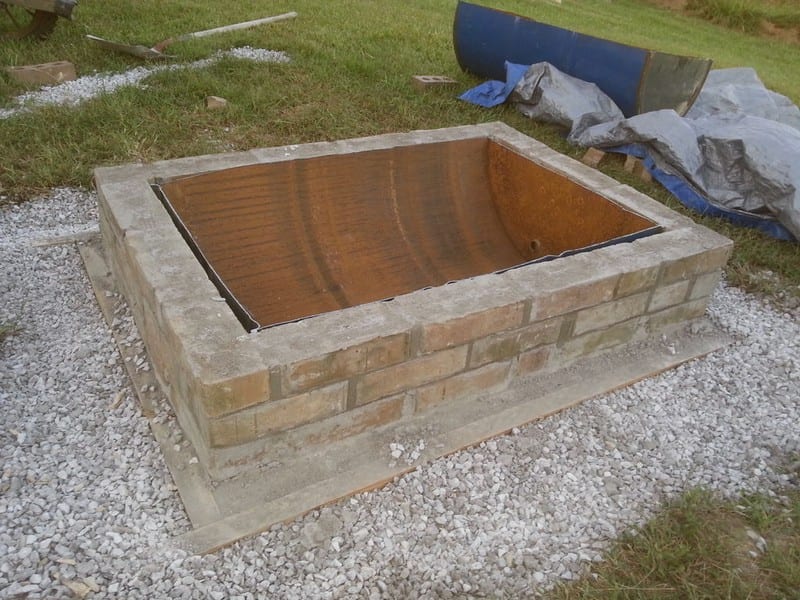
Brick Laying. Laying the bricks for your custom cap stone fire pit doesn’t have to be perfect and mine sure isn’t but make an extra effort on the last layer to make it level so your capstone will seat right and not wobble. Also on the last layer take and fill the holes in the bricks as added level support to your capstone. Let them sit for around 4 hours before continuing.
For mortar joints: Take a wire brush and brush every joint so that they all look consistent. Worked great just make sure you wait 3 or 4 hours before you do this.

While you are waiting it’s a good time to split your barrel in two with a cutoff wheel, or Sawzall (be careful and check what contents were in the barrel previously and watch for flammable liquids, if needed, purge the barrel with argon or other non-flammable gas for added protection).

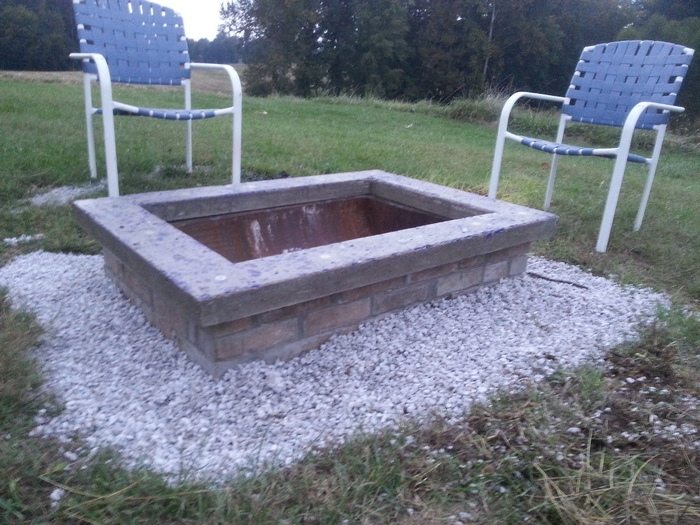
Now take and test fit your barrel half into your custom cap stone fire pit. Test fit both pieces as one will probably fit better since it’s tough to split a barrel in half perfectly. Save the other half as we will use it to make an accessory to the fire pit.
Once again kick back and have a cold beverage and in a couple of days once your mortar has set test out your custom cap stone fire pit before moving on to the most labour-intensive step thus far.

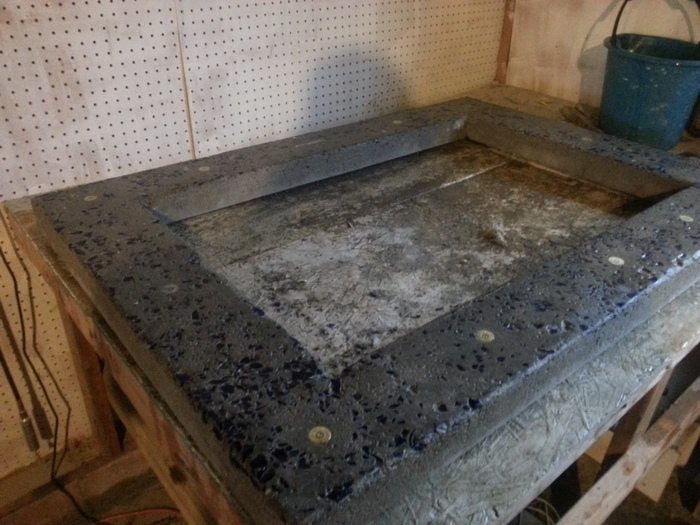
Building a concrete capstone.
Pull out the capstone blueprints, the melamine sheet and your large box of 3″ screws (melamine is used because the water in the concrete will not make the melamine swell as long as it doesn’t come in contact with the inner wood on the sheets).
Grab the cut-list and begin ripping 2.5″ strips of melamine off the 4′ side followed by cutting the strips to the dimensions you determined on the mitre saw. Make sure the inside wall has 45-degree mitres on them, the goal is to make sure as little of the inner wood is exposed as possible, then use caulk to seal those places.
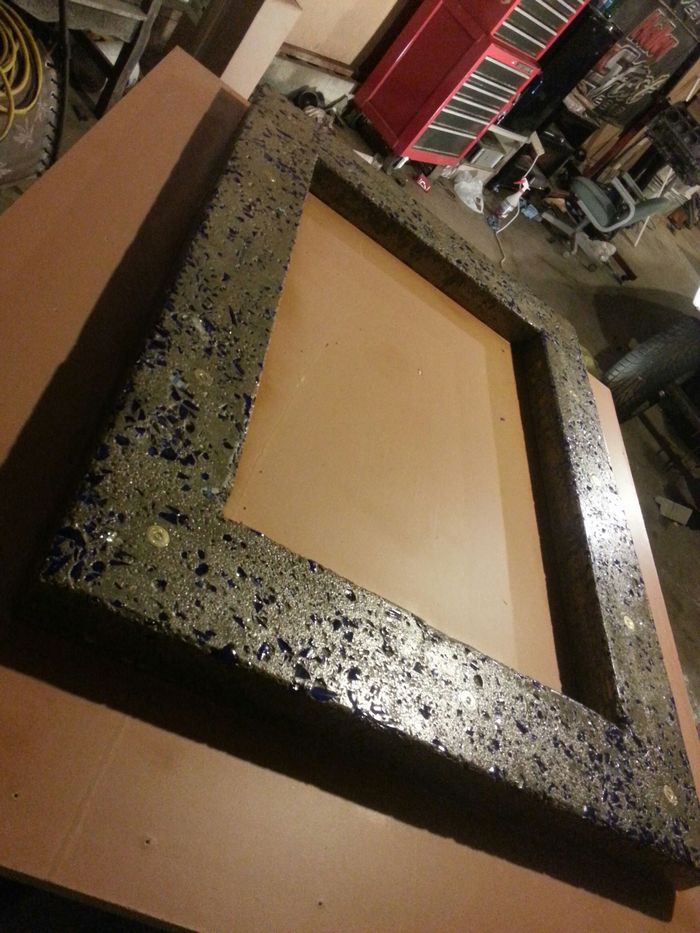
First, take a sharpie and lay out the dimensions of your custom cap stone fire pit capstone, this way you know that the box you build should keep the lines you have drawn inside it. If you look closely in picture 1 you can see the custom cap stone fire pit layout done in sharpie, also you can see the 45-degree mitres on the inside form.
Take the pieces of 2.5″ melamine and dry stack them to ensure it will be correct. Now we’re ready to secure our forms to the base. Take a 3″ drill bit smaller than your wood screws and begin drilling pilot holes through the strips and into the base, I started with one corner than the other corner making sure the inside edges lined up with my sharpie lines, secure the ends with screws.
Then drill every 3″ inches and secure with a screw. Take the extra time to make sure your forms are straight and make good corner joints. Once you have your form made and screwed down, take some silicone caulk and caulk all the joints to keep the water in the concrete from getting into the wood.
This also will create rounded edges which look better and from a parent’s point of view may be the difference between a bruise and stitches from a sharp corner.

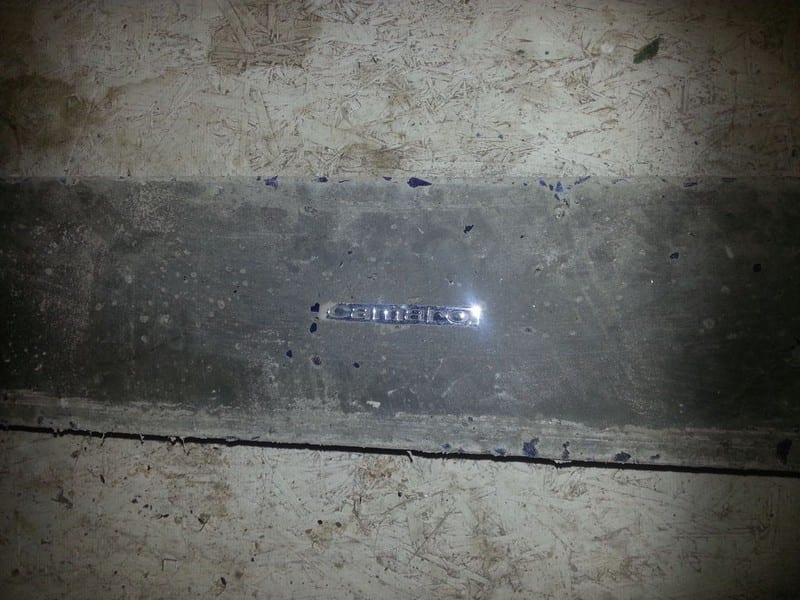
There are endless possibilities for aesthetics for your capstone, I chose broken glass bottles, shotgun shells and a Camaro emblem.
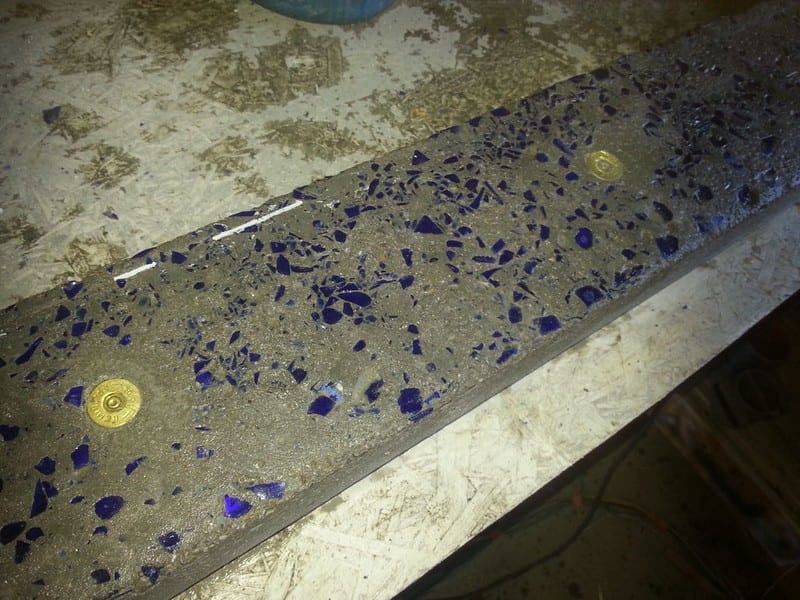
Anything you want to strategically place, use spray glue and glue it to the custom cap stone fire pit form. And don’t forget as I did to glue some glass to the side walls so they don’t look plain.

Now we need to insert mesh for added support and longevity of your custom cap stone fire pit life. Without some kind of reinforcement, it will probably fall apart at some point. Pick up some mesh from your local supplier and cut it to fit inside your form making sure that it will not come within 1″ of any wall.
Then, get some small pieces of 2×4 and make spacers to hold the mesh above the surface of your form while you secure it with wire. I drilled and inserted screws on the outside of the mold every 5 inches inside and out then secured the mesh to them with copper speaker wire. Once the mesh is tied off all the way around then remove your 2×4 blocks. Whalah was ready for some more concrete.

Now it’s time to fill your custom cap stone fire pit form with concrete. Grab a couple of bags of quikrete 5000 and mix to the same consistency as the foundation maybe a hair wetter. Using your hands to start off gently lay concrete into the form all the way around the form until you are about an inch deep so as not to disturb the manly decor underneath.
Once you have it built up all the way around to about 1″ you can get more aggressive with it. Fill it till it’s slightly overflowing. Now grab a rubber mallet and begin wailing on the custom cap stone fire pit form in a downward motion, striking the outside of the form for approx. 10-15 minutes, this is to vibrate out the air bubbles in the concrete, which weakens the concrete and gives it a bad appearance.
Let the mold sit for 20 minutes, and then wail on it some more. After two or three sessions screed off the overflowing form to a nice level surface.

Curing:
Concrete curing happens over a prolonged period of time, up to 30 days. We want to catch it before it has hardened to the point of requiring diamond grinding pads which are costly, instead let us catch it while it’s soft enough to use traditional grinding stones and sandpaper. Around day 2 or 3 is when you want to move on.
De-forming:
Once the concrete is starting to harden to the point that you have trouble scratching it with your fingernails then it’s time to take apart the forms and flip the capstone over so you can grind and sand it. The outside of the form is easy to remove the screws and put them back in their box for another project and remove the outside form walls.
The inside walls may be more difficult. I chiselled a corner of one wall off then removed the rest one at a time. Be careful during this process and pay attention to the concrete, if you don’t think it is hard enough to flip then wait another day but if it is then grab a buddy and flip it over and begin the grinding process.
Grinding:
I did my grinding at a different point than most that make concrete countertops. Most suggest waiting 5 or 6 days and then using diamond grinding pads to sand the concrete to a mirror finish that resembles granite. I on the other hand didn’t want to go that far with it, I wanted it to look more natural.
So after two days, I decided instead of waiting til it was super hard and investing in diamond pads, I would wait two days and hit it with regular sandpaper and grinding wheels. I gotta say I think it turned out rather well. The concrete was dry enough to hold shape but soft enough to sand. Use a 2×4 as a sanding block if you don’t have one.
First, use a regular grinding wheel to expose the aggregate and broken glass, it won’t take much so don’t use any pressure. Once you have the desired amount of aggregate and glass showing move on to sanding with 60 grit paper. Use the 60 grit to get a flat surface and remove your grinder marks. A 2×4 or sanding block makes it pretty easy.
Make sure to sand the sides of the capstone as well as the top and to make it extra smooth keep the capstone slightly wet. Once you’re done with 60 grit repeat this step with 120, 180, 220, 320, 400 and 600 at which time you will be done.

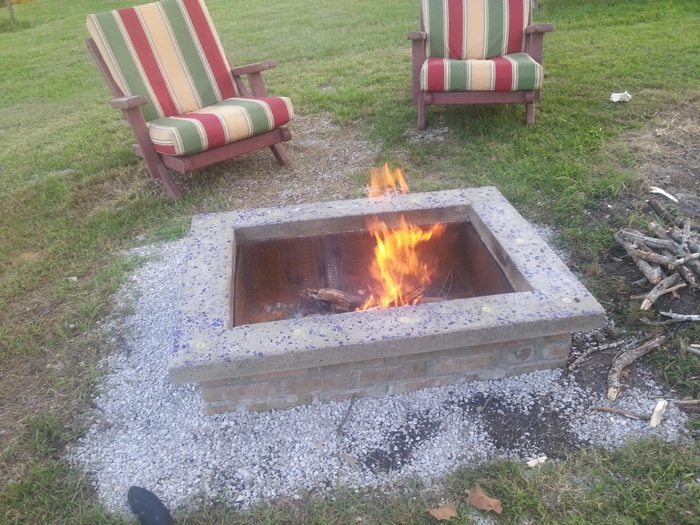
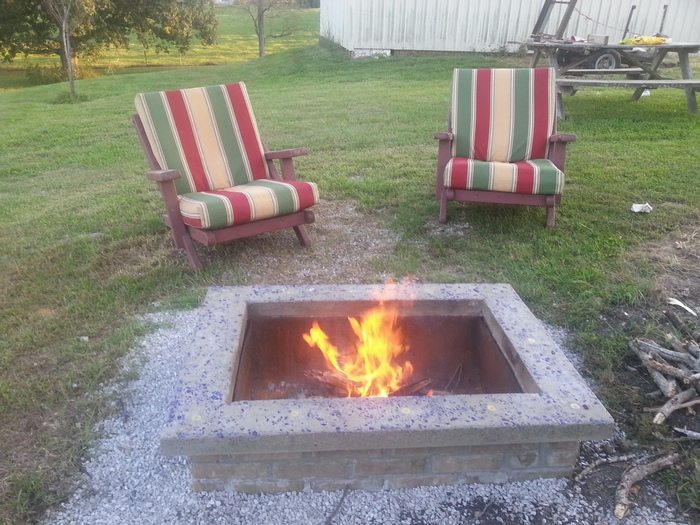
Setting the capstone. A week after the pour it’s time to set the capstone, there are two ways you can do it, set it in mortar, or dry stack it. I decided to dry stack just in case I ever needed to access the barrel. Grab a buddy and tilt the stone up and set it in place, making sure to centre it.
Sealing the capstone:
Before sealing the capstone give it a good bath and let it dry very very well before sealing. After doing some tests with a thermometer I believe any sealer would work on the surface of the capstone due to the fact that it doesn’t get hot. However the inside edge does, I recommend using some 1200-degree black grill paint on the inside edge, then sealing the top, I used 1200-degree clear coat but may go back later with epoxy. Let it sit overnight.

Now you need to cure the high temp paint or clear on the capstone, to do this start a small fire inside the custom cap stone fire pit and let the capstone slowly warm up, the next day start a slightly bigger fire and on the third day start a full-size fire. This will cure the ceramic in the paint.

Custom Cap Stone Fire Pit Accessories
Water drainage:
Drill 1/2″ holes every 6 inches in the bottom of the barrel in the custom cap stone fire pit so water can drain out.
The man-weenie stick:
Take a green, straight stick that’s around 4 ft in length and has a smaller end diameter of approx. 1/4″. Shave the end to a point, now move up 6 inches and score a line around the diameter of the stick with ur knife cutting through the outside layer of bark, move up 1″ and do the same. Score a line from the first score line to the second and peel the bark off to make a clean cut revealing the white under the bark, repeat every 6 inches.
Ash removal and barrel saver:
Take the other half of the barrel from this build and cut the circular ends off leaving you with a rounded piece of sheet metal, place in the pit as a removable bottom which makes ash removal a breeze and also keeps the bottom of your barrel from ever burning out.
Grill top:
Almost a must for this fire pit, take some 1″ angle and expanded metal and weld together a grate that will set on the man pit then take two 1/4″ brake lines or stainless lines that are about a foot in length and bend them into a handle so you don’t need gloves to pick it up after cooking with it.

Isn’t this a great fire pit design? If you are in for a grill, you can do so without any difficulties because of its wide and level top. You can even use the capstone to place your drinks, especially during cooler nights!
Would you want a DIY fire pit with custom cap stone in your outdoor area? It’s truly a quality outdoor feature and yet very easy to make!
Thanks to RNation0001 for this great tutorial!
Conclusion
Building a custom cap stone fire pit transforms your outdoor space into a warm and inviting area for relaxation and entertainment. The process offers a rewarding DIY project that allows for personalization and creativity, ensuring each fire pit is unique. Following our guide should help you make an incredible fire pit worth the envy of your neighbors.