Last Updated on August 19, 2024 by teamobn
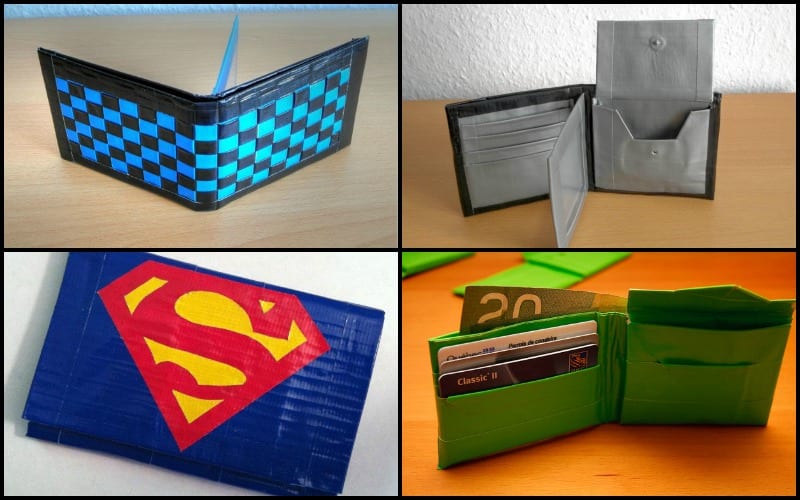
Here’s an interesting project for the weekend that some of you might want to do – making a wallet entirely out of duct tape! I personally find this idea clever because it’s one that I could really use.

My friends and I have a small clothing business where we do all the work, including going to a street market almost every weekend to buy supplies. It’s a very crowded place, especially during weekends. And since many people are busy crowding in and shopping, pickpockets see this place as a gold mine.
I used to buy cheap wallets which I could use while I shop at this particular place. With those, I wouldn’t care much if they steal it. But this duct tape wallet is better as it’s not bulky. I could put it in any of my pockets and people won’t easily notice it.
It’s also a great wallet for kids since duct tapes are basically durable!
Want to know how to create one? Get your duct tape ready and watch this basic tutorial
Contents [show]
- 1 Crafting a Duct Tape Wallet
- 1.1 Materials and Tools Needed:
- 1.2 Steps to Make a Duct Tape Wallet:
- 1.3 Durability and Maintenance Tips
- 1.4 Advanced Designs and Customization
- 1.5 Custom Features for Duct Tape Wallets
- 1.6 Advanced Design Techniques
- 1.7 Enhancements for Durability and Aesthetics
- 1.8 Functional Enhancements
- 1.9 Aesthetic Customizations
- 1.10 Advanced Structural Designs
- 1.11 Decorative Techniques
- 2 Conclusion
Crafting a Duct Tape Wallet
Materials and Tools Needed:
- Duct Tape: Choose one or more colors or patterns for customization.
- Scissors or a Craft Knife: For cutting the tape.
- Ruler: To measure and cut straight edges.
- Cutting Board or a similar surface: Protects your table and ensures clean cuts.
- Plastic for the ID window (optional): A clear plastic sheet, like from a zip bag.
Steps to Make a Duct Tape Wallet:
- Cut the Tape: Start by cutting several strips of duct tape about 9 inches long. You’ll need about 8-10 strips, depending on the wallet thickness you prefer.
- Create the Body:
- Lay four strips sticky-side up on your cutting board. Overlap them slightly to make a solid sheet.
- Place another four strips sticky-side down on top of the first layer, covering the sticky surfaces. This creates a double-sided duct tape fabric.
- Trim the Edges:
- Use your scissors or craft knife and ruler to trim the edges, making a neat rectangle. This will form the body of your wallet, typically around 8 inches by 7 inches.
- Fold the Fabric:
- Fold the rectangle in half to about 3.5 inches tall. This fold determines the final size of your wallet.
- Create Pockets for Cards:
- Cut additional strips of duct tape about 4 inches long to create card pockets.
- Fold these strips in half lengthwise so they are double-sided.
- Attach these to one half of the inside of your wallet, layering them slightly over each other to create multiple pockets.
- Seal the Sides:
- Cut two short strips of duct tape.
- Use these strips to seal the sides of the wallet, ensuring no sticky edges are exposed and pockets are secure.
- Add an ID Window (optional):
- Cut a small rectangle of clear plastic that fits within the wallet size.
- Use duct tape to frame and attach the plastic on the inside of one side of the wallet to create an ID window.
- Final Touches:
- Fold the wallet closed and press firmly along all edges and folds to secure everything in place.
- Optionally, add additional strips or shapes of duct tape to the outside for decoration or personalization.
Durability and Maintenance Tips
Apart from a distinctive and artistic tool, duct tape wallets are surprisingly robust and easy to maintain. These ideas will help you make sure your duct tape wallet looks great and lasts for a long period.
Durability of Duct Tape Wallets
Resilience of duct tape wallets is well known. Under normal conditions, the great tensile strength of duct tape makes these wallets impervious to weathering and tearing. Like any object, though, they can deteriorate from too much bending or from very damp surroundings. Your duct tape wallet should be kept away from direct sunlight and extreme temperatures and avoided overstuffed to extend its lifetime and prevent the tape from softening or becoming sticky.
Maintenance Tips
Maintaining the best condition of your duct tape wallet depends on basic maintenance techniques:
- Cleaning Your Wallet: Because duct tape resists water, the wallet is rather easy to clean. To get stains and dirt off the surface, wipe it with a moist cloth. One can use a little rubbing alcohol for more difficult stains. Once cleaned, let the wallet dry totally before using it once more.
- Preventing Sticky Edges: As the adhesive breaks down, periodically the edges of a duct tape wallet may get sticky from either high heat or over time. Applying a little piece of fresh duct tape over the exposed sticky areas will help you to correct this.
- Storing Your Wallet: Stow your duct tape wallet in a cool, dry area when not in use. While too much moisture might weaken the fabric of the tape, prolonged heat can make the adhesive sticky.
Enhancing the Lifespan
To ensure that your duct tape wallet lasts as long as possible, consider reinforcing stress points with additional tape. Places where the wallet folds are particularly susceptible to wear and tear. Adding a second layer of duct tape on these fold lines can significantly extend the overall durability of your wallet.
With these tips, your duct tape wallet can remain a stylish and functional piece of your daily essentials, proving that something as simple as duct tape can be transformed into a lasting accessory.
Advanced Designs and Customization
Duct tape wallets provide great opportunities for advanced design and personalizing. Whether your level of experience with crafts is new or advanced, you can transform the basic duct tape wallet into a unique item that highlights your own style and fits your particular need.
Custom Features for Duct Tape Wallets
Customizing your duct tape wallet lets it be as useful as it looks. Here are some improvements you could give thought:
- ID Windows: To make a see-through ID window, cut a small rectangle from clear plastic packaging—like a zip bag—then duct tape it. Quick ID checks without opening your wallet will find this function especially helpful.
- Coin Pockets: To securely save coins, design a little pocket with a flap over top. This helps your duct tape wallet to be more flexible and helps them to avoid falling out.
- Multiple Card Slots: Adding several layers of duct tape folded into pockets replaces one or two card slots. This lets you carry more neatly arranged, readily accessible cards.
Advanced Design Techniques
These design ideas can give both aesthetic appeal and utility for those wishing to elevate their duct tape wallet:
- Color Blocking and Patterns: Use several colors of duct tape to create original patterns including chevrons, stripes, even plaid designs. Color blocking is the visually arresting effect created by arranging big blocks of various colors.
- Embossing: Under the last layer of tape, form raised designs on your duct tape wallet using a cut-out form—like a letter or number. The shape will produce a subdued raised pattern as you apply the last layer.
- Themed Wallets: Choose colors and patterns that fit your hobbies, sports team, or movie to theme your wallet. This makes your duct tape wallet uniquely yours and a conversation starter.
Enhancements for Durability and Aesthetics
To enhance both the durability and the aesthetic appeal of your duct tape wallet, consider these tips:
- Reinforcement with Fabric: For areas that will experience frequent wear and tear, reinforce them with a piece of fabric before covering them with duct tape. This adds an extra layer of durability.
- Waterproofing: While duct tape is inherently water-resistant, sealing the edges and seams with a clear waterproof sealant can prevent moisture from seeping in and degrading the adhesive.
Functional Enhancements
- Elastic Money Band: Add an elastic band to the outside or inside of the wallet for holding bills securely. This can be particularly useful for those who prefer not to fold their money inside the wallet.
- Key Holder: Integrate a small loop or clip made from duct tape or a reinforced piece of metal to keep keys securely attached to your wallet. This is ideal for minimalists who want everything in one place.
Aesthetic Customizations
- Textured Surfaces: Create textures on your wallet by layering small pieces of duct tape in a scale-like pattern. This not only adds a unique feel but also enhances grip.
- Glow-in-the-Dark Features: Use glow-in-the-dark duct tape for portions of the wallet or for decorative designs, making your wallet easy to find in the dark.
- Personalized Tags or Labels: Add a small, personalized label or tag made from a different color of duct tape, perhaps with your initials or a special symbol that represents you.
Advanced Structural Designs
- Fold-Out Sections: Design a fold-out section for extra storage, which can be tucked away when not in use. This is great for storing receipts or tickets temporarily.
- Integrated RFID Blocking Layer: Include a layer of RFID-blocking material within the wallet’s lining to protect your cards from unauthorized scanning. This is a practical feature for those concerned with digital security.
Decorative Techniques
- Stenciling: Use a stencil to add intricate designs or lettering to your duct tape wallet. This method allows for detailed and precise decorations.
- Mixing Materials: Combine duct tape with other materials like fabric, leather strips, or metal accents for a mixed-media effect. This can add both texture and a touch of elegance to your wallet.
Making a custom duct tape wallet offers a fun and fulfilling do-it-yourself project in addition to allowing you to have a distinctive accessory fit for your need. Your duct tape wallet will be a useful tool as well as a display of your creative ability with these sophisticated designs and personalizing choices.
Conclusion
Duct tape wallets showcase the versatility and creativity that can be achieved with simple materials. They offer a durable, customizable solution for anyone looking to express their style while ensuring practicality. As you explore various designs and functionalities, your duct tape wallet can truly become a reflection of your personal taste and needs.
Want another DIY wallet idea? Here’s a tutorial for kids’ wallet…


