Last Updated on May 7, 2024 by teamobn
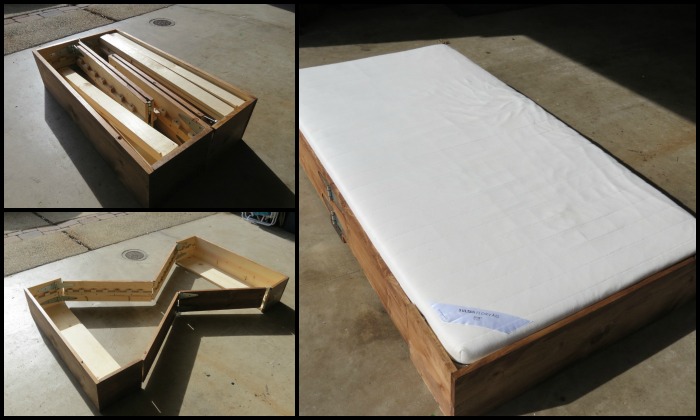
Did you like the amazing bed in a box we’ve featured in the past? If you say yes, then you are probably going to like this slightly different version, too!
Inspired by the original, this twin-sized bed in a box was built to be smaller and simpler so that it can be stored under another bed.
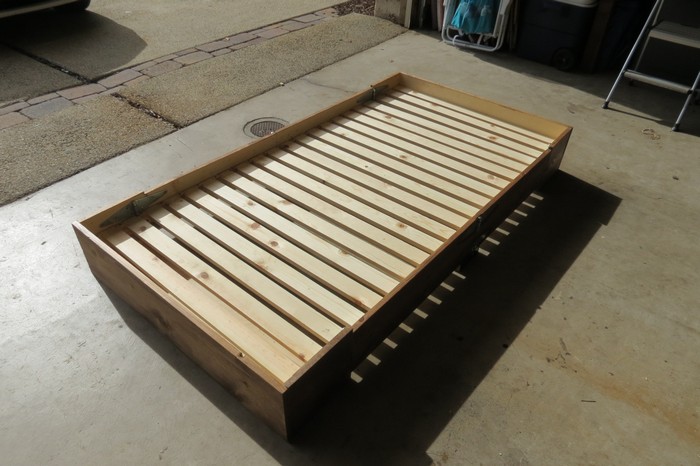
If you want a nice extra bed that you can hide when not in use, this collapsible bed in a box is the one for you!
Though a bed in a box looks complicated to build, it’s definitely easier than it looks and we’re confident you can make it.
Contents
Building a Bed in a Box
Materials
- 12 pcs of 6″ Fence Gate Hinges
- 3/4″ Wood Screws
- 2″ Wood Screws
- 3 pcs of 1″x2″x8′ Pine Board
- 10 pcs of 1″x3″x8′ Pine Board
- 2 pcs of 1″x8″x8′ Pine Board
- 3 pcs of 1″x10″x8′ Pine Board
- Wood Stain
Tools
- Brushes/Rags
- Cordless Drill
- Table Saw
- Measuring Tape
Cutting List
1″x2″x8′ Pine Board: TBD – these cuts were made after assembly; they get a little complicated with the hinges in the way
1″x3″x8′ Pine Board:
- (20) 39″ Lengths
1″x8″x8′ Pine Board:
- (2) 26.75″ Lengths
- (2) 28.25″ Lentghs
1″x10″x8′ Pine Board:
- (2) 40.5″ Lengths
- (2) 39″ Lengths
- (2) 10″ Lengths
Click on any image to start the lightbox display. Use your Esc key to close the lightbox.![]()

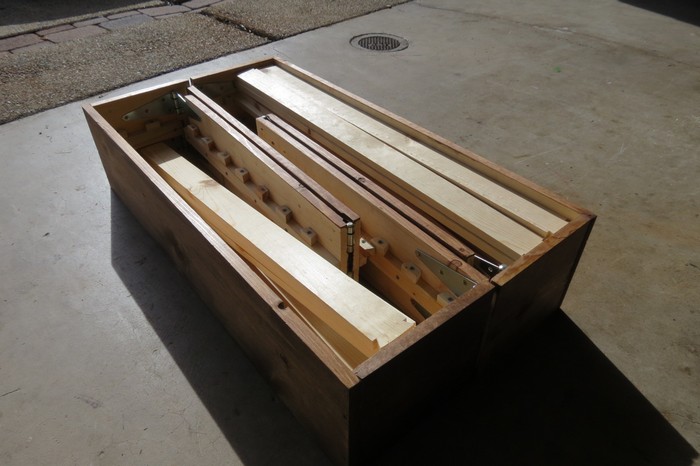
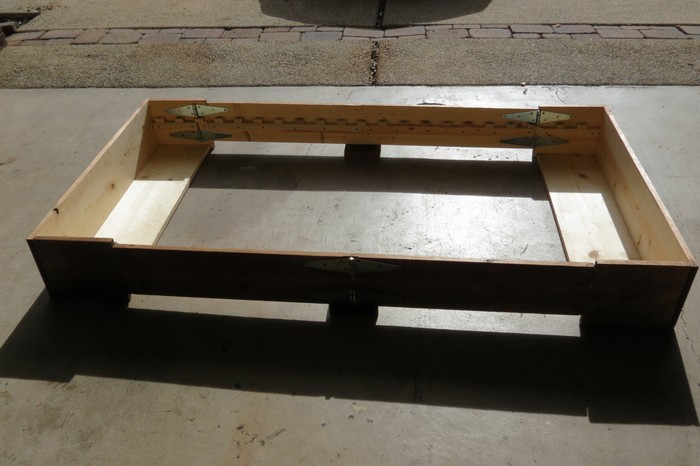
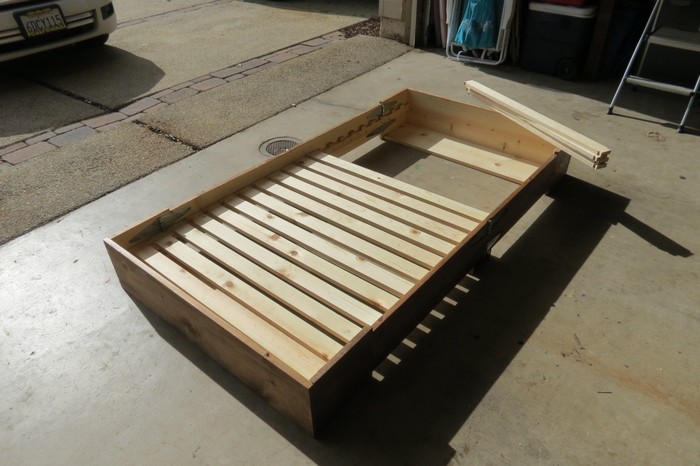

Here’s a video demonstration of the assembly of this bed in a box project:
Instructions
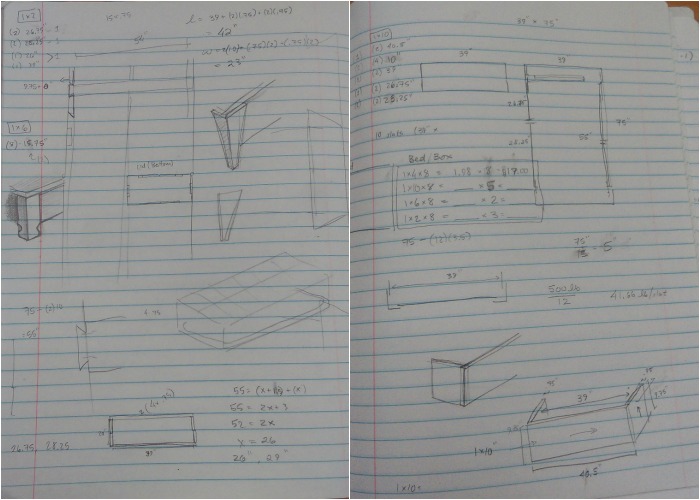
Design and Materials: I should preface any description of the design of this bed in a box by mentioning that a picture really is worth a thousand words, especially in this case. If any of these explanations don’t make sense, be sure to check out the photos to clarify (more so during the other steps than this one; these pictures are just a compilation of my poorly organized design sketches).
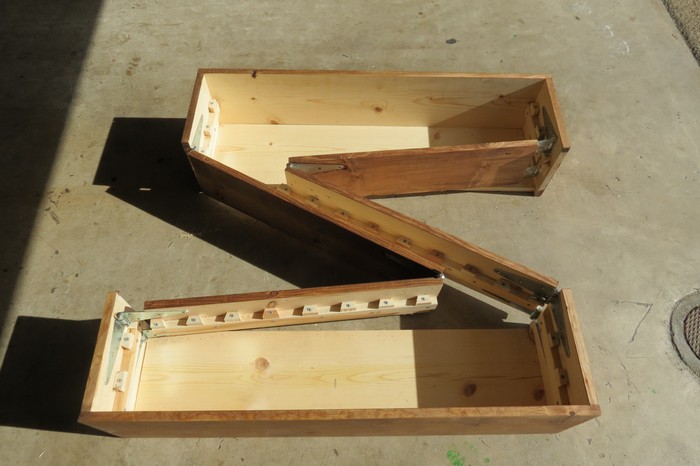
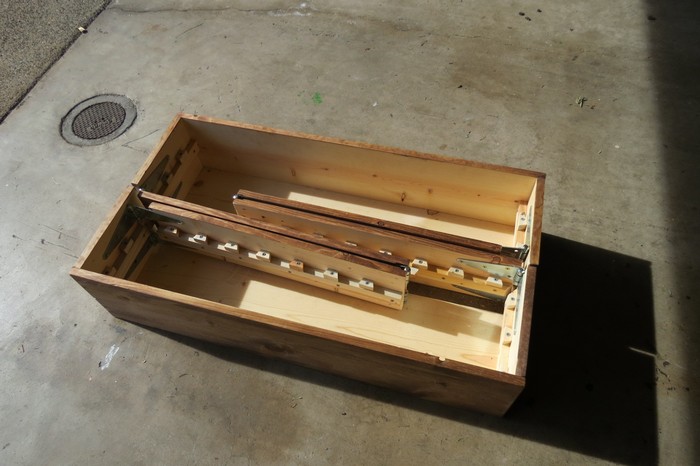
The bed in a box design is simple enough; it consists of two main parts/systems: the “box” and the slat/rail system. The “box” is a simple box, cut in half, which contains the extending sides. In order for the box to be able to close completely, the sides (and hinges) have to be offset by several inches. This will be covered in greater detail in the next step.
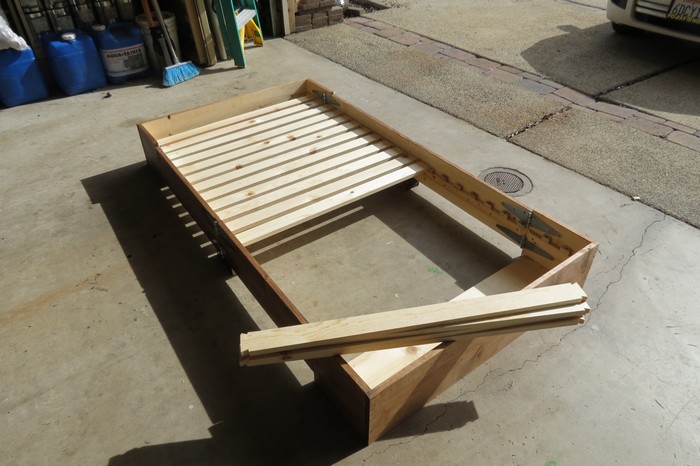
The slat/rail system consists of a 1″x2″ pine board running along both sides of the extended “box”. This rail is lined with small, trapezoidal 3/4″x3/4″ pieces that engage with the dovetail joints in each slat. This ensures that the sides of the bed in a box cannot extend once the slats are in place.
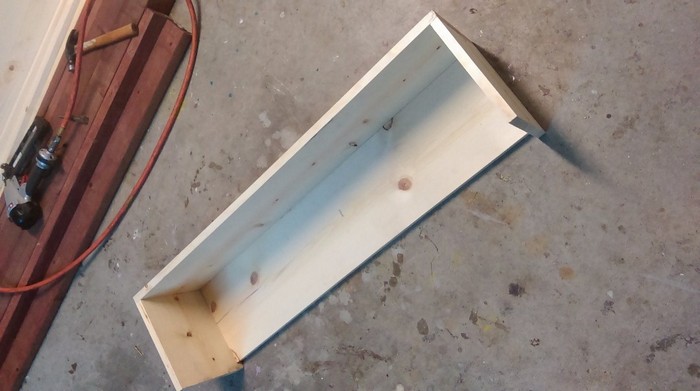
The Box: First, construct the two halves of the bed in a box by screwing together one of the 40.5″ pieces with the 39″ piece and the two 10″ sides. See the first picture for clarification. Yes, I know this will leave a gap along the bottom, and I do mostly regret it….but in the long run, you’ll almost never see it because it will almost always be covered when the bed in a box is in a “closed” position. The first of many potential improvements, but as I was on a deadline I let it slide.
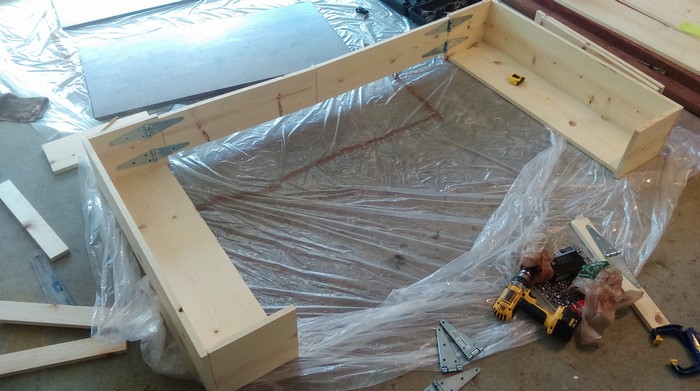
Next, is the complicated part. In order for the sides to be able to close without interfering with each other, they must be offset by a couple of inches. I calculated a 2″ offset and that seemed to work alright.
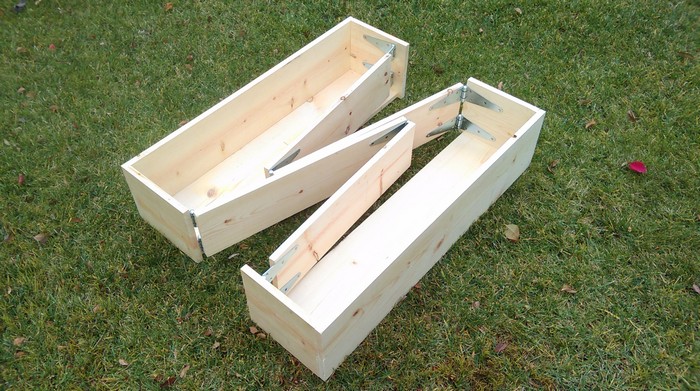
In order for the bed in a box design to function correctly, the shorter end (the 26.75″ one) must be the “offset” side. That means that when you attach the 26.75″ side to one of the halves of the box, the hinges must be set 2″ into the box. The hinges for the 28.25″ side are then attached flush to the other half of the box. Once again, see the pictures for clarity. I tried to take some good close-ups so that you can get the idea.
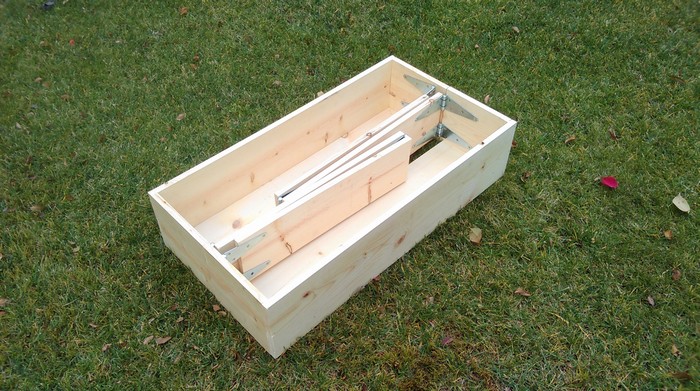
For the other side, flip the 26.75″ and 28.25″ lengths. I mention this because I accidentally forgot and had to take everything off and redo it.
I placed the hinges almost flush with the top and bottom of the 1″x8″ pieces, but I offset the 1″x8″ from the 10″ sides of the box by about 3/4″. Initially, I designed this offset to allow for a lid to be placed on top of the box, but I ended up nixing that idea so you could easily set these flush with one another.
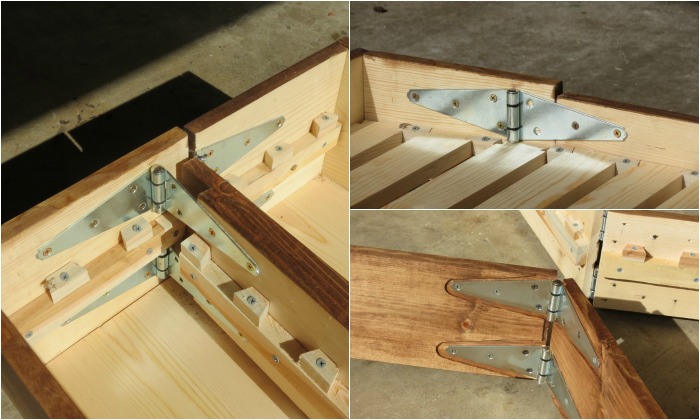
Some reminders/tips for the hinges: Make sure that attach the hinges in the right orientation. These hinges will normally bind in one direction and then fold completely in the other direction. Depending on where they are being placed, the hinges will need to be attached accordingly.
Also, I used a router to knock off an 1/8″ of wood behind the hinges in order to buy myself a little more space when in the “closed” position. Once again, see the pictures for clarification.

The Slats: This is where it gets complicated. First, the 1″x2″ lengths must be cut into corresponding lengths to run along the 10″, 26.75″, and 28.25″ lengths. It wouldn’t hurt to miter every one of these before screwing them to the sides of the bed. This will allow the sides to open and close without bumping into each other.
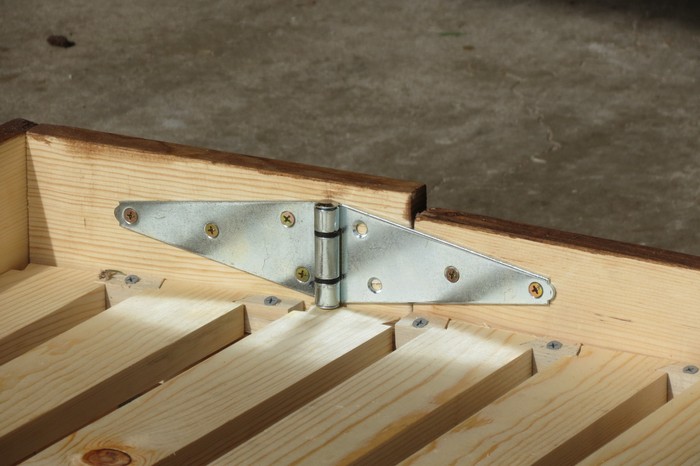
I attached these “rails” 3/4″ under the top set of hinges. Try your best to keep these levels relative to each other (and especially from one side to the next, so that there’s no incline when you put the mattress down).

Once these are in place, cut your remaining 1″x2″ into 3/4″x3/4″x1.5″ pieces, with a slight miter on both sides. This miter can be anywhere from 20-30 degrees and must correspond directly with the dovetail that will be cut into each of the slats.
Now the slats. Cut your 1″x3″ lumber into as many 39″ lengths as possible (I ended up using 21, but in hindsight, I would have preferred a round 20). Trace and cut a 3/4″ deep dovetail into both sides of each slat, once again corresponding to the depth and angle of the trapezoidal pieces that were just cut.
Now ensues the tedious process that I will summarize in the following 4 steps:
1. Set slat on the rail.
2. Place one trapezoidal piece on both ends, engaging the dovetails in the slat.
3. Drill a pilot hole and screw the trapezoidal piece into the rail.
4. Rinse, repeat
**Tip: Number your slats 1-20 and mark one side of the bed as the starting point. This will help you avoid some complications in the future.

It sounds simple, but you’ll also have to check often to ensure that the pieces you’re screwing in aren’t interfering with the box’s ability to close and open. This will require some adjusting of the pieces around the hinges.

Finishing Touches: Now that you’ve got everything assembled, there are just a few more finishing touches before it’s ready for a mattress! First of all, you’ll need something to support the sides of the bed, near the hinges.
My simple, practical solution was to attach a small bracket to a 2″x4″, which -conveniently- fit perfectly under the sides of the bed. These, as well as the slats, fit conveniently into the box when collapsed into the “closed” position.

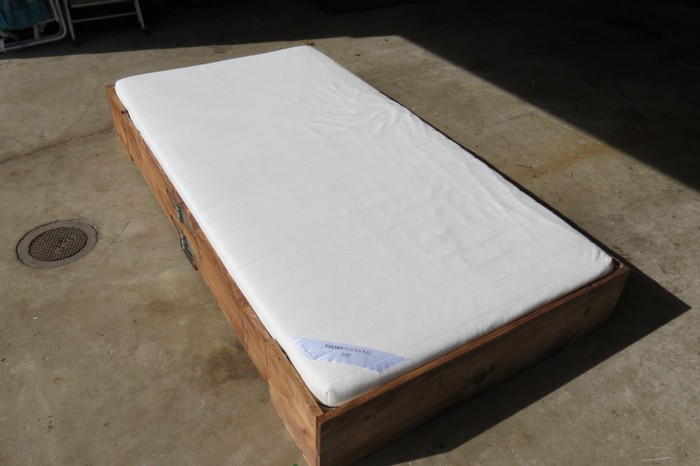
I also applied a dark stain to the outside of the bed in a box, which gives it a much better look overall, both in the open and closed positions. Let it dry and it’s ready for a mattress! The twin-sized mattress fits perfectly inside the frame, and if I do say so myself it looks great. Simple. Practical. Beautiful. Oh yeah, and less than $150.
Thanks to ineverfinishanyth for this great project!
Space Optimization in Small Bedrooms
Maximizing space in small bedrooms can be a challenge, but with the right strategies and furnishings, you can create a functional and stylish room. One clever solution is incorporating a bed in a box, which provides a versatile and space-saving option.
Below are some tips on arranging furniture and choosing the right items to complement your bed in a box, ensuring your small space remains both beautiful and practical.
Furniture Arrangement Tips
- Strategic Placement: Start by placing the largest pieces of furniture, like your bed in a box, against the wall opposite the door. This placement helps create an unobstructed view and sense of space upon entering the room.
- Use Vertical Space: Utilize vertical space for storage, using tall bookcases and shelves that draw the eye upward. This technique not only saves floor space but also makes the room appear larger.
- Multi-functional Furniture: Opt for furniture that can serve multiple purposes. For instance, choose bedside tables that double as desks or opt for ottomans with storage. These choices complement the functionality of a bed in a box and enhance the overall usability of the room.
Complementary Furniture
- Choosing Slim and High Furniture: To keep the room feeling open, select furniture pieces that are taller rather than wider. This includes narrow wardrobes, slim bookshelves, and vertical dressers, which provide ample storage without overwhelming the space.
- Folding and Expanding Pieces: Consider furniture that can be folded or expanded as needed, such as fold-down desks or extendable side tables. These are perfect partners for a bed in a box, as they can be adjusted based on your daily needs and tucked away when not in use.
- Harmonious Color Scheme: Stick to a coherent color scheme that reflects light and creates a sense of openness. Lighter colors make a room feel bigger and airier, enhancing the compact efficiency of your bed in a box.
Incorporating these strategies in small bedrooms not only maximizes space but also ensures that every square inch is utilized efficiently and stylishly. With a bed in a box, you’re not just saving space; you’re also adding a versatile and attractive piece that enhances the functionality of your small bedroom.
Conclusion
Building a bed in a box offers a practical solution for those needing extra space and a touch of simplicity in their home decor. This project not only challenges your DIY skills but also delivers a versatile and cost-effective piece of furniture. Once assembled, the bed in a box serves as a stylish yet functional addition to any room, ready to impress with its dual-purpose design.

