Last Updated on April 17, 2024 by teamobn
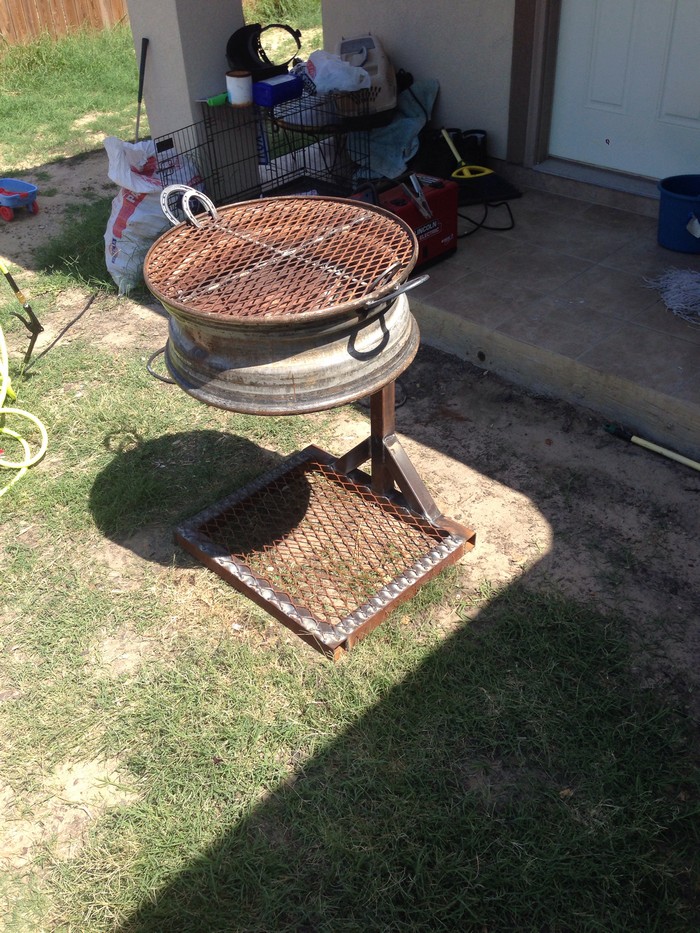
Every DIY enthusiast will tell you that a little creativity may save you a lot of money. For instance, making your own charcoal grill will definitely cut down on the cost of buying a new one. Especially if you use an old tire rim!
There are several examples of tire rim grills out there, but this is one of the more elegant versions. And what’s great is that it is also one of the easiest DIY projects you can find. You can definitely make this for yourself regardless of your skill level!
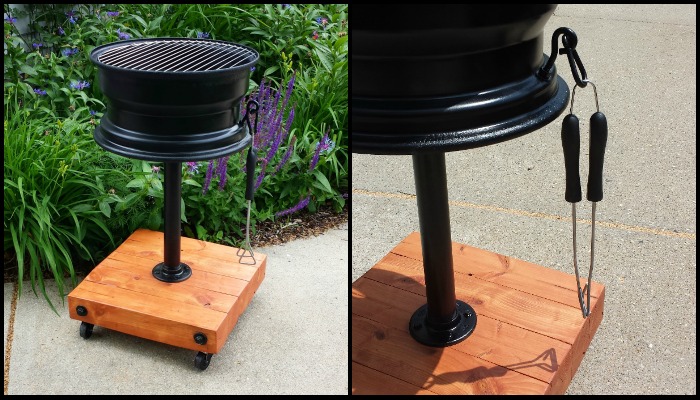
This DIY grill is made out of only one tire rim and it does not require any welding. It’s all about simply putting 4x4s, a steel pipe, and the tire rim together! It also comes with wheels, making it very convenient and easy to use. You can put in a fine wire mesh, a thin steel sheet, or an old frying pan as your ash pan.
The most important thing to remember here however is to clean the tire rim thoroughly, especially by sandblasting. And as with any new grill, do an initial burn before cooking with it.

If you want to have an awesome tire rim grill but don’t know how to weld it yet, here’s the right DIY project for you!
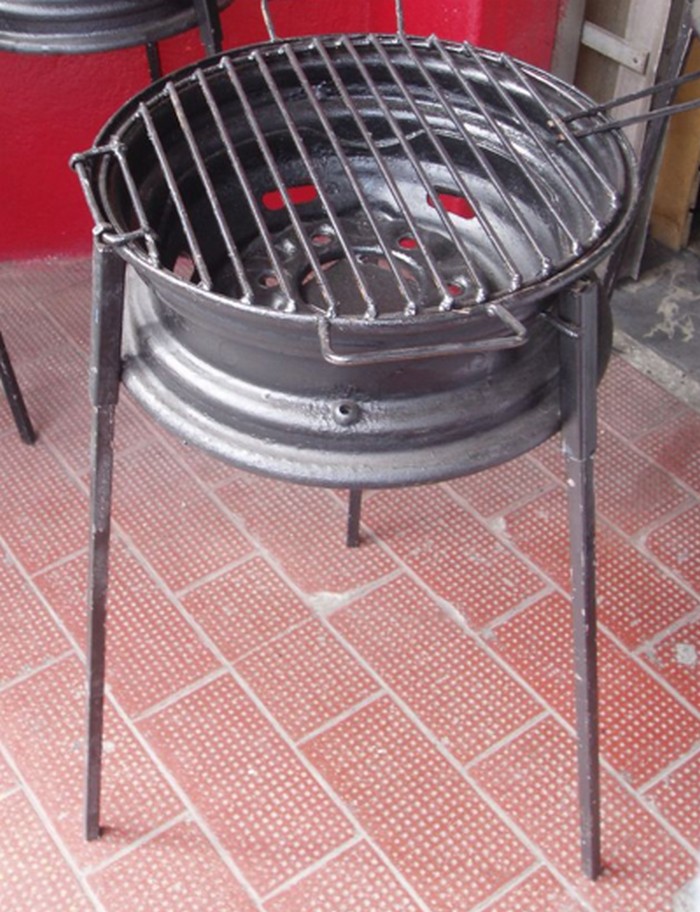
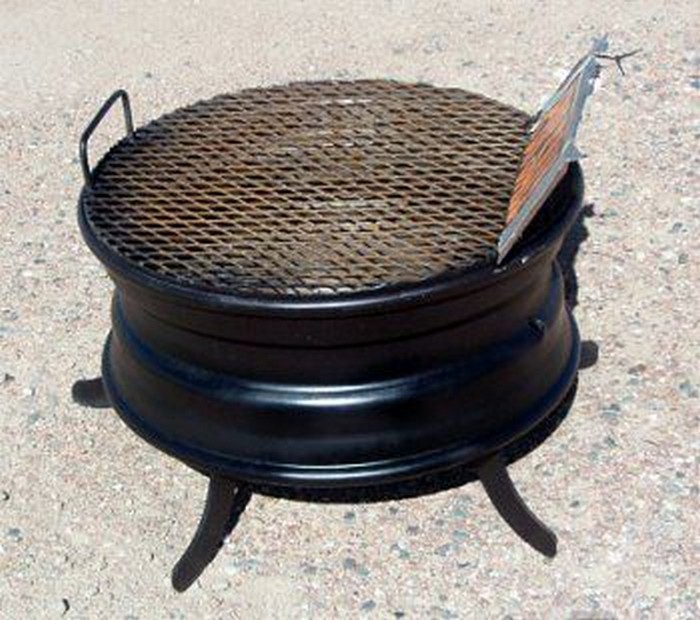
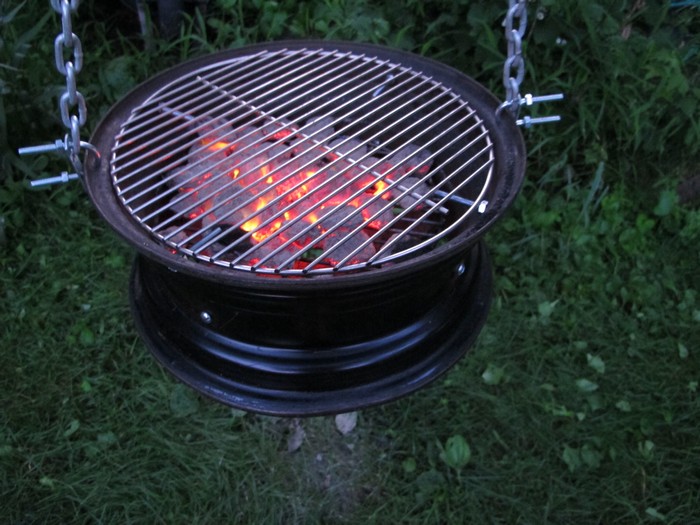
Here are some other versions of the no-weld tire rim grill for your inspiration!
Click on any image to start the lightbox display. Use your Esc key to close the lightbox. ![]()
Contents
Building a Tire Rim Grill
Materials
- Tire Rim
- 2 cans of High Heat Paint
- 4’x 4 Timber x96″
- 4 pcs of 5/8″ Bolts/Hardware
- 4 pcs of 1/2″ Lag Bolts
- 1 1/2″ Steel Black Pipe (18″ long)
- 2 pcs of 1/2″ Threaded Rods/Hardware
- 1-2 pcs of Grill Grate
- Wheel Casters – 4
Tools
- Grinder
- Miter Saw
- Power Drill
- Planer (Optional)
- Reciprocating Saw
- Pry Bar
Instructions
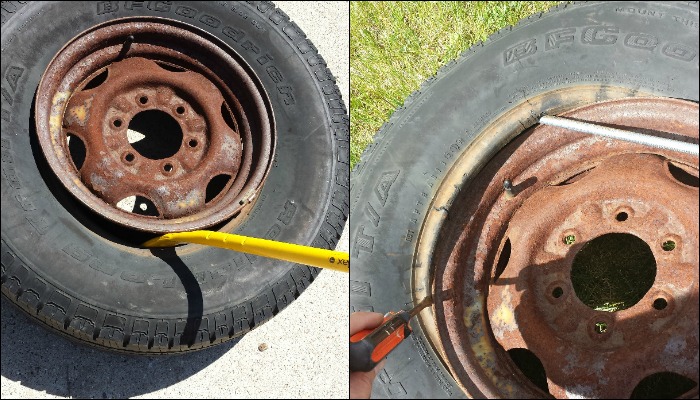
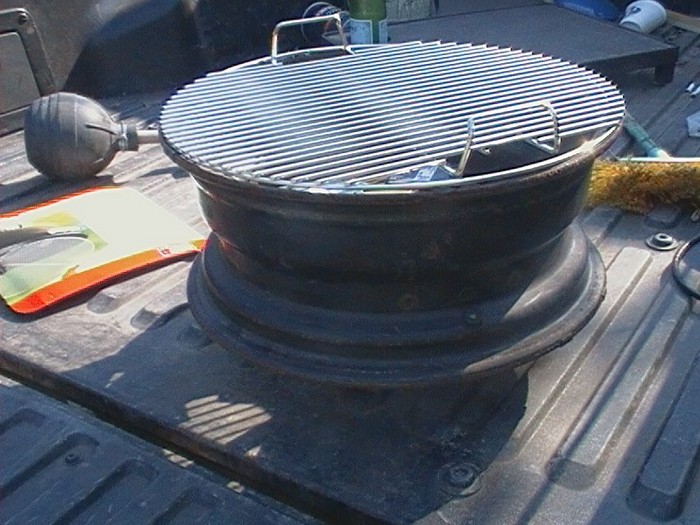
The most frustrating step: Removing the rim from the rubber was by far the most frustrating step in making the no-weld tire rim grill. After watching several videos and trying to pry the two pieces apart I actually ended up using a reciprocating saw with a metal cutting blade to cut the bead from the tire and then pried the rim out with a threaded rod and large screwdriver.
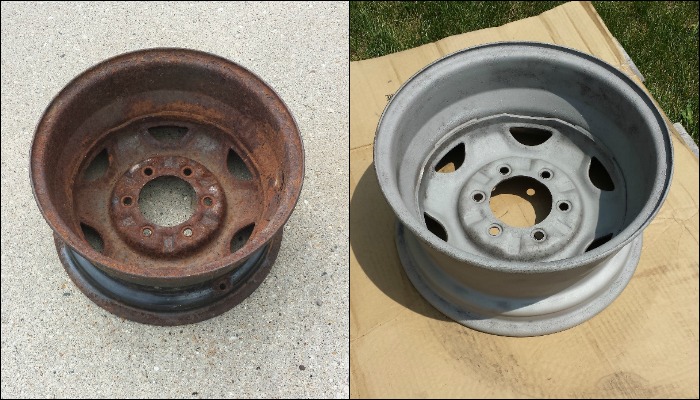
After freeing the rim I took it to a local shot blasting facility where they let me blast it myself. It took about 11 minutes and cost under $20 ($30 if the facility did it themselves).
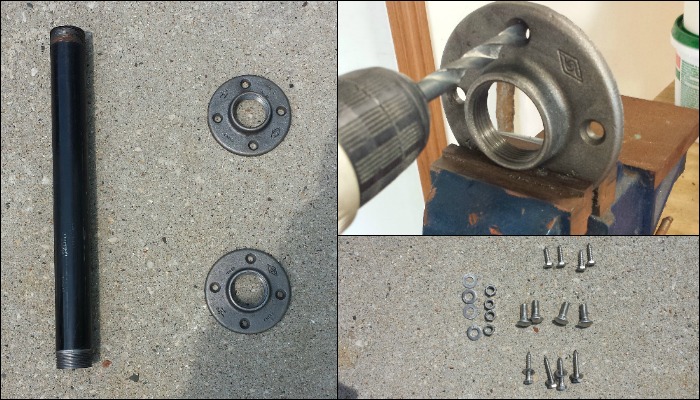
Parts and paint: All the parts I found at my local Home Depot. The black pipe I had cut and threaded there. The pipe flange that will be mounted to the wood base needed no further attention as it would be taking the appropriate 1/2″ lag bolts. The flange that will secure the rim to the pipe needed its holes drilled larger to accommodate the wider 5/8″ wide head bolts.
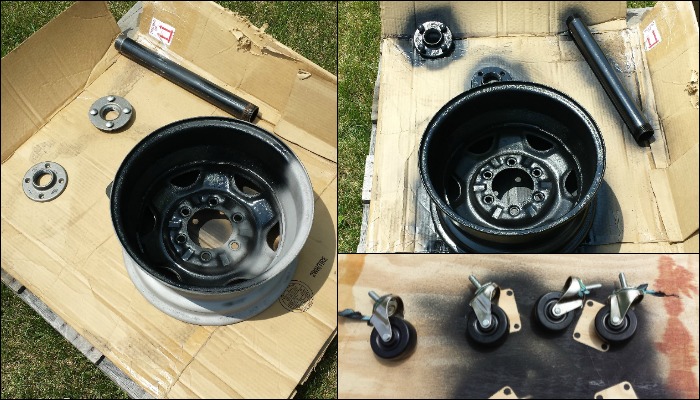
Next is the painting. I used Rustoleum High Heat paint which is specifically for grills. It goes on just like any other spray paint (if anything it goes on smoother). I applied two coats to the parts of the tire rim grills and hardware. I pressed paper towel strips into the bearings of the wheels before painting to ensure they wouldn’t get clogged.
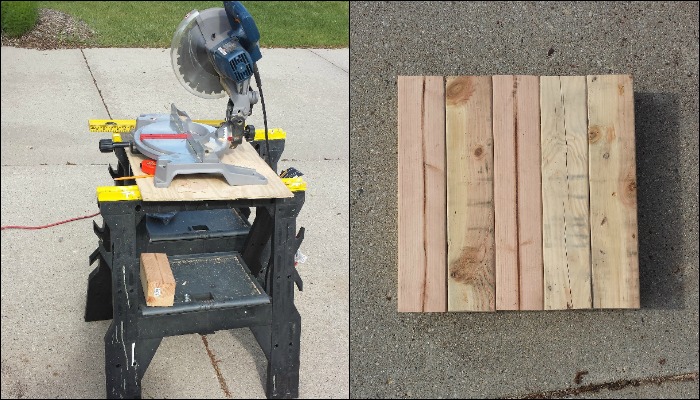
The base: Tire rims are fairly heavy so the base had to be fairly heavy also. I wanted to match or exceed the weight while not making the base too large so I settled on using 4×4’s. I cut the 4×4 with a miter saw so that the base would be square.
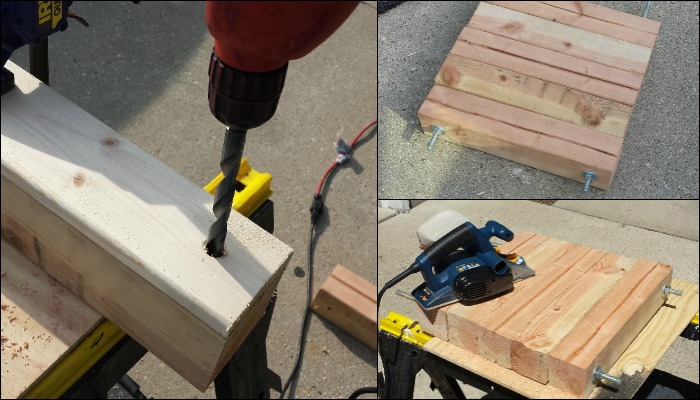
Next, I drilled holes through the ends using a guide hole I drilled in a piece of scrap wood. Ideally, I would have used a drill press for this step as the holes would have been perfect the same in each piece of wood but since I didn’t have one I planned and sanded the whole base of the tire rim grills after sliding the threaded rods through the holes.
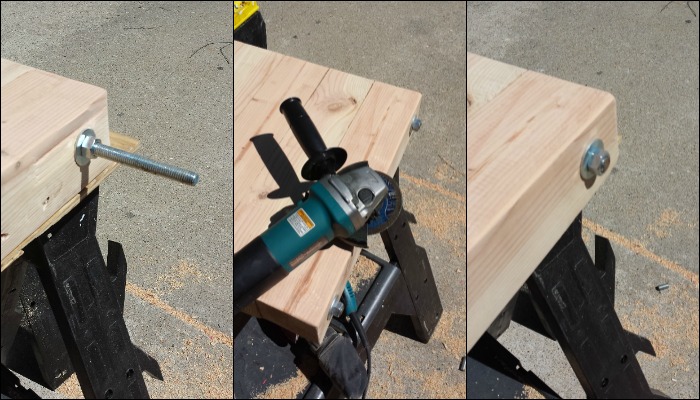
I then put bolts and washers on the threaded rods and then ground off the extra piece of threaded rod. Then I drilled (and sanded) holes to accommodate the lag bolts on top and the wheels on the bottom.
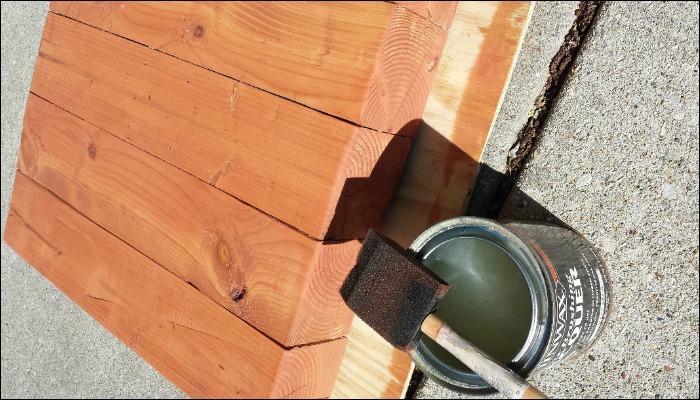
The final step for the base was a coat of stain and lacquer.
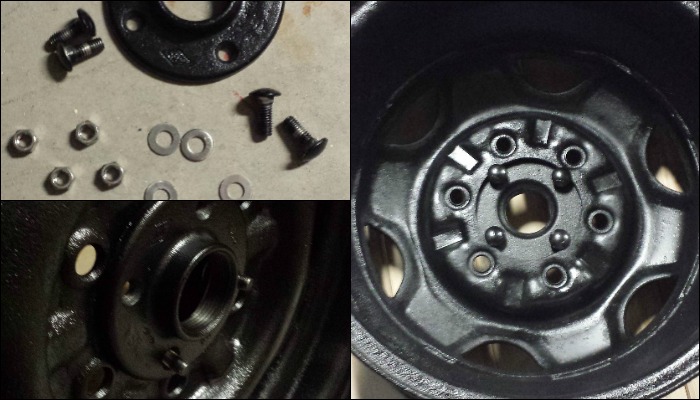
Rim to Pipe to Base: To attach the steel pipe flange to the rim I used smooth top bolts (with the widest possible heads). Simply insert the bolts into the flange while making sure the lip of the bolts makes maximum contact with the lip of the rim’s center hole. It may not seem like much contact but once tightened I was able to attach the steel black pipe and pick up the rim by the pipe without any give whatsoever.
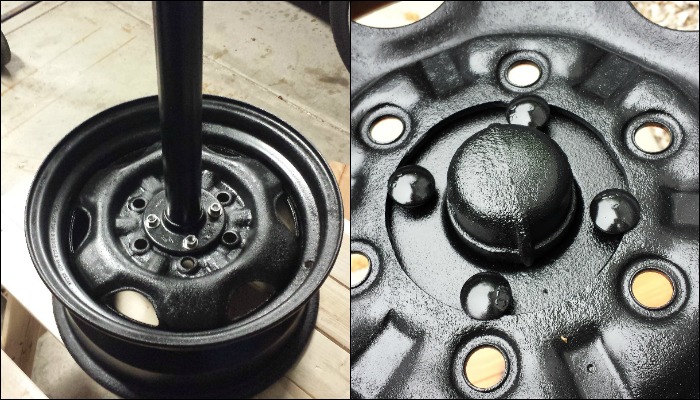
I covered the hole of the pipe with a 1″ cap which fit nicely on top (so ash wouldn’t get in). I painted it with high heat paint also.

The pipe screws into the flange of the rim on one end and the flange of the base on the other. The base flange is secured by lag bolts and washers. These I also painted.
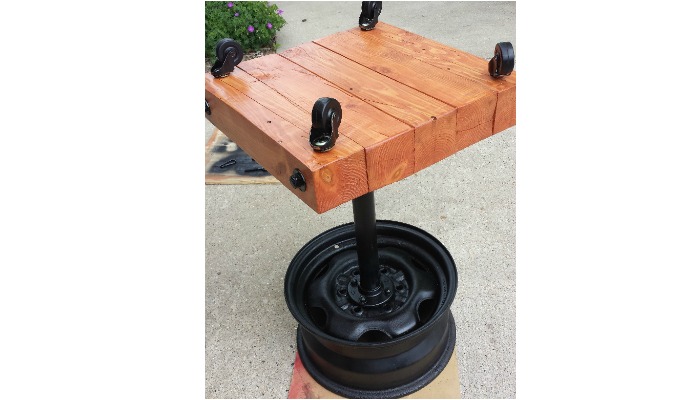
Finishing touches: The tire rim grill is on the heavy side so I inserted wheels into holes on the underside of the base for easier movement.

I used the hole from the valve stem to attach an eye hook with a couple of nuts and added a carabiner clip so I could hold all my grilling implements (tongs, brush, spatula).

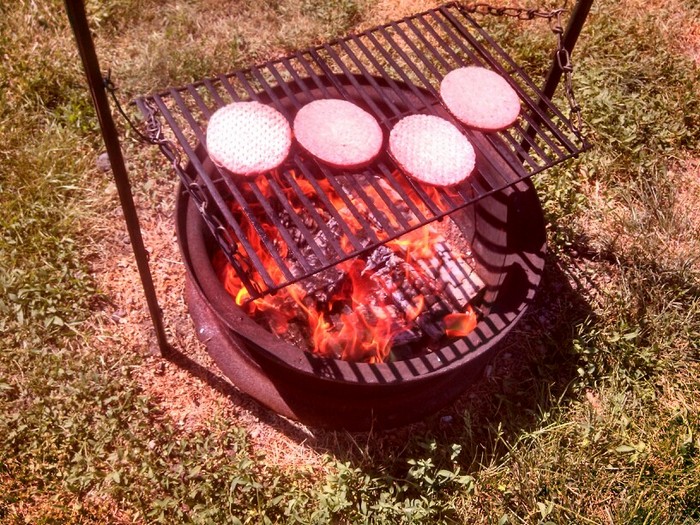
Finding appropriate-sized grates was tricky but with some internet searching, I found a grate that would fit low in the tire rim grill to hold the charcoal and another to fit on top to hold the food. One grate could suffice as the coals could be placed directly into the tire rim grill without any hazard (only stainless or raw steel was used as opposed to zinc or galvanized metal) but I felt that coals may fall through the outer tire rim grills holes and land on the wood below if left uncovered.

Conclusion: I am very satisfied with my tire rim grill both in looks and functionality. As someone who has not yet learned how to weld (but would like to!) it was a challenge to think of a way to make a secure metal structure but I believe I succeeded.

Also if the wheels are removed and the grill is flipped upside down it makes a pretty stylish table. 🙂
Thanks to AmateurHour for this great project!
Here’s a quick video…
Safety Precautions When Handling Tire Rims
When embarking on a DIY project like building a tire rim grill, safety is paramount. Tire rims are heavy and can have sharp edges that pose risks if not handled properly. Here are essential safety precautions to ensure your project proceeds smoothly and safely.
Wear Protective Gear
Always wear protective gear when handling tire rims, especially when you’re turning one into a tire rim grill. Sturdy gloves will protect your hands from sharp edges and potential burrs on the metal surface. Safety goggles are crucial to shield your eyes from metal shavings or dust, particularly during cutting or cleaning processes.
Secure Your Workspace
Ensure your workspace is stable and well-organized. Working with a tire rim for a grill setup involves significant movement and force, so a slip or a trip can lead to injuries. Keep your tools neatly arranged and the floor clear of obstructions. Make sure the rim is securely placed and won’t roll away or tip over.
Handle with Care
Due to their weight and bulk, moving tire rims can strain your back or pinch your fingers. When lifting the rim, use your legs, not your back, and if possible, seek assistance to move it. When converting the rim into a tire rim grill, ensure all movements are slow and deliberate to avoid sudden shifts that could lead to injury.
Check for Sharp Edges
Before starting the conversion into a tire rim grill, inspect the rim thoroughly for any sharp edges or points. If any are found, smooth them out with a metal file or an angle grinder equipped with a sanding disc. This will prevent cuts and scratches both during the build and later when using the grill.
By following these precautions, you’ll ensure that your tire rim grill project is not only successful but also safe from start to finish. Always remember that taking your time to prepare and execute safety measures is crucial in any DIY project.
Maintenance and Care for Your Tire Rim Grill
Proper maintenance and care are essential for extending the lifespan of your tire rim grill and ensuring it remains safe and functional for future barbecues. Here’s how you can keep your grill in top condition.
Regular Cleaning
Regularly clean your tire rim grill to prevent buildup of grease, ash, and debris, which can affect its performance and longevity. After each use, allow the grill to cool completely, then remove any residual ash and unburnt charcoal. Use a wire brush to scrub the grill grates and the inner surfaces of the rim to remove stuck-on food and rust spots.
Protective Coating
To protect the tire rim grill from rust and weather elements, apply a high-heat resistant paint as needed. This not only enhances the grill’s appearance but also adds a layer of protection against moisture and rust. Check for any chips in the paint periodically and touch up these areas to prevent rust from developing.
Check for Wear and Tear
Inspect your tire rim grill regularly for signs of wear and tear. Pay special attention to the stability of the mounted components and the integrity of the grill grate. Tighten any loose bolts and replace worn-out parts as needed. This ensures that every part of your grill is always in good working order and safe to use.
Store Properly
When not in use, store your tire rim grill in a dry, covered area to protect it from the elements. If outdoor storage is unavoidable, invest in a waterproof grill cover that fits snugly around your grill. This will keep it dry and reduce the risk of rust and damage from harsh weather conditions.
Following these maintenance steps will help ensure that your tire rim grill remains a reliable and enjoyable tool for outdoor cooking for many years. Regular upkeep not only preserves your grill but also enhances your cooking experience.
Conclusion
Building a tire rim grill offers a cost-effective and creative way to enjoy outdoor cooking. This DIY project is accessible to enthusiasts of all skill levels and adds a unique touch to any gathering. With the right care and maintenance, your tire rim grill will serve up delightful meals for years to come.
We have more incredible grill ideas. Check out our grill gazebo project next!