Last Updated on January 31, 2024 by teamobn
Need a REALLY wide table for you to work on? Buying one can be expensive. This DIY PVC table solves your budget concern, plus it’s relatively easy to build!
DIY PVC table is ideal for those who work with a team that needs more than one unit as each only costs around $74. Imagine the amount of money saved as compared to store-bought desks!
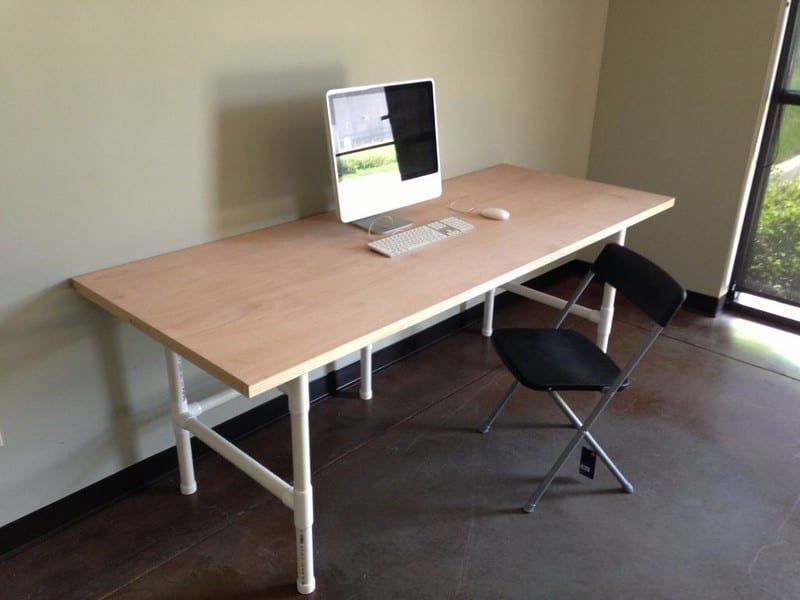
This PVC table uses a hollow core door tabletop which can be used for simple workloads like computer work, crafting, drawing, or kids’ table. If you are planning to use this PVC table as a workbench, you can use a solid core door instead.
This PVC table measures 80 x 36 inches! What’s even better is that this table doesn’t shake or wobble. 😉
Is this PVC table perfect for your needs? Then read this tutorial by trevormates!
Contents
Building a PVC Table
Materials:
- Hollow Core Door
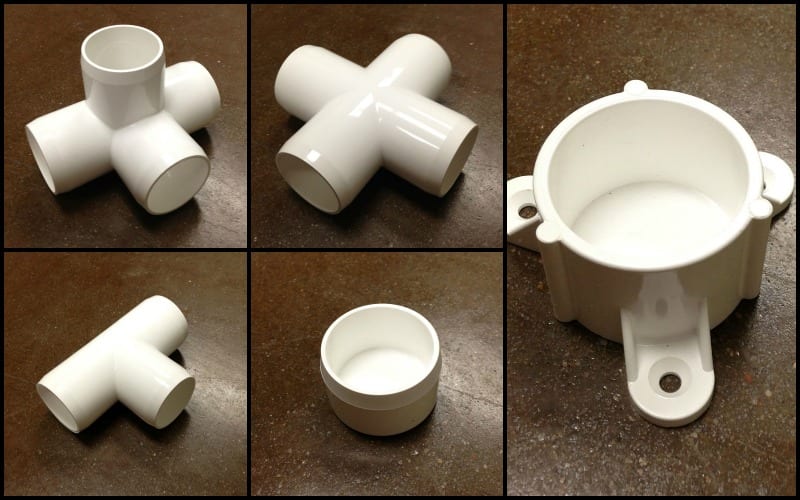
- Furniture Grade PVC Fittings
- 5 x 1-1/4” PVC External Caps (F114EEC)
- 5 x 1-1/4” PVC Table Caps (F114ECT)
- 4 x 1-1/4” PVC 4-Way Tees (F1144WT)
- 4 x 1-1/4” PVC Regular Tees (F114TEE)
- 2 x 1-1/4” PVC Crosses (F114CRX)
- Plumbing Grade PVC Pipe (see the list in the first step)
- 1-1/4″ to 1-1/2″ long threaded Screws
- Drywall Screw Inserts
- PVC Cement
Tools:
- Hacksaw, Ratcheting Plastic Pipe Cutter, or Power Miter Saw (for cutting pipes)
- Power Drill
- Measuring Tape
Steps:
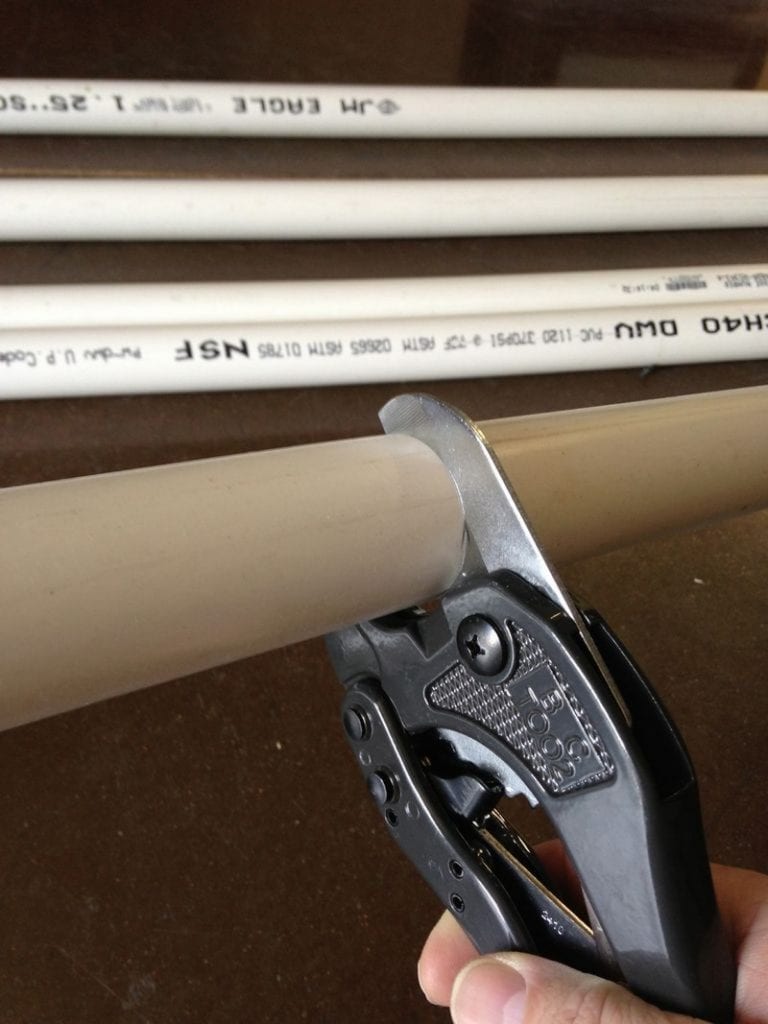

I used plumbing grade pipe to keep costs low, as shipping of furniture grade pipe, while much more attractive, ridged, and strong can be expensive. I used off-the-shelf pipe for home depot, at $3.60 for a 10’ stick, with a total of four (4) sticks being used (or 40 feet). The pipe was cut to the following lengths and quantities:
- A quantity of five (5) 3” lengths.
- A quantity of ten (10) 12” lengths.
- A quantity of four (4) 20” lengths.
- A quantity of four (4) 30” lengths.
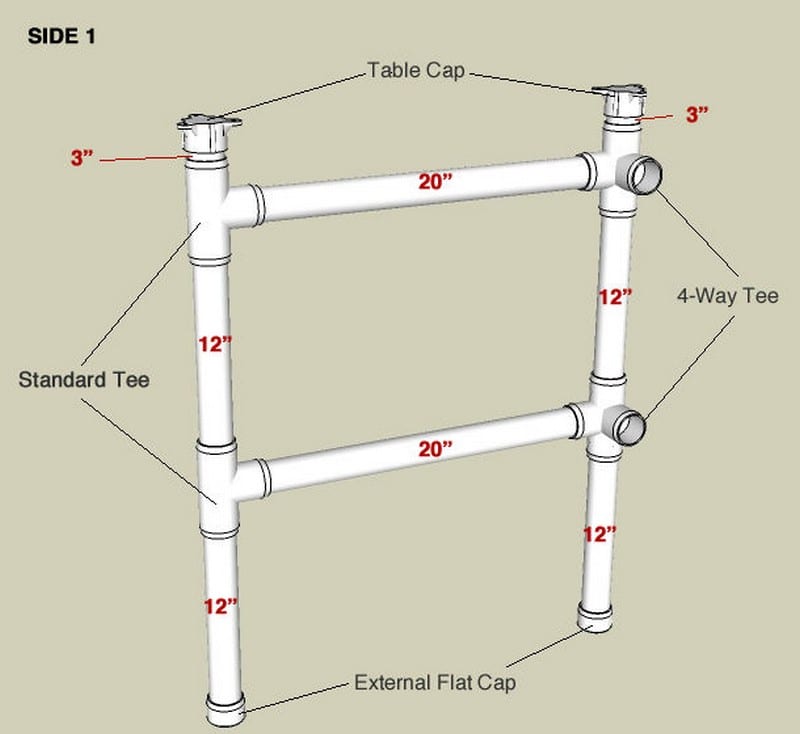
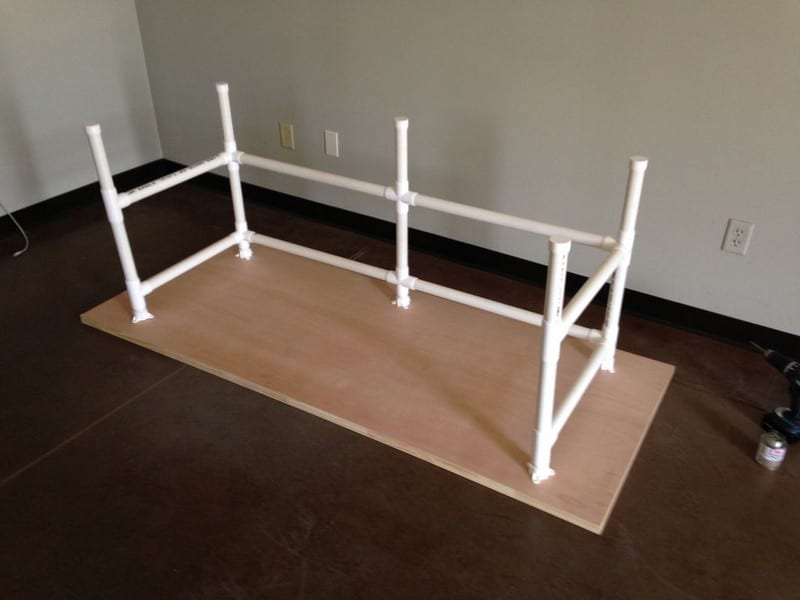
The first thing you want to do is assemble the first of the two sides of the PVC table frame using the Tees, 4-Way Tees, the End Caps, and the Table Caps, as shown in the attached photo. The fitting placement is in BLACK, and the pipe size to use is shown in RED. This will be ‘SIDE 1’, or the left side of the PVC table.
I recommend a dry fit first, THEN pull everything apart and reassemble using PVC Cement. As many of you know, once you apply PVC cement, it will not come apart again.
Apply the PVC cement to the inside of the fitting at the ‘stop’ point of the fitting only. Make sure things are being inserted the way they should, then press the pipe into the fitting and hold for 30 seconds to secure the weld.
NOTE: THE SEQUEL: If you don’t want to use PVC cement (as it is noxious indoors), use 1/2″ screws between where the pipe and fitting meet to secure them both in place.
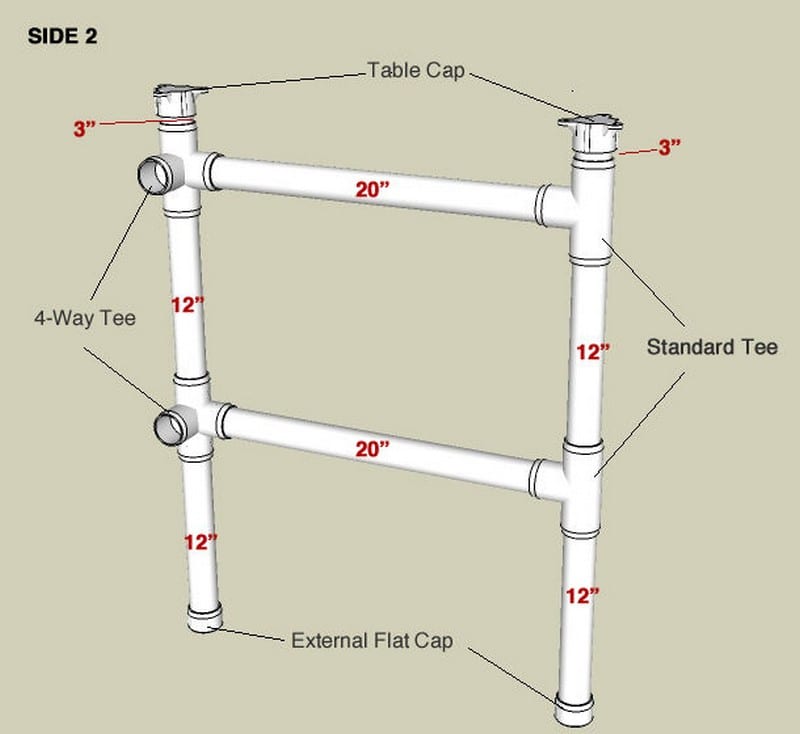
The next step is the same as the previous, however, you want to build your ‘SIDE 2’ or the right side of the table as a mirror image to the SIDE 1, so that the ports on the 4-Way Tees face the other direction, when in the rear.
Another diagram is attached which shows a pipe and fitting placement, with a pipe in RED and fittings in BLACK.
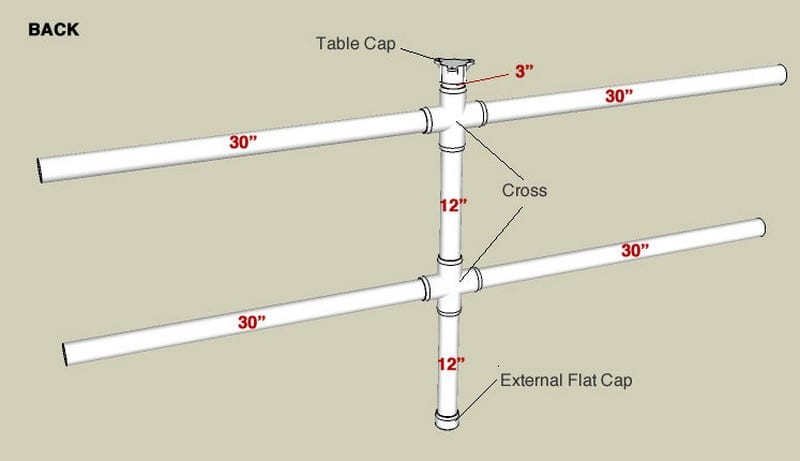
Now it’s time to build the ‘BACK’ of the table, which is fairly simple. For this step, you will need a Table Cap, an External Cap, and two Crosses, both of which should not have not yet been used. Assemble them, along with the long pieces of 30” pipe to make something that looks like it belongs on the top of a telephone pole.
When assembling the ‘centre stack’ with PVC cement, lay this flat on the floor so that everything is flat and your pipe is all parallel.
Now it’s time to bring everything (PVC-related) together.
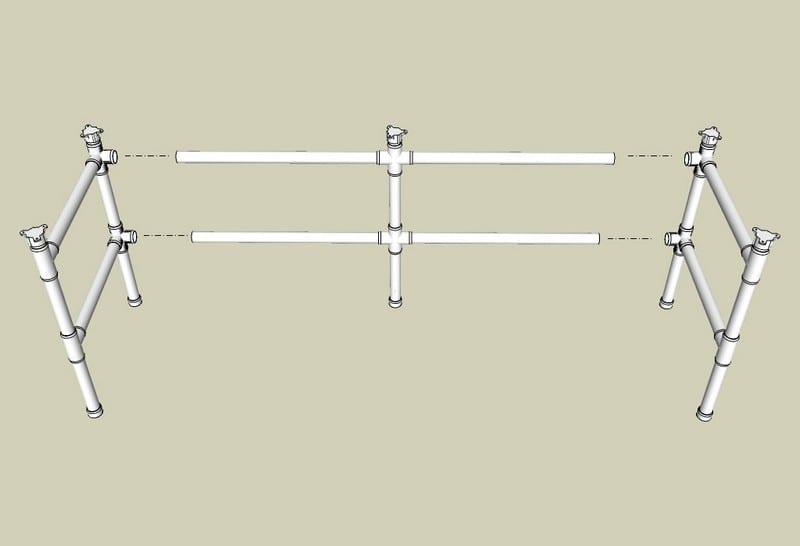
Insert the ends of the pipes from the BACK into each of the SIDE 1 and SIDE 2 elements to end up with something shown in the diagram. Again, I recommend a dry fit to make sure everything lines up before applying PVC cement.
Once you a comfy with the dry fit, pull them apart and apply PVC cement into the fittings on SIDE 1, and insert the BACK pipes into the 4-Way Tees on SIDE 1. Quickly make sure everything is sitting at the right angles. Press together and wait 30 seconds.
Next, apply PVC cement into the fittings on SIDE 2, and insert the BACK pipes into the 4-Way Tees on SIDE 2. Quickly make sure everything is sitting at the right angles. Again, press together and wait 30 seconds.
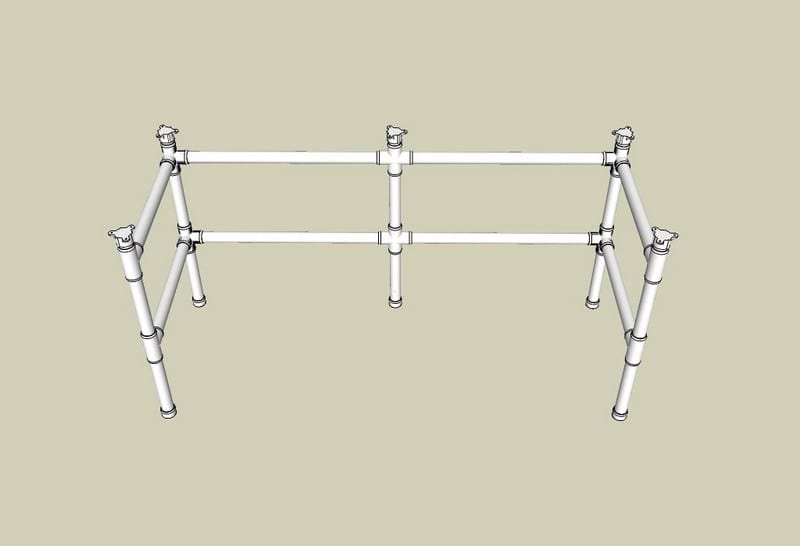
You should now have a completed frame! Almost Done!
The Trouble with Hollow-Core Doors:
Hollow-core doors are constructed of an outer frame and various slats that run (when stood upright) along the horizontal plane of the door. The remainder of the area between these slats is either filled with cardboard (seriously), foam, or just plain nothing.
Since we can’t see where those slats are, I found that it is a hit-or-miss scenario as to where our table caps will end up attaching to the door, be it a slat or a fluffy piece of cardboard. Where it is cardboard we want to use a drywall insert, to attach the cap to the wood or wall of the door instead. Here is how we do it:
- Lay the hollow-core door on the floor, with the side you want to be the top, facing the floor, then flip the PVC structure over and place it, upside down onto the door, with the table caps against the door.
- Centre the whole structure by eyeballing the placement of the PVC pipe segments and their relation to the edges of the door, then using a pencil or Sharpie marker, mark where the holes in the Table Caps meet the door.
- Remove the PVC structure and place it to the side. With a drill or electric screwdriver, insert a screw into each of the marked points you just made on the door.
- If it goes in easily, you have hit a hollow point in the door. Remove the screw and insert a drywall screw insert into these holes (if you need to, make the hole bigger with a drill bit).
- If it goes in and catches the threads, you have hit a slat, and the hole is good as it is. No drywall screw insert is needed. Remove the screw.

Once you have determined where you need/don’t need inserts, make sure all of your ‘test screws’ have been removed and replace the PVC structure onto the tabletop and align the table caps with the holes that have been predrilled.
NOTE: All of this can be avoided if you use a solid-core door. I am $25 under budget on each table for not doing so, but alas, I am a cheap, cheap man.
Finally, insert the screws into the table caps and the door/screw inserts. You now have a fully completed, upside-down table.

Finally, flip the table over and you should have (if I have explained myself correctly) a fully functional, huge, sturdy table.
You can finish the table with paint, or a nice stain if so desired. We chose to keep ours ‘natural’, however water stains show up like mad on the thin wood, so we recommend a light waterproofing stain or paint.
Thanks to
PVC Table Customization Options
PVC tables are not just practical; they’re also highly customizable. This flexibility allows you to tailor your PVC table to fit perfectly in various spaces and serve multiple purposes. Whether it’s adjusting dimensions or adding creative features, the options are endless. Here’s how you can personalize your PVC table to meet your specific needs.
Adjusting Dimensions for Different Spaces
The flexibility to adjust dimensions is a key feature of DIY PVC tables. This adaptability ensures they fit perfectly in any space, big or small. PVC pipes, the main component of these tables, can be easily cut to any desired length. This allows for extensive customization based on your specific space requirements.
For smaller areas, such as tiny offices or compact living spaces, you can reduce the size of the PVC table. Shortening the pipe lengths creates a more compact table that fits snugly into limited spaces. This smaller table can serve as a cozy work area, a side table, or even a space-saving dining surface.
In contrast, if you have a larger room or need a substantial working area, extending the PVC pipes is the solution. By increasing the length of the pipes, you can create a spacious table surface ideal for projects that require more room. This is particularly useful in creative studios, workshops, or as a central table in a large family room.
The beauty of a DIY PVC table lies in this very adaptability. It’s not just a static piece of furniture but a dynamic solution that can evolve with your changing space and needs. Whether it’s a shift from a small apartment to a larger home, or the need to repurpose a room, your PVC table can be resized accordingly. This makes the PVC table an incredibly versatile choice, suitable for a variety of settings and purposes.
Adding Shelves and Storage Solutions
Effective storage solutions are vital for a well-organized workspace. A PVC table can be transformed to include ample storage, making it a practical addition to any area. This adaptability is what makes PVC tables so appealing for various uses.
Integrating shelves beneath the tabletop is a smart way to utilize space. You can add horizontal pipes under the main surface to create these shelves. These can be used to store essential tools, office supplies, or even books.
The shelf height can be adjusted based on what you plan to store, offering customizability. This feature is particularly useful in craft rooms, home offices, or kids’ study areas, where maximizing space is crucial.
In addition to under-table storage, the sides of your PVC table can also be used efficiently. Attaching wire baskets or fabric bins to the sides of the table offers quick and easy access to frequently used items.
This is an excellent way to store stationery, craft materials, or electronic accessories. For a cleaner look, you can even incorporate PVC pipe segments vertically along the table’s edges to create pigeonhole-like storage spaces.
These storage solutions add significant functionality to your PVC table, making it more than just a work surface. They help in maintaining an organized and clutter-free workspace, which is essential for productivity.
By customizing your PVC table with these storage options, you create a multi-functional piece of furniture that caters to a wide range of storage needs. This is especially beneficial in areas where space is at a premium, as it allows for a more efficient use of the available area.
Incorporating these customization options into your PVC table project will result in a piece of furniture that’s not just cost-effective and sturdy, but also tailored to your specific needs and preferences.
Advantages of PVC Tables
PVC tables offer a unique combination of practicality and versatility. They are becoming increasingly popular for both home and professional settings. Here are some key advantages of using PVC tables.
Durability and Lightweight Nature
PVC tables are known for their durability. They resist wear and tear, making them ideal for frequent use. Unlike wood or metal, PVC doesn’t corrode or degrade easily. This resilience extends the table’s lifespan, ensuring it remains a reliable fixture for years.
Additionally, PVC is lightweight. This makes PVC tables easy to move and reposition, a handy feature for dynamic spaces or for those who often like to rearrange their settings.
Ease of Cleaning and Maintenance
Another significant advantage is the ease of cleaning and maintenance. PVC surfaces are smooth and non-porous, which means spills and stains can be wiped off easily. They don’t require special cleaning agents or treatments.
This low-maintenance aspect is especially beneficial in environments where cleanliness is paramount, such as in craft areas, children’s playrooms, or dining spaces. Regular cleaning with just a damp cloth can keep a PVC table looking new for a long time.
Cost-Effectiveness
PVC tables are a cost-effective solution compared to traditional furniture made from materials like wood or metal. The materials needed to build a PVC table are generally inexpensive. This affordability makes PVC tables an attractive option for those on a budget, without compromising on quality or durability.
Customizable Design
The customizable nature of PVC tables is another significant advantage. They can be tailored to fit any space and meet specific needs. Whether it’s adjusting the size, adding shelves, or modifying the design, PVC tables offer a level of customization that is hard to find in standard furniture. This adaptability makes them suitable for a wide range of uses, from office desks to craft tables.
Eco-Friendly Option
PVC tables can be an eco-friendly choice. PVC is a recyclable material. When a PVC table reaches the end of its life, the material can be recycled to create new products, reducing waste. This aspect is particularly appealing to environmentally conscious consumers.
Versatility in Design and Usage
PVC tables are incredibly versatile. They can be designed in a range of styles to suit different decor themes, from modern minimalistic to rustic or industrial. This versatility extends to their use as well. PVC tables are suitable for indoor and outdoor settings, making them ideal for garden tables, study desks, or craft tables.
Resistance to Elements
PVC tables exhibit excellent resistance to various elements. They are water-resistant, making them suitable for outdoor use or in environments where spills are common. They also resist damage from insects and termites, a common issue with wooden furniture.
Light and Safe to Handle
Being light and safe to handle, PVC tables are ideal in homes with children or for elderly individuals. They lack sharp edges and heavy components, reducing the risk of injuries associated with moving or bumping into furniture.
Easy Assembly and Disassembly
The assembly and disassembly process of PVC tables is straightforward. This makes them convenient for people who move frequently or need to repurpose space regularly. The ease of assembly also means that you can add or remove components based on changing needs.
Sound Absorption
PVC material has sound-dampening properties. PVC tables can help reduce noise levels in a room, making them a suitable choice for busy offices or study areas where maintaining a quiet environment is essential.
No Need for Sophisticated Tools
Building a PVC table doesn’t require sophisticated tools or skills. Basic hand tools are sufficient, making this a feasible project for DIY enthusiasts or those without advanced carpentry skills.
Good Thermal Insulation
PVC has good thermal insulation properties. PVC tables do not get too hot or too cold, making them comfortable to use in various climates.
Conclusion
PVC tables stand out as an exceptional choice for various settings due to their unique set of advantages. They combine durability, ease of maintenance, cost-effectiveness, and customizable design with additional benefits like versatility, element resistance, safety, and ease of assembly. These features make PVC tables not just a practical choice but also a smart, adaptable, and eco-friendly option for homes, offices, and outdoor spaces.
Looking for more productive DIY projects? Check out our power tool organizers post next!