Last Updated on March 14, 2024 by teamobn
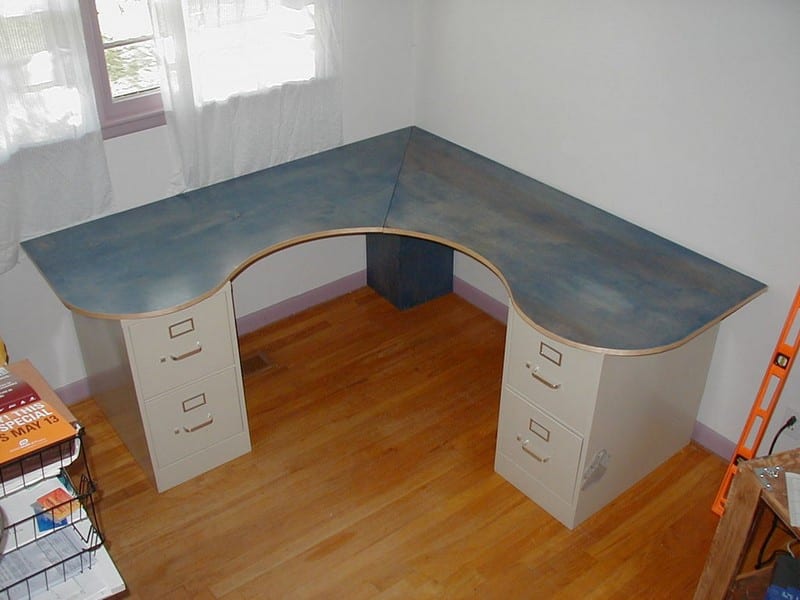
If you’re looking for a home office project, this one could be for you. This wrap-around desk will give you some great workspace and an individual look.
Contents
- 1 Building a Wrap-Around Desk
- 2 Ergonomic Considerations for Wrap-Around Desks
- 3 Space Optimization Tips
- 4 FAQ on Building a Wrap-Around Desk
- 4.1 What materials do I need to build a wrap-around desk?
- 4.2 How do I measure my space for a wrap-around desk?
- 4.3 How can I ensure my wrap-around desk is stable?
- 4.4 How can I incorporate cable management into my wrap-around desk?
- 4.5 Is it possible to build a wrap-around desk if I have limited DIY experience?
- 5 Conclusion
Building a Wrap-Around Desk
Materials
- 2 – short filing cabinets of equal height
- 1 piece – 4’x8′ of 3/4″ double-faced plywood.
- 1 or 2 table/trunk latches.
- 4 pieces – 1/2″ radius quarter round trim, 18″ long.
- Metal Strapping or Corner Brace
- Paint or Stain
- Polyurethane
- 12 feet of real wood edging with heat-sensitive glue on the back (optional)
Tools
- Jigsaw
- Screwdriver
- Circular Saw and Long Straightedge (optional)
- Clothes Iron (optional)
- Sandpaper of varying grits
- Paintbrush/Drop Cloth
Instructions
To start with your wrap-around desk project, make the long diagonal cut all the way through the sheet from a point 2 feet from the corner along one long side to a point 2 feet from the opposite corner along the other long side. (it’s the long straight cut diagonally side-to-side in the drawing) Use a circular saw with a long straightedge clamped into place, if you have such. The straighter, the better.
2) If you have a long enough cutting blade for your jigsaw, clamp the two pieces of the wrap-around desk together, lining up all the sides (rotate the top cut piece 180 degrees to line up with the bottom piece)
3) Using a pencil on a non-stretchy 12″ string and anchoring the string at point “A” in the diagram, draw an arc from the short edge of the sheet around about 120 degrees. Point “A” is 18″ from the (previously) long side of the sheet, and 12″ from the end. (see drawing)
4) Lengthening the string to 18″, draw an arc centred at point “B” in the diagram from the edge you just cut around until it meets the other arc centred on point “A”. Point B is 6″ from the shortest edge of the quadrilateral you’re left with after the diagonal cut, and on the cut diagonal edge (actually 30″ from the end of the sheet). (see drawing)
5) Cut along the long curved line you just drew.
6) Take the pieces left over and cut a 12″x30″ shape and a 12″x12″ right triangle shape from them, in the manner shown on the diagram, outlined in orange and blue respectively. These will form the corner support stand.


Trim the long leftover rectangular pieces to the height of your filing cabinets, in my case, 29″ tall. You want the final height of the stand to be the same as your filing cabinets.
Use glue and screws to assemble the corner support of the wrap-around desk in the picture shown. I used 1.25″ drywall screws, just because I had them around. Since you’re screwing into the edge of the plywood, pilot holes are a good idea. These are all just lap joints, nothing fancy. It’s not very visible anyway.

Clamp the two halves of the wrap-around desk top together again and sand the edges to try to make them as symmetrical as you can. I used a mini-drum sander bit for my electric drill, but sandpaper on a curved surface should work well, if slower.
Orient the top pieces of the wrap-around desk in the way they will be assembled (one top piece has to flip over and join with the other at the diagonal cut). Mark or somehow assign which is the top side and sand with progressively finer grits of sandpaper until it’s as smooth as you like it. You may wish to sand the bottom to a medium fineness—the stain applies easier to a smoother surface.
If you want the edges to match the top, apply the wood edging to the exposed edges with a heat source, either a clothes iron or (possibly—I didn’t try this) a curling iron. The curved surface of the curling iron may work better on the concave curves.

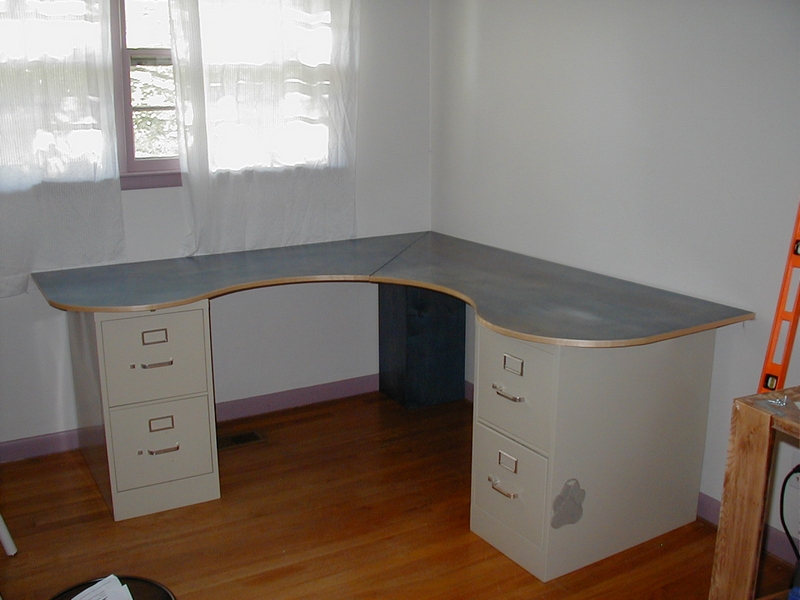
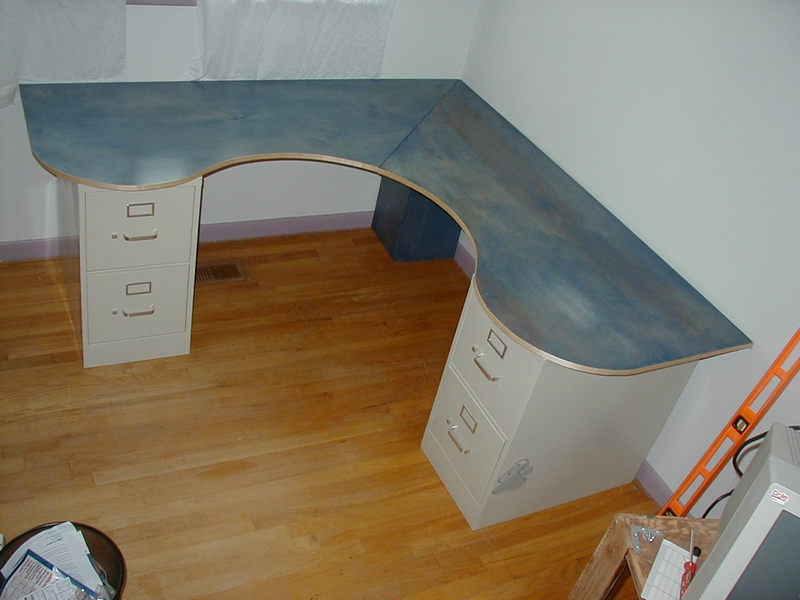
I really liked the look of the coloured stain for this, so I chose a blue-tinted Minwax stain. I stained the bottom sides first, then the tops, and repeated for a total of 2 coats on each side.
I then applied 3-4 coats of water-based polyurethane, sanding between each step. I poly’d each of the surfaces which would be seen, including the “front” of the corner support stand.

Note: I did not then nor have I yet attached the desktops to the corner support. I had planned to do it, but when I place my monitor on the desk in the corner, with the file cabinets in place, nothing seemed to move, so I didn’t bother. Feel free to attach them if you wish – I’d use 1.25″ screws from the bottom.
Turn the desktops face down on the floor, and diagonal cuts together. Place the two-piece latches, closed, on the joint and mark and drill pilot holes for their screws. Be careful not to drill through the top side. Attach the latches. Unhook them and separate the pieces.

Place the corner support in the corner and the file cabinets on either side of the corner in their approximate positions. Place each desktop half, top side up, where it’s supposed to go supported by the file cabinets and corner support. Latch the two halves together with the latches you just installed above. Hopefully, both halves will move as one now.

Line up the file cabinets along each wall, maybe moving them 1-2 inches out from the wall to allow cords and such to go behind them. Put them under the fattest part of the outer curves and mark the undersides along the sides of the cabinets.
Unlatch the desktop halves and turn them over. Align the pieces of the quarter round along those marks, flat sides toward the underside of the desktops and toward the filing cabinets. Make sure they’re short enough to not be seen when the wrap-around desk is right-side-up. Pilot drill and screw them down with 1″ screws.


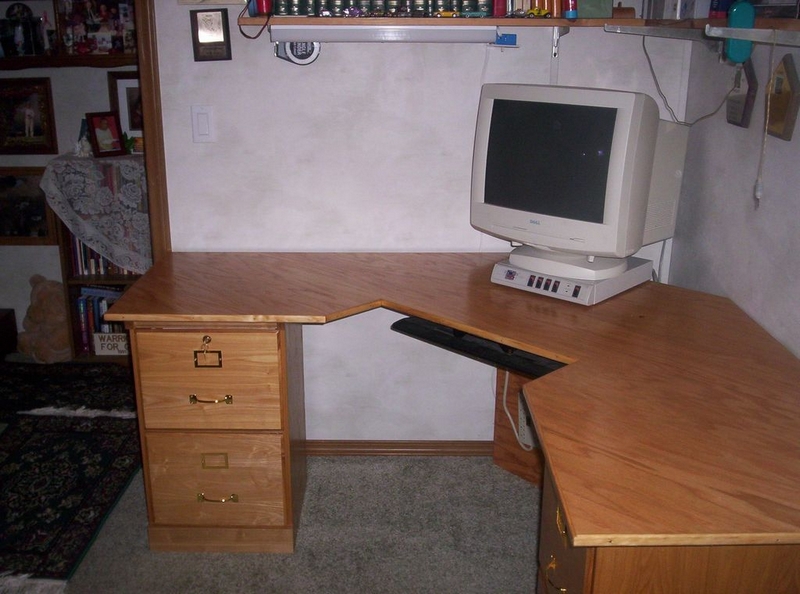
Place the desktops back up on the cabinets where they belong and latch them together. You most likely need a little more support in the middle right under your arms since the latches are the only things holding the top together and they occasionally become uneven.
I used a corner bracket screwed into each side. In elegant perhaps, but each half is level with the other and there is plenty of support for my hands, keyboard, forearms, yada yada yada.


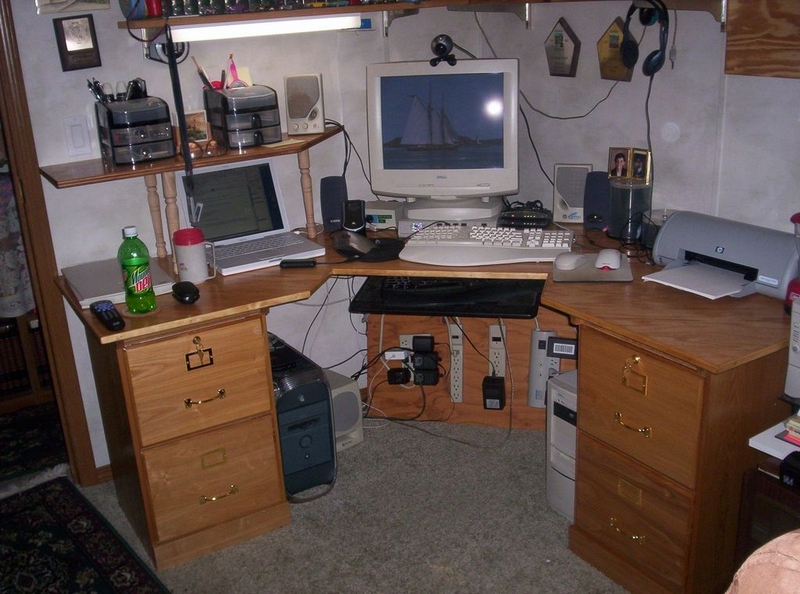
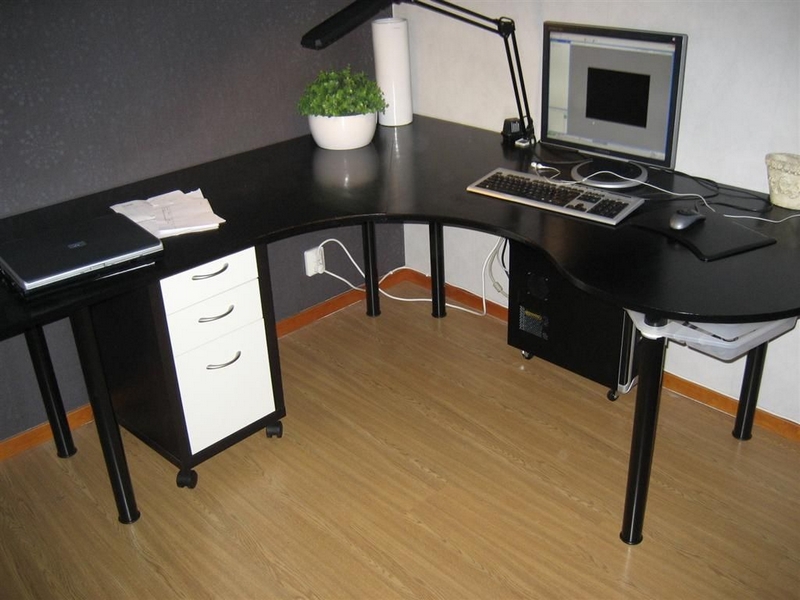
The wrap-around desk is ready to use – enjoy. I have. Mine has been great, even with my honking big desk chair (see picture). The centre sitting area is about 32″ wide – plenty of room in general, and there is a metric buttload of deskspace to fill up

Here’s a great tip: If you want an easy cord pass-through of the desktop, you can cut the corner tip off each desktop half prior to staining. Enjoy!
Thanks to themostbob for this great project.
Ergonomic Considerations for Wrap-Around Desks
Creating an ergonomic workspace is crucial for comfort and productivity, especially for custom furniture like wrap-around desks. These desks offer expansive workspaces ideal for multitasking and creative projects. However, without proper ergonomic considerations, users might experience discomfort or strain.
Below, we outline essential factors to ensure your wrap-around desk supports your well-being.
Desk Height and Chair Alignment
The height of your wrap-around desk should allow you to maintain a neutral posture. Your sitting position should let you rest your elbow on your desk at a 90-degree angle.
Ensure your chair is adjustable to be the same height as your wrap-around desk. Your feet should lie flat on the ground when you sit down. This alignment helps reduce stress on your back and shoulders, making the wrap-around desk more comfortable for extended use.
Monitor Placement
With the ample space a wrap-around desk provides, it’s tempting to use multiple monitors. A good rule of thumb is to have your monitor or monitors positioned an arm’s length away from you and has/have the same level as your eyes.
This positioning helps prevent neck strain and supports better posture. For wrap-around desks accommodating multiple monitors, ensure they are positioned to minimize excessive head turning, which can lead to neck and shoulder discomfort.
Keyboard and Mouse Position
Position your keyboard and mouse within easy reach to maintain straight wrists. This setup prevents strain and supports natural hand movements. A wrap-around desk offers the flexibility to create a dedicated zone for typing and mouse use, which can be particularly beneficial if the desk is used for both computer and non-computer tasks.
Adequate Leg Room and Movement
A key advantage of wrap-around desks is their potential for ample leg space, allowing you to easily change positions and stretch your legs. Ensure there’s enough clearance beneath the desk for comfortable leg movement. Adjusting your position easily throughout the day is vital for circulation and preventing muscle stiffness.
Lighting and Glare
Proper lighting is an often overlooked aspect of desk ergonomics. Your wrap-around desk should be situated to minimize glare on computer screens, which can cause eye strain.
Consider adjustable task lighting to illuminate documents or other items on your desk without increasing screen glare. Natural light is beneficial but should not directly hit computer screens or cause shadows that make viewing difficult.
Incorporating these ergonomic considerations can make your wrap-around desk a healthy, productive workspace centerpiece. Adjustments to height, chair alignment, and equipment placement can significantly improve comfort and efficiency, turning your wrap-around desk into an ergonomic asset that supports your work and well-being.
Click on any image to start the lightbox display. Use your Esc key to close the lightbox. ![]()

Space Optimization Tips
A wrap-around desk is a fantastic solution for maximizing the utility and aesthetics of your workspace, especially in corner areas of a room. You can enhance functionality and organization by effectively utilizing the unique shape and extensive surface area of a wrap-around desk.
Here are several space optimization tips to ensure your wrap-around desk serves your needs while keeping clutter at bay.
Efficient Use of Corner Space
The cornerstone of a wrap-around desk’s appeal is its ability to seamlessly fit into corner spaces, transforming underutilized areas into productive work zones. Consider the positioning of your wrap-around desk to take full advantage of natural light and to align with the flow of the room. This strategic placement optimizes space and contributes to a more energizing and inviting workspace.
Vertical Storage Solutions
Wrap-around desks provide ample desktop space, but keeping the surface uncluttered for productivity is essential. Utilize vertical storage options like shelving units, pegboards, or wall-mounted organizers above the desk.
These solutions can hold supplies, reference materials, and personal items without encroaching on valuable desk space. Additionally, consider integrating a hutch or overhead cabinets designed to complement the wrap-around desk, enhancing storage capacity and accessibility.
Under-Desk Organization
The area beneath a wrap-around desk offers prime real estate for storage and organization. Rolling filing cabinets, CPU holders, or under-desk drawers can keep essential items close at hand without disrupting the desk’s surface area. Cable management systems can also be installed underneath to maintain a clean, uncluttered look by neatly organizing power cords and cables.
Multipurpose Accessories
To fully leverage the extensive workspace of a wrap-around desk, opt for multipurpose accessories that serve various functions without occupying too much space. These are excellent examples of desk organizers with compartments for different supplies, clamp-on monitor arms that free up surface area, and keyboard trays that slide under the desk when not in use.
These accessories enhance the functionality of the wrap-around desk while maintaining a streamlined workspace. Majority of these desk accessories are also affordable at most stores.
Dedicated Zones
Given the expansive nature of wrap-around desks, creating dedicated zones for specific activities can significantly enhance space utilization. Allocate sections of the desk for computing, writing, crafting, or any other tasks you regularly perform.
This helps keep the desk organized and boosts efficiency by minimizing the time spent rearranging items for different tasks.
Implement Desk Dividers
For those who share their wrap-around desk or use it for varied tasks, desk dividers can be a game-changer. They help segment the desk into focused work areas, allowing for simultaneous activities without disruption. Choose lightweight, movable dividers for flexibility, or invest in modular panels that can be customized to fit the unique dimensions of your wrap-around desk.
Use Pull-Out Surfaces
A wrap-around desk can be customized with pull-out surfaces or keyboard trays that tuck away when not in use. These features are especially beneficial for creating additional workspace without permanently occupying room on the desk surface. They’re perfect for temporary tasks that require extra space, such as sorting paperwork or setting up a drawing tablet.
Accessorize with Mobile Storage Units
Incorporate mobile storage units that can fit under or beside your wrap-around desk. These units offer the flexibility to be moved as needed, providing additional storage where and when you need it. Opt for units with a mix of drawers and open shelves to accommodate a variety of storage needs, from files to office supplies.
Explore Above-Desk Shelving
Expand your storage options vertically with above-desk shelving units specifically designed to complement the shape of your wrap-around desk. These shelves can house books, decorative items, or equipment, keeping them within easy reach without crowding your workspace. Adjustable shelving allows for customization based on the size and number of items you need to store.
Incorporate a Monitor Stand or Riser
Elevate your monitor or laptop with a stand or riser to free up valuable desk space underneath. This not only improves ergonomics by raising the screen to eye level but also creates additional room for storing small items or office supplies. Choose a stand with built-in storage options like drawers or compartments for maximum space optimization.
Utilize Clip-On Accessories
Make use of the edges of your wrap-around desk with clip-on accessories. Cup holders, headphone hooks, or small baskets can be clipped onto the desk’s edge, providing convenient storage without taking up desk surface area. This approach keeps essential items within reach and helps maintain a tidy workspace.
Opt for Under-Desk Hooks
Install hooks under your wrap-around desk to hang bags, headphones, or cables. This simple addition keeps these items off the floor and out of the way, contributing to a more organized and clutter-free work environment. Ensure the hooks are strategically placed for easy access without interfering with legroom.
By implementing these space optimization tips, your wrap-around desk can transform into a highly efficient, organized hub for work and creativity. Maximizing the potential of every inch ensures that your workspace meets your functional needs and contributes to a more productive and enjoyable working environment.
FAQ on Building a Wrap-Around Desk
What materials do I need to build a wrap-around desk?
To build a wrap-around desk, you will typically need sheets of plywood or MDF, filing cabinets or legs for support, screws and brackets for assembly, sandpaper, paint or stain for finishing, and optional accessories like cable management tools or a keyboard tray. The choice of materials can vary based on your design preferences and budget.
How do I measure my space for a wrap-around desk?
Begin by measuring the corner or area where you plan to install the wrap-around desk. Note the length of each wall and any potential obstructions like windows or radiators. Consider the desk’s depth and height to ensure it fits comfortably in the space and meets ergonomic requirements for use.
How can I ensure my wrap-around desk is stable?
Use sturdy materials and ensure all joints are securely fastened with screws or brackets. Attaching the desk to wall studs can add stability, as can using filing cabinets or solid legs as the base. Consider adding a back brace or diagonal supports if the desk spans a large area.
How can I incorporate cable management into my wrap-around desk?
Plan for cable management by installing grommets in the desk surface for cords to pass through, attaching under-desk cable trays or clips to keep cords organized, and considering a power strip mount to keep everything within reach. Strategic placement of equipment can also minimize visible cables.
Is it possible to build a wrap-around desk if I have limited DIY experience?
Yes, with careful planning and perhaps some help from more experienced friends or online tutorials. Choose a simple design and take your time with each step. Many community workshops or makerspaces offer tools and guidance for DIY projects, which can be invaluable for beginners.
Conclusion
Building a wrap-around desk offers a custom, space-efficient solution for any workspace, leveraging underused corner areas to create a vast, functional surface. With the right materials, tools, and a bit of creativity, you can design a desk that not only fits your specific needs but also enhances your productivity and comfort. This project stands as a testament to the power of DIY in transforming a simple idea into a personalized and practical piece of furniture.
When you need a DIY table for your home office, check out our PVC table project next!