Last Updated on May 22, 2024 by teamobn
Step 24: The Siding of the pallet playhouse
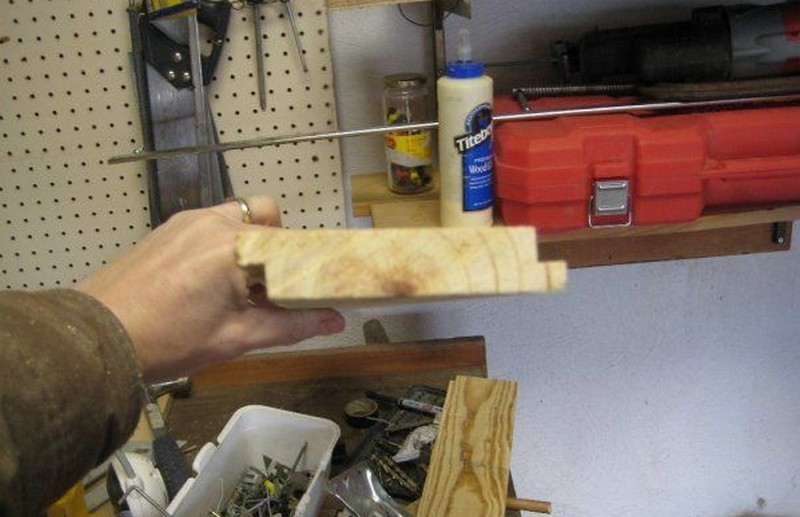

How to side the pallet playhouse was a problem I chewed on for a while. I didn’t want to just butt the 1×4’s together since that wouldn’t be even close to watertight. I finally decided to make my own shiplap siding.
It is installed with the “inside” edge above the “outside” edge. See the picture notes. I have a dado blade for my table saw. Two cuts on each board. About 200 boards. Let’s just say it was something I regretted around board number 75. The second photo shows two pieces of siding together.
Image Notes
1. inside edge
2. outside edge.
Step 25: The Siding, continued
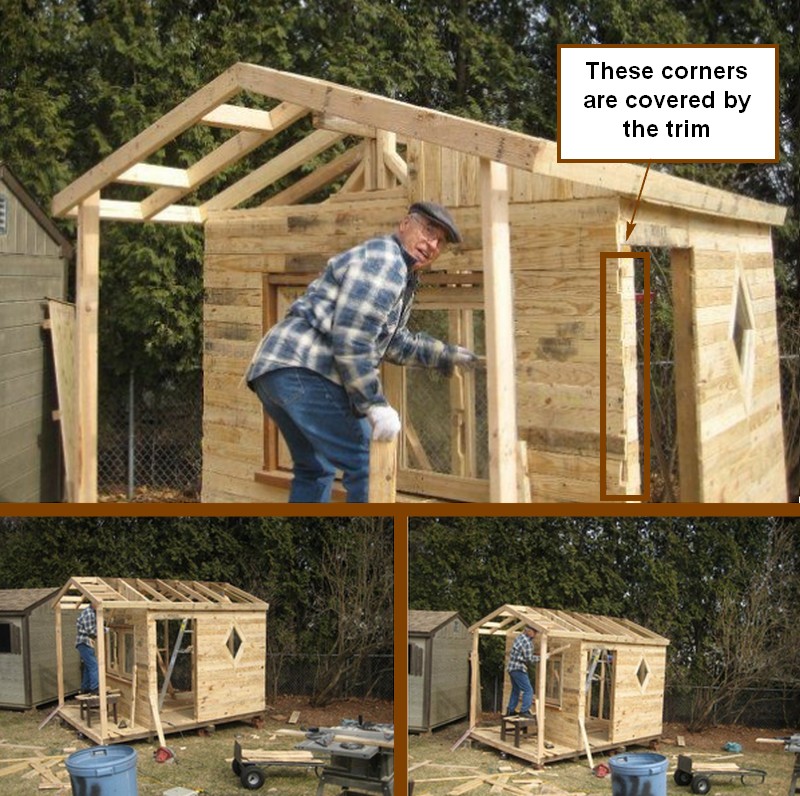
It’s always nice to have some help. This is my father-in-law. He thinks I’m nuts, but he loves a challenge. The shiplap is installed with the inside edge on top, and the outside edge on the bottom. This ensures that rain is kept out and channelled away by gravity.
The vertical butt joints were staggered to add strength, much like the pattern you’d see in bricklaying. They should always meet with a 2×4 member. I used two nails per board for the 1X4, one on each side, and four nails for the 1×6’s, two to a side. The corners of the structure are rough– they’ll be covered over with vertical moulding.
Image Notes
1. Rough corners will be covered with trim board
Step 26: Roofing time
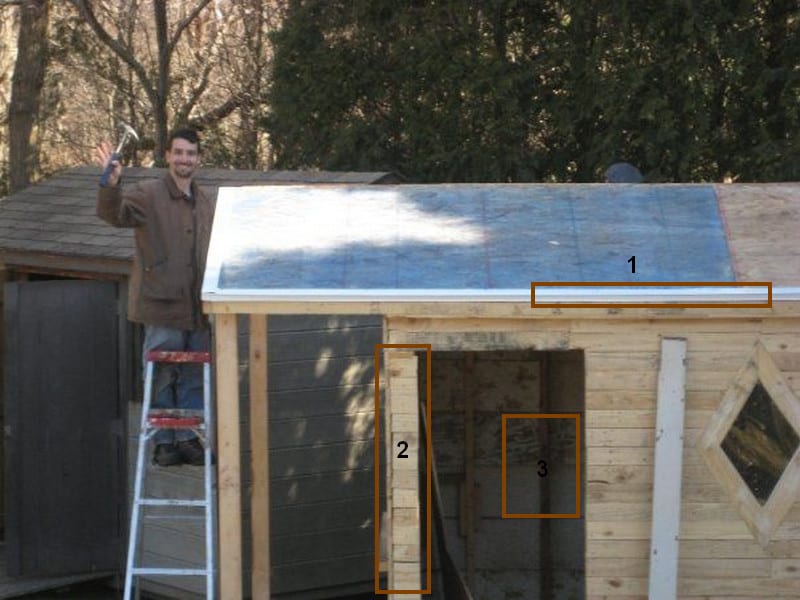
Time to lay the roof deck. This is 5/8 OSB, rated for roofing. It was about $8 a sheet. I also bought (3) 10-foot sections of drip edge at Lowe’s, for about $7.50. If I waited around long enough, I could have gotten them for free off craigslist, I’m sure, but I was pretty happy with the very low amount of cash I’d had to spend.
If you look at the front door, you can see that the back wall is not pallet lumber. I ran out by this point and ended up using some very nice 1×10 boards my father-in-law dug up at his place. They were shelves, 20 years ago. He has stored them under his porch, along with some vintage, turn-of-the-century 6″ mouldings, but he didn’t forget about them.
If you look at the rough door opening, you’ll see that the left edge is very narrow (see note). This was probably the biggest framing mistake I made. Because it was so narrow, I had to rip the beautiful 6″ moulding down to 4″, plus I had to shiplap behind it with tiny little pieces of siding. I should have framed the door out at least 8″ from the corner.
Image Notes
1. drip edge
2. This was way too narrow an area. It cause a lot of trouble later when it was time to put up the moulding.
3. 1×10 shelving, used as siding for the rear.
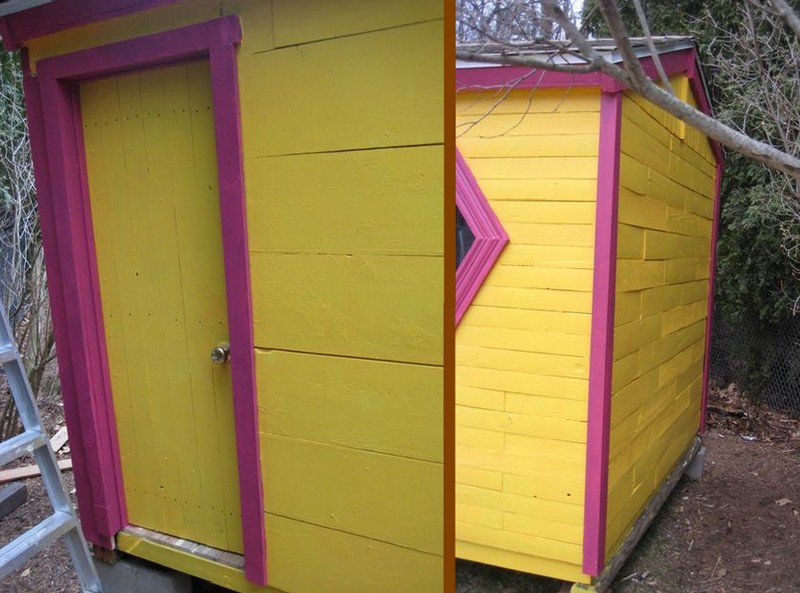
Step 27: The end (almost)

Here it is, the finished project. The shingles were free. My nephew had them left over from a job and very nicely donated to the cause. The mouldings, as I mentioned, were from my father-in-law. They really made a difference. The four-panel front door was a six-panel door I got from a guy on – yep – Craigslist. It was brand new! I cut the little side rails from scrap fence pickets.
We spent a whopping $120 on paint. This was by far the biggest expense, but I am a firm believer in quality paint. Don’t forget a LARGE bucket of exterior wood putty (no more than $8.) Just about every piece of siding had holes from pulled nails.
I later put a laminate floor down and panelled the inside in a pegboard. We added some decorations here and there and the rest is history…
Image Notes
1. These crosses are thin strips of wood glued directly to the glass
2. Scrap fence pickets
Step 28: The end, continued…
You can see the 1X10’s here. I did actually cut a shiplap edge in each board so it would be watertight. The corner beads were salvaged materials, Craigslist, of course.
Here’s the back door. I made it from an old fence panel. I used the final dregs of the 1×4’s and 1×6’s on the inside, installed perpendicular to the vertical pickets. My father-in-law had the door knobs. I made a threshold, later on, to cover the ugly place under the door.
On the right, you can see I had to use 1×6’s on the side, instead of the 1×4’s.
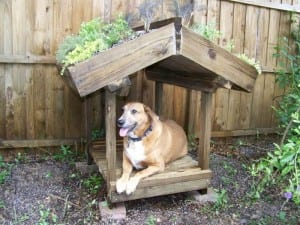
Some other ideas–pallet doghouse
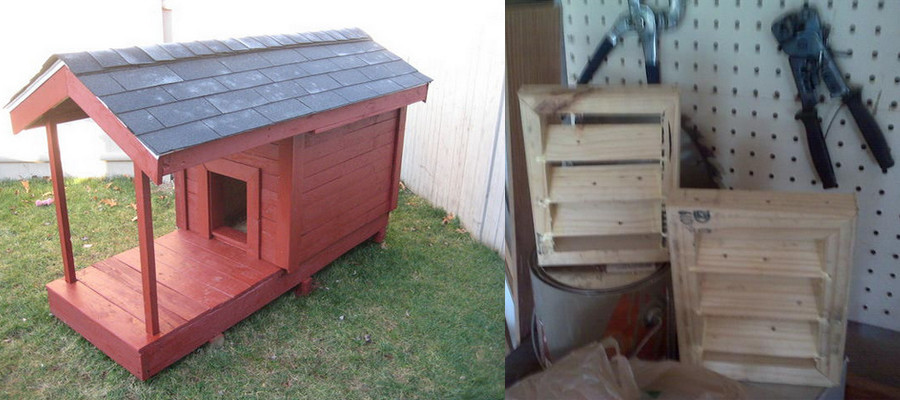
I did some other projects, too, like this pallet doghouse. The design is almost exactly the same as the pallet playhouse. I bought the shingles for $10 a bundle off Craigslist. No freebies this time, unfortunately.
I incorporated some improvements here, the biggest being that I installed gable vents on the roof. I made these from pallets as well. The total cost for this project was only about $35. This time, I used some old, leftover paint.
Thanks to jkratman for allowing us to share this great project!
Here’s the full gallery of images for you to work through…


What do you think? Are you tempted to plan your own pallet project? Share your thoughts in the comments section below…
Want more incredible playhouse ideas? Check out our VW Micro-Bus bunk bed and playhouse guide!