Last Updated on March 9, 2017 by teamobn
If you’ve followed this blog from the start (a big thanks for that), you’ll know that it has been a long series of holes being dug and then being filled again. And the reed bed is no different, except for the fact that it is the last hole!

I’ve read the comments from people worrying about brain-eating amoeba (and just about every other imaginable creature other than crocodiles and irukanji) in a natural swimming pond.
If you look at a continuum of places to swim, a natural swimming pond probably lies in the middle. At one end you’ve got the highly chlorinated, eye burning public pool. At the other end you’ve got lakes, dams, swimming holes etc. I hate to scare anyone, but any rural waterway is going to end up with rotting vegetation, dead animals and poo in it. Not to mention the fish, frogs and other wildlife living, eating and procreating in it. Anything is possible, but the chances are, if you’ve survived swimming in any of the above, then a natural swimming pond will be decidedly cleaner.
The filtration system of a natural swimming pond is the most difficult to get your head around and also the hardest to find technical information on. We ended up having to use a variety of sources, both to explain how and why it works (to the non-believers) and to get the specifications on how to actually “build” one.
At the bottom of this post are some links to sites that provide better technical explanations and diagrams than this non-scientific woman can. But in the interim, it’s digging time.
In one of my very first blogs, I explained that you need to allow a surface area 50% of the size of your swimming area for your reed bed filtration system. In our case that is about 16m2. The depth of the swimming area has no bearing on the size of your filtration system and has to be between about 40cm and 100cm, irrespective of the size of your pond. So we’re digging a hole roughly 9m x 2m with a depth of 600mm (yes, we’re being generous).
The excavater turned the dirt over, but not much else, so we spend a full day shovelling, wheelbarrowing, mattocking shale and refining edges. It’s stinking hot and we’re tired. We’re worried that the shale will puncture a hole in the pond liner we’re using for the reed bed, but thanks to a quick Facebook post, someone offers us some old carpet to act as underlay in the hole.
A new (hot) day dawns and we make a start before the sun is fully up. The carpet goes into the hole, followed by a few old horse rugs and anything else we can sacrifice to make the hole as “soft” as possible. Then we spend a lot of time playing with a piece of heavy duty black plastic that is determined to catch every breath of wind. The girls come in handy as anchor points, sitting in strategic corners while we get everything positioned.

Because the boys are insistent on using the bucket of the tractor to tip the gravel into the hole, we panic some more about puncturing the liner and end up putting old shade cloth and tarps on top of the pond liner to minimise the impact.
Inlet and outlet wells are created from wired meshed garbage bins and surrounded by large gravel and a small hole is cut and glued for the inlet pipe. Finally we start moving gravel and there is literally tonnes of the stuff. The tractor can only access one end of the hole so we are left hand bucketing the stuff for what seems like an eternity.
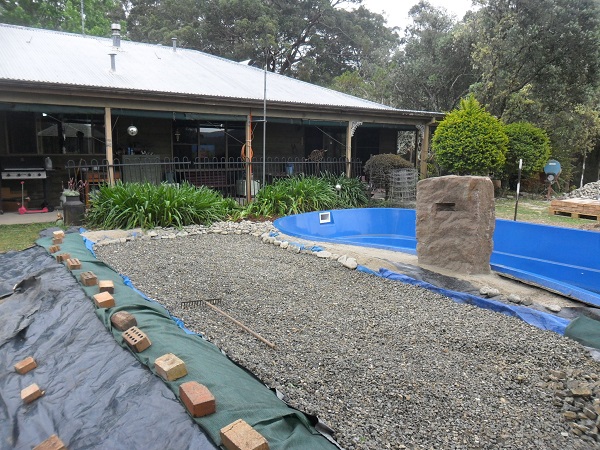
With everything crossed, we start filling the pond, which in turn will fill the reed bed. Paranoia abounds as to whether we have somehow punctured the liner. But it’s all good. The water level holds steady for the rest of the week!
It’s working bee day. We’ve got a great cast of friends here to help build a retaining wall, get a proper fence installed and plant out the reed bed. It’s an exciting day. While the boys get busy on the heavy duty construction, the girls (big and small) head off on a nature hunt in the dams and water courses on the property.
We return with a variety of specimens and with a bit of help from Google and cross referencing with books on plants, we’ve lucked it in on finding suitable (and recommended) species. The roots get rinsed off and the leaves are given a serious hair cut, to promote growth. I spend the afternoon waddling around in several inches of water, planting reeds.

It’s a great day with friends we are grateful for having and a “to do” list that has a lot less on it!
The technical stuff:
Mount Isa in Central Australia uses a reed bed filtration system for their supply of town potable (aka drinking) water. If you can drink it, you can swim in it!
http://www.mountisawater.qld.gov.au/water-supply-clearwater.php
http://www.mountisawater.qld.gov.au/pdfs/mountisawaterboard-waterqualityfeature.pdf
Not being able to find technical details on how to construct a reed bed for a natural swimming pond, we ended up designing the reed bed based on the specifications of reed beds for the purposes of treating sewerage and waste water. Nothing like a bit of over-engineering, but again, if it can clean black water (think toilet) and grey water (washing machines, dishwashers etc), then surely the system will work for filtering anything out of a swimming pond.
This document really was our go to, as it has diagrams, gravel sizes, flow rates, etc. and because the area is only a few hours north of us, it allowed us to use the same reeds (as they are native to our area too).
http://www.aila.org.au/canberragarden/water/Reedbed.pdf
Finally, we are lucky to live on a rural property where we could access our own native water plants. Do your research into what grows well in your own area. If you live in suburbia, head out to your nearest rural area. Ask a friendly farmer if you can take some water weeds from their dam. They’ll probably be happy for you to take them for free!
We’ve got a few more hurdles to jump over, but the end is in sight. I hope you’ll stay with me to the finish line. 🙂
Share the love by leaving your comments or questions in the Comments Box below.
Rebecca
Part 9: The Last Post!

