If you’ve got an old dresser that’s looking a bit worn out, don’t get rid of it – give it a makeover instead! With a bit of elbow grease and some creativity, you can transform an outdated dresser into a stylish piece of furniture.
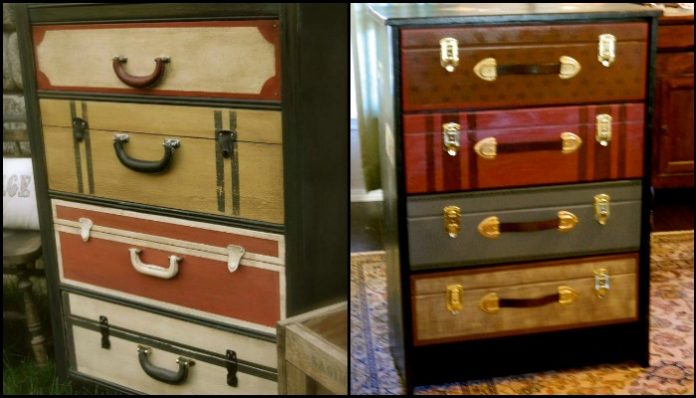
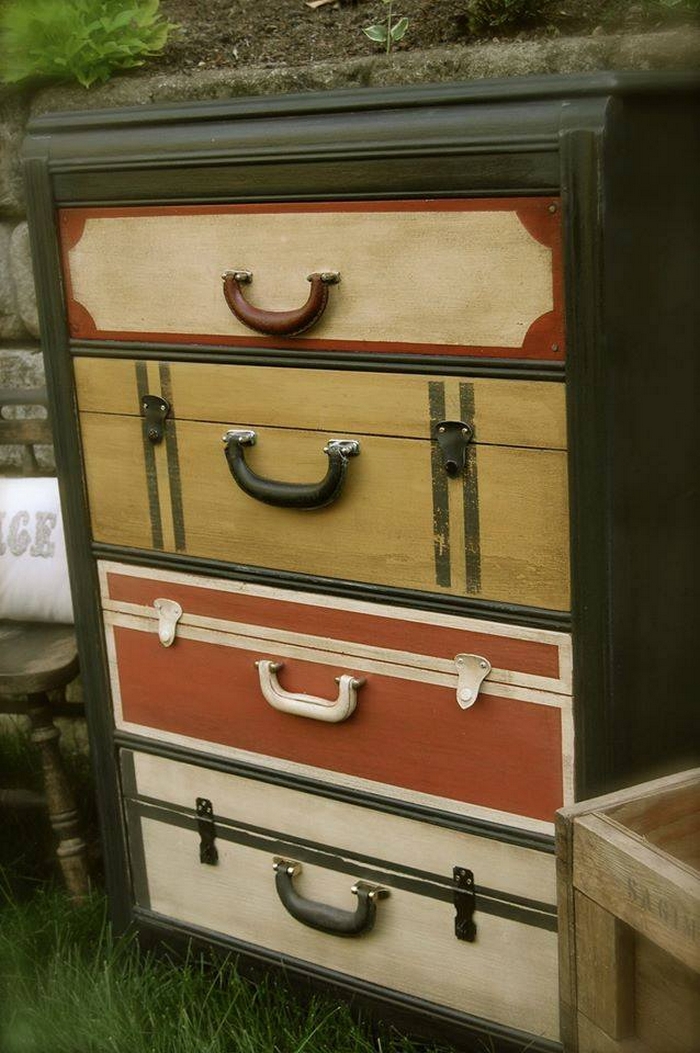
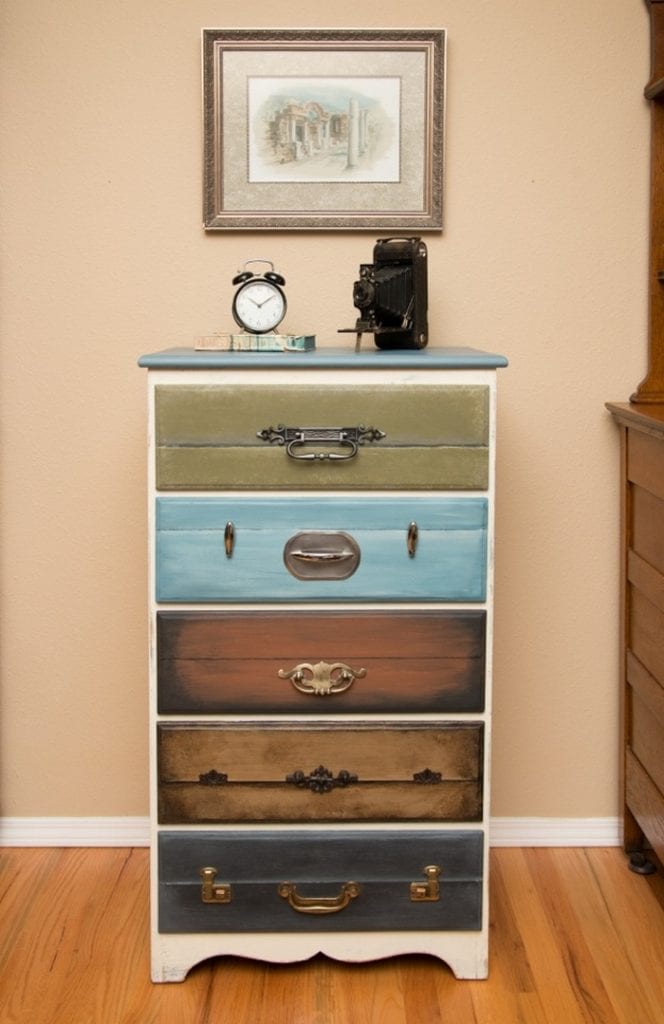
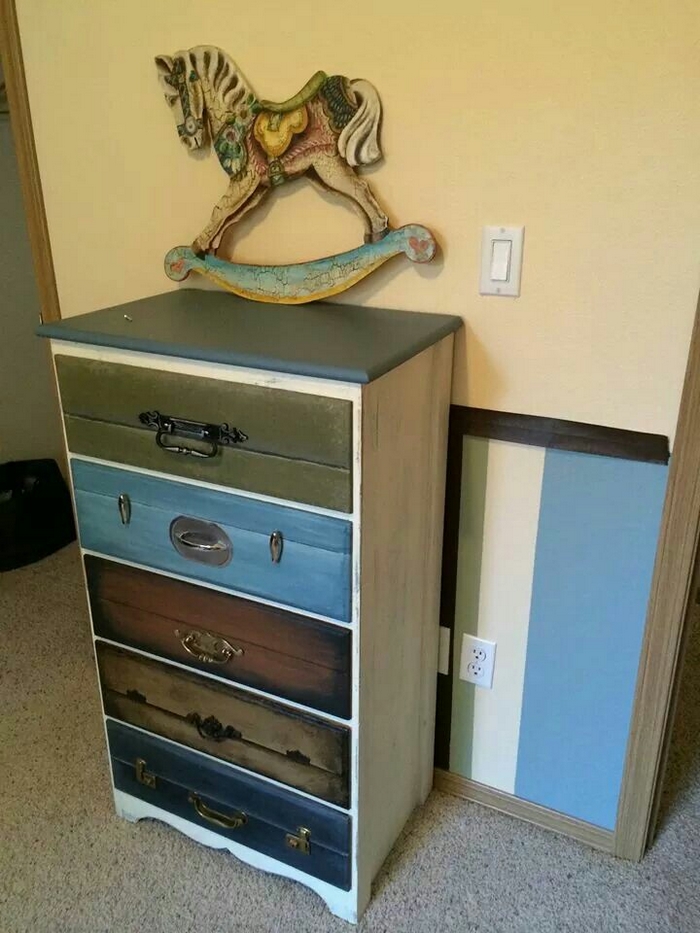
If you’re struggling to come up with a good design for your old dresser makeover, you might want to consider this faux suitcase-painted furniture idea. It’s a simple way to add some visual interest to your dresser, and it’s also a great way to upcycle an old suitcase that you might have lying around.
A faux suitcase is a type of luggage that is designed to look like a real suitcase but is actually much cheaper and less durable. Faux suitcases are often made of plastic or composite materials and are often used as a cheaper alternative to real suitcases. However, because they are not as durable as real suitcases, they are not ideal for long-term use or for carrying heavy items.
In this project, you will be painting your old dresser with a design that makes it look like it is made out of old suitcases. This is a great way to give new life to an old piece of furniture, and it can also be a lot of fun. The more detailed the paintings are, the better. faux suitcase-painted furniture should look very realistic for them to look really nice.
If you want your project to look realistic, it is important to create texture to mimic the look and feel of real fabric, leather, or wood. Pay attention to shadows and highlights to further add depth and realism. With careful attention to detail, your project will look amazing!
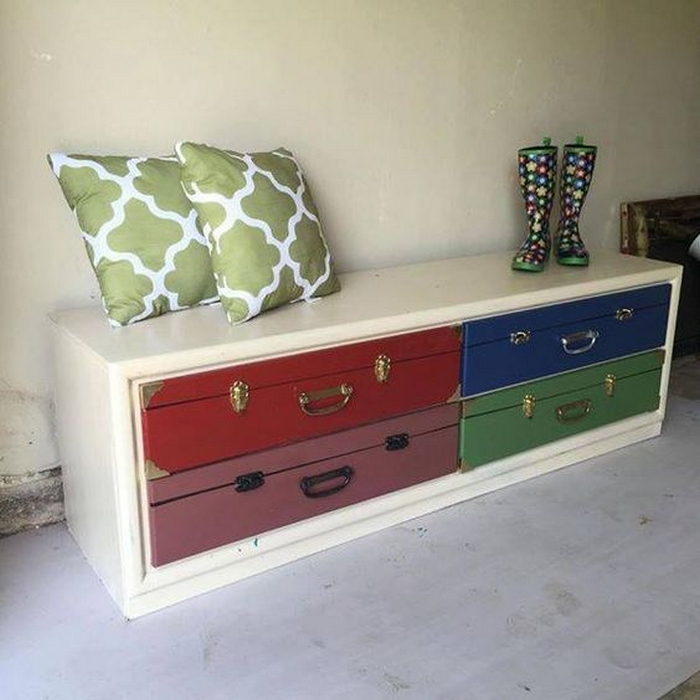
If you have some extra money to spare, consider purchasing some vintage design hardware such as clasps and corner brackets. These items will help complete the look of your faux suitcase drawers and give them a more authentic appearance.
Need inspiration? You can get plenty from our album below! 🙂
Contents
Building a Faux Suitcase-Painted Furniture
Materials
- Old Dresser
- Leather Strips
- Vintage Suitcase Clasps
- Vintage Suitcase Corner Brackets
- Screws
- Various Colours of Paint
- Adhesive/Glue
Tools
- Measuring Tape
- Paintbrushes
- Drill
- Sander
Instructions
Step 1: Prepare the Dresser
- Clean the Dresser: Start by cleaning the dresser thoroughly to remove any dust, dirt, or grime.
- Sanding: Use a sander to sand down the entire surface of the dresser, including the drawers. This step ensures that the paint adheres properly and creates a smooth finish.
Step 2: Design Planning
- Measure and Plan: Use a measuring tape to plan where the leather strips, clasps, and corner brackets will be placed. Mark these positions lightly with a pencil.
- Color Selection: Choose your colors. Consider traditional suitcase colors like browns, blacks, or burgundies, or go bold with more vibrant colors.
Step 3: Base Coat
- Paint the Base Coat: Apply a base coat of paint to the entire dresser. Let it dry completely. This might take a few hours, so be patient.
Step 4: Detailing
- Paint Stripes: Once the base coat is dry, start painting stripes or patterns that mimic the look of a suitcase. Use different colors to create contrast.
- Create Texture: To add a realistic texture, you can use techniques like sponging or stippling in areas to mimic fabric or leather textures.
Step 5: Apply Clear Sealer
- Protective Coat: After all the paint has dried, apply a clear sealer over the painted areas to protect your work and give the dresser a glossy finish.
Step 6: Attach Hardware
- Install Clasps and Brackets: Position the vintage suitcase clasps and corner brackets where you planned. Use a drill to make any necessary holes, and then attach the hardware with screws.
- Add Leather Strips: Cut the leather strips to the required lengths. Attach them to the faux suitcase-painted furniture using adhesive or by nailing them down for extra durability.
Step 7: Final Touches
- Check and Secure: Go over each attachment point to ensure everything is securely attached. Tighten any loose screws and add more adhesive if needed.
- Clean Up: Wipe down the entire dresser to remove any dust or debris from the installation process.
Step 8: Enjoy Your New Piece
- Place the Dresser: Now that your faux suitcase dresser is complete, place it in its new spot. It’s ready to be used and admired!
Click on any image to start the lightbox display. Use your Esc key to close the lightbox. ![]()

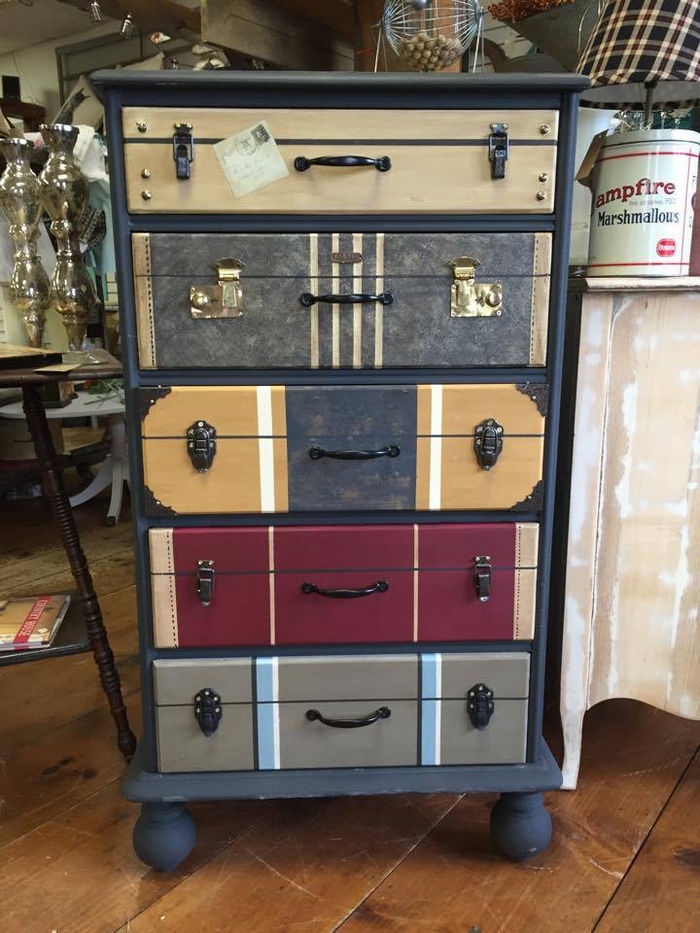
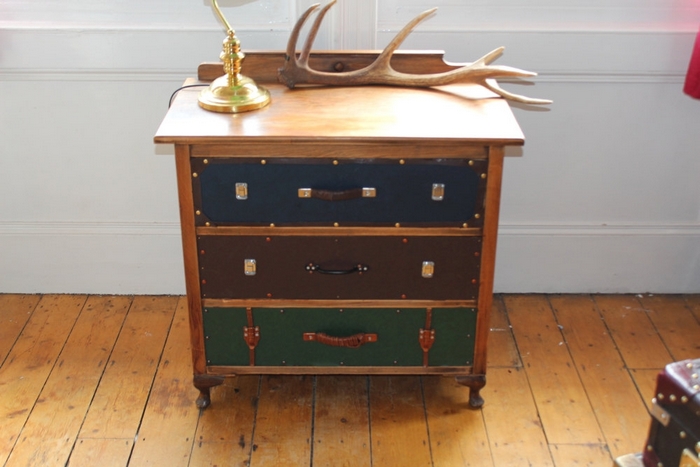
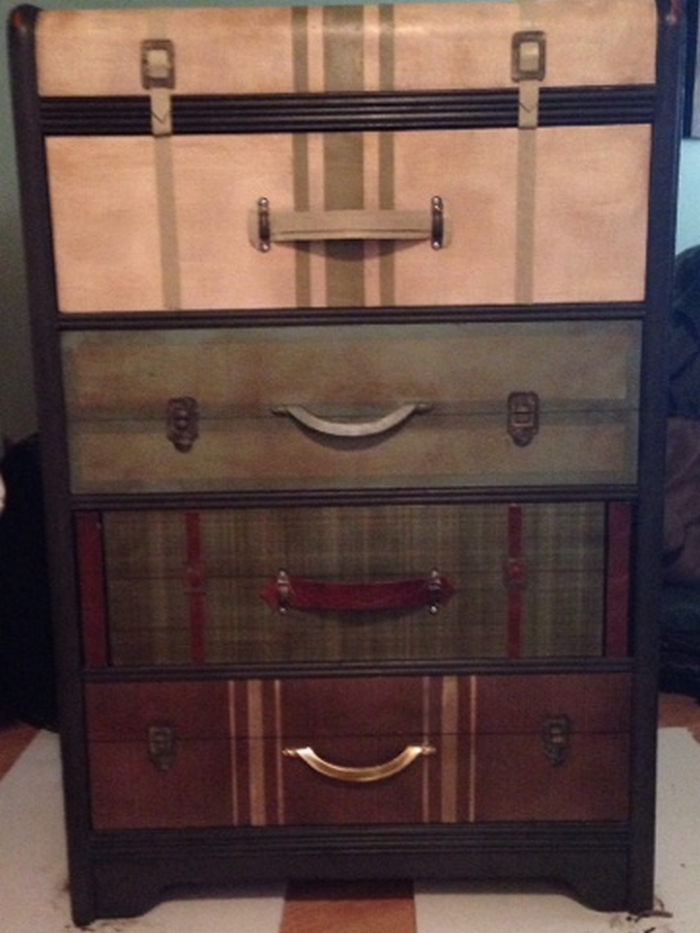
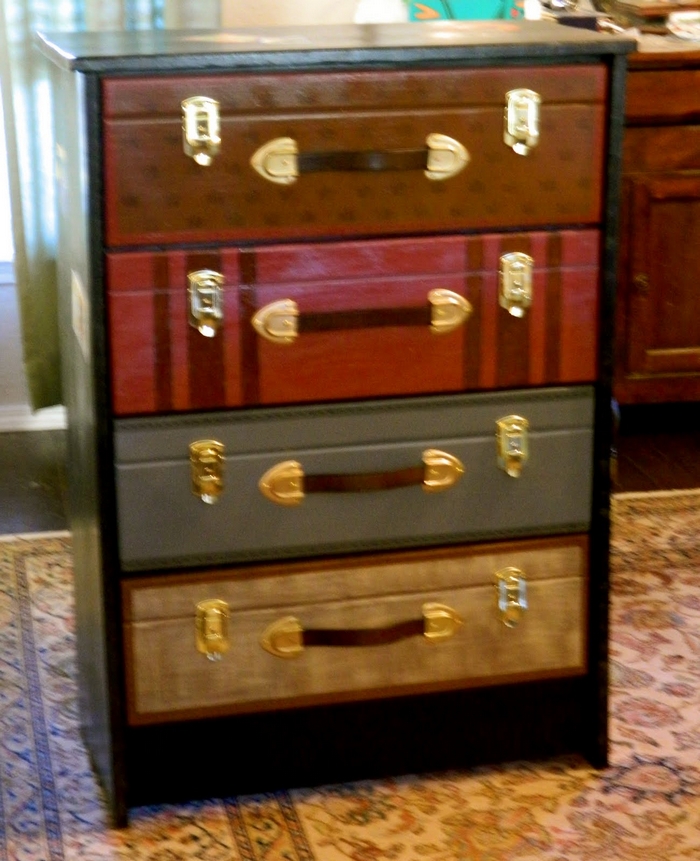
What do you think of this old dresser makeover project? Would you want to have faux suitcase-designed drawers in your room? Well, you can get more details from Lynn Rollins over at Again… Furniture and More!
Materials Guide for Faux Suitcase Furniture
Creating faux suitcase-painted furniture is an exciting way to add character and vintage charm to your living space. Whether you’re transforming a dresser, a side table, or a cabinet, the right materials can make all the difference in achieving an authentic and durable finish.
Here’s a comprehensive guide to the materials you’ll need to bring your faux suitcase-painted furniture project to life.
Paints
- Acrylic Paints: These are versatile and dry quickly, offering a durable finish suitable for faux suitcase-painted furniture. Opt for high-quality acrylic paints that offer good coverage and a rich color palette.
- Chalk Paints: Ideal for creating a distressed look that is often associated with vintage suitcase styles. Chalk paints adhere well to various surfaces without the need for priming.
- Metallic Paints: Use these to add details that mimic metal parts of a suitcase, such as corners and locks.
Adhesives and Glues
- Wood Glue: Essential for attaching wooden parts securely when modifying or repairing furniture structures.
- Epoxy Resin: Perfect for creating a hard, durable surface that can resemble the glossy finish of certain suitcases.
- Contact Cement: Best for attaching leather and fabric materials to faux suitcase-painted furniture as it provides a strong bond and dries quickly.
Fabrics and Textiles
- Leather or Faux Leather: These materials can be used to cover parts of your furniture, providing a rich, authentic suitcase appearance.
- Canvas: A sturdy fabric that can be painted and treated to look like an old suitcase.
- Velvet: Ideal for lining the inside of drawers or boxes, adding a luxurious touch to your faux suitcase-painted furniture.
Hardware
- Vintage Suitcase Clasps: These are essential for adding realistic detailing to your faux suitcase-painted furniture, making it appear like it could be a functional suitcase.
- Corner Brackets: Typically made from metal, these brackets not only add to the aesthetic but also reinforce the structure of your faux suitcase-painted furniture.
- Handles: Choose leather handles for a classic look or metal handles for a more industrial suitcase style.
Protective Finishes
- Polyurethane: This comes in both water-based and oil-based forms and is excellent for protecting painted surfaces from wear and tear.
- Wax Finish: Particularly useful if you’re using chalk paint, as it enhances the color and provides a protective coating.
- Clear Sealer: A must-have for any painted furniture project to ensure the longevity of your work, preventing chips and scratches.
Tools and Sundries
- Sandpaper and Sanders: Needed to prepare your furniture for painting by smoothing out the surface and removing old finishes.
- Paintbrushes and Rollers: Essential for applying paint and finishes. Opt for high-quality brushes to avoid bristle loss and achieve a smooth finish.
- Measuring Tape and Rulers: Ensure that all additions and modifications are accurately measured.
Selecting the right materials for your faux suitcase-painted furniture project is crucial for achieving both the desired aesthetic and long-lasting durability. By carefully choosing each component, from paints to hardware, you can transform an ordinary piece of furniture into a stunning, suitcase-inspired showpiece that captures the nostalgia and elegance of vintage travel.
DIY Custom Hardware for Faux Suitcases
Custom hardware can transform simple furniture into exquisite pieces that capture the essence of vintage travel. For enthusiasts of faux suitcase-painted furniture, creating and installing your own hardware allows for complete customization, ensuring each piece is as functional as it is decorative.
Types of Custom Hardware
Clasps
- Function and Flair: Clasps are central to the suitcase look, serving both a functional and decorative role. They secure the contents theoretically and add a focal point to the design.
- DIY Tips: You can craft clasps from metal plates, bending them into shape and attaching them with rivets or screws. For a rustic look, apply a patina finish or use metallic paint.
Corner Brackets
- Structural Integrity: Corner brackets reinforce the corners of the furniture, preventing damage and wear while enhancing the suitcase’s realism.
- DIY Tips: Using thin metal sheets, cut triangular or quadrant shapes tailored to fit the corners of your piece. These can be painted to match or contrast with the body of your faux suitcase-painted furniture, then attached using small screws.
Handles
- Practical Touches: Leather handles are not just practical for the hypothetical mobility of the suitcase; they also add a luxurious touch, reminiscent of old-world luggage.
- DIY Tips: Cut sturdy leather strips to the desired length. Attach metal end caps for durability and style, and secure the handles onto the furniture with strong adhesive and screws.
Decorative Straps
- Visual Interest: Decorative straps wrap around the piece, mimicking the look of a suitcase being securely fastened. This element is particularly striking on larger pieces.
- DIY Tips: Use faux leather or canvas straps, securing them with custom-made buckles or additional clasps for an authentic look.
Enhancing Your Faux Suitcase-Painted Furniture
Each type of hardware not only adds functionality but also serves to complete the visual narrative of the piece. By incorporating elements typical of traditional suitcases, you reinforce the thematic integrity of your furniture, making it a standout addition to any décor.
- Consistency in Design: Ensure all hardware pieces share a cohesive style and finish to maintain a unified look for your faux suitcase-painted furniture.
- Attention to Detail: Small details, such as matching the color of screws with the hardware or adding subtle aging effects, can significantly boost the authenticity of your DIY project.
Crafting your own custom hardware for faux suitcase-painted furniture is a rewarding endeavor that elevates your furniture from mere functional pieces to artful imitations of vintage charm. Through the thoughtful addition of clasps, corner brackets, handles, and decorative straps, your furniture will capture the imagination and admiration of all who see it, making it not just a piece of furniture but a storied artefact of a bygone era.
Conclusion
Creating faux suitcase-painted furniture allows you to transform ordinary pieces into unique, vintage-inspired showpieces. Each step, from selecting paints and fabrics to adding custom hardware, is an opportunity to infuse creativity and personal style into your home decor. This DIY project not only rejuvenates old furniture but also adds a touch of nostalgic elegance to any room.