Last Updated on November 25, 2024 by teamobn

A workbench is an essential piece of equipment for any serious DIYer. This is where different projects come from. It pays to ensure the workbench is stable for any kind of work such as sawing and drilling. Not only does the workbench serve as a work area, it should also hold all of their tools and small materials.
This is a perfect project for DIYers who don’t have the luxury of a spacious workshop. Having used his kitchen table for various projects, this DIYer needed a dedicated work area.
He decided to use the wall space in his garage as a workbench. The problem is that the garage doesn’t have extra space when the vehicles are inside.
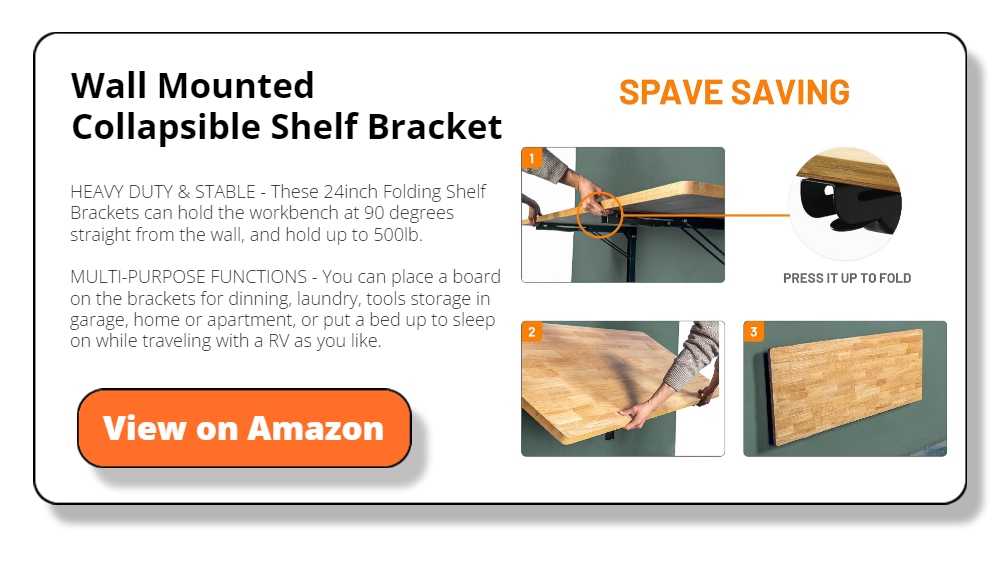
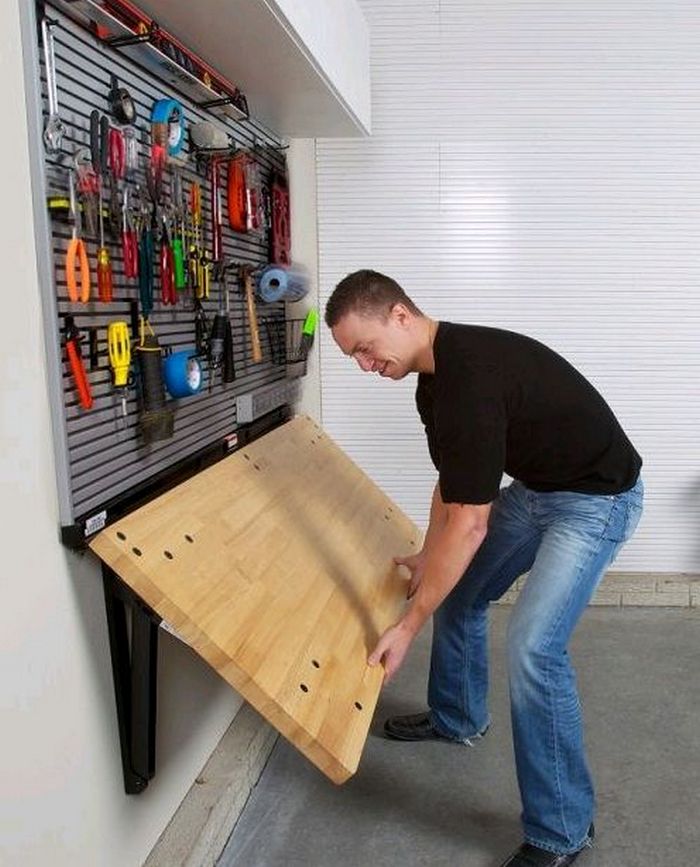
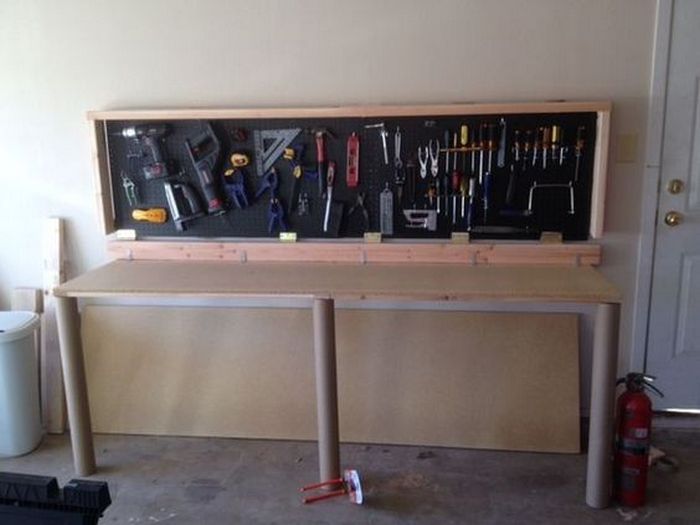
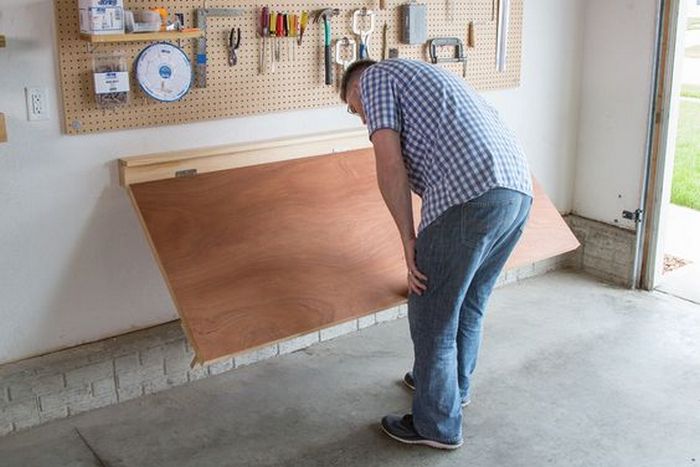
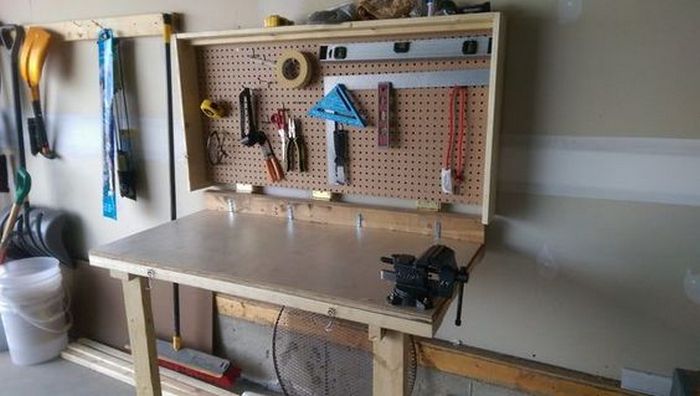
The solution is a folding mechanism. This gives you a workbench that can be folded away when not in use. It also serves as space-saving storage for tools that you can conveniently access while working on your projects.
As you can see from the material list, building a bench like this won’t cost you a fortune. All of the needed materials are easily found in your local hardware store. The project only requires basic woodworking tools and skills to accomplish the project.
Click on any image to start the lightbox display. Use your Esc key to close the lightbox.
Contents
- 1 Making Your DIY Folding WorkBench
- 2 Customizing Your Workbench
- 3 Tool Organization
- 4 Safety Tips
- 5 FAQ for DIY Workbench Article
- 5.1 How much space do I need for a DIY workbench?
- 5.2 Can I build a DIY workbench with limited woodworking skills?
- 5.3 What materials are best for a durable DIY workbench?
- 5.4 How do I ensure my DIY workbench is stable?
- 5.5 What is the ideal height for a DIY workbench?
- 5.6 Can I modify my DIY workbench later?
- 5.7 How do I maintain my DIY workbench?
- 5.8 What tools do I need to build a DIY workbench?
- 5.9 Are there ways to keep myself safe while building my workbench?
- 5.10 What is the estimated building time for my own DIY workbench?
- 6 Conclusion
Making Your DIY Folding WorkBench
Materials:
- 2’x4′ 2 EA Pegboard
- 1x3x8′ 3 EA Cedar
- 1x4x12′ 1 EA Pine
- 2x4x8′ 3 EA Pine Stud
- 1 piece 4’x8′ sheet Particle Board (or any other surface desired for the workbench)
- 3″ 3 EA Core Butcher Paper Roll (or 2×4’s or metal fence posts)
- 7 pieces 3” Door Hinges
- 2 pieces 2″ Hooks
- 4-6″ Small Chain
- 50ct 3″ Wood Screws
- 100ct 1-1/2″ Wood Screws
- 100ct 1″ Wood Screws
- 50ct 1/2″ Wood Screws
Tools:
- Drill (with Phillips head & various size drill bits for pre-drilling holes)
- Circular Saw
- Tape measure
- Sander
- Stud Finder
- Clamps
- Level
- Saw Horse (or any temporary work surface)
Cuts:
- Particle Board – ripped @ 23″1x3x8′
- Cedar: 4 pieces 44-1/4″; 3 pieces 23″
- 1x4x12′ Pine: 6 equal pieces
- 2x4x8′ Pine Studs: 2 pieces 20″; leave the other 2 studs full length
Steps to make this DIY workbench:
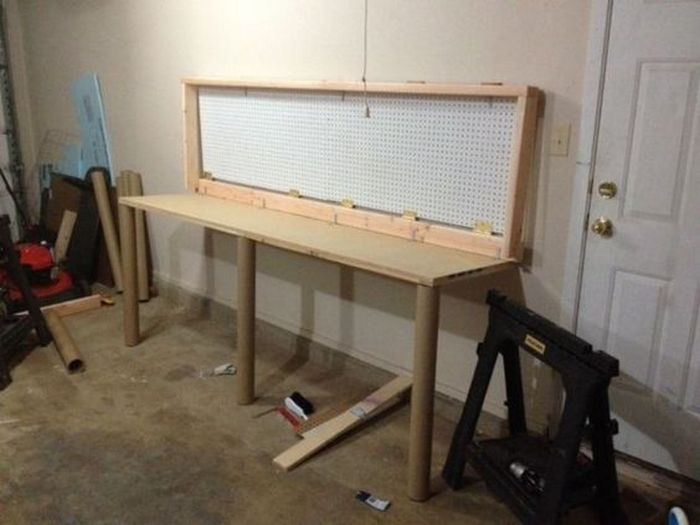
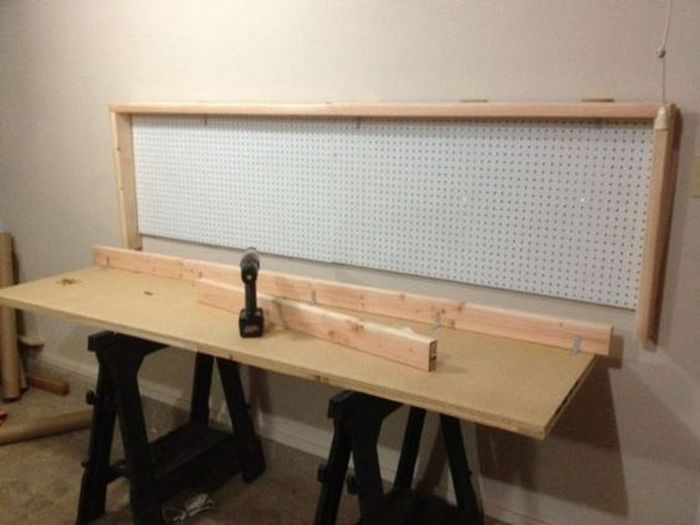
Layout the 1×3 Cedar trim on the side of the particleboard that is exposed when the workbench is closed. As shown in the photo below, there are 3 vertical slats, 2 bottom, and 2 top horizontal pieces. Pre-drill your Cedar pieces before screwing them down the particle board – prevents wood from splitting, and easier to drill down the screws.

Flip the work desk over and attach one 2×4 to the edge that will attach to the wall. Secure the stud with 3″ screws from the trim side into the stud. Then attach 6 pieces of 2×2 corner braces on the other side with 1/2″ screws.

The next step is to mount the pegboard. Using the stud finder mark the studs and the desired workbench height on the wall. Also, mark the alignment of the bottom of the 1×4 Pine slats at around 4-5″ above your workbench height. It is important that these are aligned – the top of the slats don’t matter. Attach the 1×4 Pine slats, with the studs on the center of course. 🙂


Place your work desk on two sawhorses or any support that could hold the work desk for you. It is best if these supports places the work desk at your desired height.

Mark the hinges respective to the Pine slats that mount your pegboard, and also on the 2×4 backboard attached to your work desk.

NOTE: Secure the hinges on the workbench first before attaching it to the pegboard.

Double-check your work; see if the hinges are installed properly and that there aren’t any issues with opening and closing the work desk. Then, in this particular example, the cores used came with plastic plugs that go into the end. These plugs are installed on the trim side of the work desk, as shown in the photo below. But your table leg installation would depend on the material you plan to use. 🙂

Attach the frames around the pegboard. Use 2×2 corner braces to hold the frames by attaching them to the pegboard support slats. And that’s it!

If the sides are too unsteady for you, you can glue a wood piece to the frame (NOT the wall).

For storage of the table legs, position some nails halfway on the top frame to hold the legs.

And you are done! 🙂

Thanks to WorkBoots09 for this idea!
Customizing Your Workbench
A folding workbench is more than just a space-saving tool; it’s a canvas for your creativity and efficiency. Customizing your folding workbench transforms it into a personalized workspace that meets your unique needs.
Add a Personal Touch
Customizing your folding workbench starts with aesthetics. Choose a color or finish that complements your workspace. Consider a protective coating to safeguard your folding workbench against wear and tear.
Magnetic Tool Holder
Install a magnetic strip on your folding workbench. This smart addition keeps your tools organized and easily accessible. It’s a simple yet effective way to enhance the functionality of your folding workbench.
Power Up
Adding a power strip to your folding workbench is a game-changer. It provides convenient access to electricity, allowing you to use power tools right on the workbench. This addition makes your folding workbench a workspace and power hub.
Lighting
Good lighting is crucial. Add an LED strip or a clip-on lamp to your folding workbench. This ensures ample light, making your workbench more versatile and suitable for detailed projects.
Ergonomic Enhancements
Enhancing the ergonomics of your folding workbench is vital. Consider adding adjustable stands or a padded footrest. These additions ensure comfort during long work hours, making your folding workbench efficient and comfortable.
Tool Racks and Holders
Incorporate tool racks or holders into your folding workbench design. This setup keeps your most-used tools within arm’s reach. It’s a practical way to streamline your workflow and enhance the utility of your folding workbench.
Folding Workbench Cover
A custom cover for your folding workbench can protect it from dust and damage when not in use. This cover can be simple, like a canvas cloth, or more elaborate with pockets for additional tool storage.
Integrated Measuring Tools
Embed measuring tapes or rulers into the surface of your folding workbench. This integration turns your workbench into a more functional workspace, allowing for precise measurements directly on the bench.
By customizing your folding workbench, you create a space that’s functional and reflects your style and needs. These tweaks make your folding workbench an indispensable part of your DIY activities.
Tool Organization
Organizing tools efficiently is key to maximizing the functionality of your folding workbench. Proper tool organization ensures everything you need is at hand, saving time and tidying your workspace.
Utilizing Pegboards
A pegboard is an essential addition to your folding workbench. It allows you to hang tools in a visible and accessible manner. Customize the pegboard with hooks and holders to fit various tools, optimizing your folding workbench’s space.
Drawer Units Underneath
If your folding workbench design allows, add drawer units underneath. These drawers are perfect for storing smaller tools and hardware, keeping them out of sight but within easy reach when working on your folding workbench.
Hanging Containers
Attach small hanging containers or bins to the sides of your folding workbench. These can hold screws, nails, and other small items. This solution keeps these tiny yet essential items organized and easy to find.
Labeling for Efficiency
Label drawers and bins on your folding workbench. Clear labels help you quickly find what you need without wasting time searching. This simple step can greatly enhance the efficiency of your folding workbench.
Implementing these tool organization strategies lets your folding workbench become a well-organized and highly functional workspace, allowing you to focus on your projects with everything you need in its proper place.
Safety Tips
Safety should always be a top priority when working at your DIY workbench. Proper safety measures prevent accidents and ensure a pleasant and productive working environment.
Correct Tool Use and Maintenance
Maintaining and correctly using tools at your DIY workbench is vital for both safety and efficiency. Here’s how to ensure your tools are in top condition:
Regular Inspection and Maintenance
Regularly inspect your tools for signs of wear or damage. Sharpen blades and drill bits as needed to keep them effective. Check for loose components, and tighten them. This not only ensures safety at your DIY workbench but also improves the performance of your tools.
Handling Power Tools
When using power tools at your DIY workbench, read and follow the manufacturer’s guidelines. Ensure the tools are disconnected from power when not in use or while making adjustments. Regularly check power cords for fraying or damage to prevent electrical hazards.
Cleaning and Storage
After each use, clean your tools before storing them. Dust, dirt, and grime can cause tools to deteriorate over time. Proper storage is also crucial. Organize tools in a way that they are easy to access and not overcrowded, which can lead to accidents at your DIY workbench.
Upgrade Tools When Necessary
Don’t hesitate to replace tools that are beyond repair. Using damaged or outdated tools can be dangerous and inefficient. Upgrading your tools can enhance safety and functionality at your DIY workbench.
Adopting these practices ensures a safer, more efficient, and enjoyable experience at your DIY workbench. Proper tool use and maintenance not only protect you but also contribute to the success of your projects.
Adequate Lighting
Ensuring adequate lighting at your DIY workbench is essential for safety and precision in your projects. Here’s how to achieve optimal lighting:
Types of Lighting
Consider different types of lighting for your DIY workbench. Overhead lighting provides general illumination, while task lighting, such as adjustable lamps, can shine directly on your work area. LED lights are a great choice for their brightness and energy efficiency.
Positioning and Angles
Position lights to minimize shadows on your work area. The light should come from multiple angles to cover the entire workspace at your DIY workbench. Adjustable lights are ideal as they can be moved and directed where needed.
Avoiding Glare
Be mindful of glare, which can be as problematic as poor lighting. Position lights so they don’t reflect off shiny surfaces into your eyes. This consideration is crucial for maintaining visibility and reducing eye strain at your DIY workbench.
Eye Strain Prevention
Choose lights with a color temperature that suits you to prevent eye strain further. Some prefer warmer lights, while others work better under cooler, daylight-like conditions. This personalization helps in reducing fatigue and maintaining focus on your DIY workbench.
By focusing on these aspects of lighting, you enhance both safety and functionality at your DIY workbench. Adequate lighting not only prevents accidents but also improves the overall quality of your work.
Safety Gear
Having the right safety gear at your DIY workbench is crucial to protect yourself from common workshop hazards. Here’s a breakdown of essential safety items and their importance:
Safety Goggles
Eyes are vulnerable to flying debris, dust, and chemical splashes. Safety goggles provide a protective barrier against these hazards. Choose goggles that fit well and offer both front and side protection for comprehensive eye safety at your DIY workbench.
Gloves
Gloves protect your hands from cuts, abrasions, and exposure to harmful substances. Use heavy-duty gloves for handling rough materials and precision gloves for detailed work. Ensure the gloves fit well and do not hinder your dexterity while working at your DIY workbench.
Ear Protection
Power tools can be loud, and prolonged exposure to this noise can damage hearing. Use ear protection like earplugs or earmuffs when operating loud machinery at your DIY workbench. This is especially important during extended work sessions.
Dust Masks or Respirators
Inhaling dust and fumes can be harmful. A dust mask is essential for general work, while a respirator is needed for more toxic materials like certain paints and solvents. Proper respiratory protection is crucial for maintaining healthy lung function at your DIY workbench.
Additional Protective Gear
Depending on your project, consider other protective gear. This might include a face shield for extra face protection, aprons or coveralls to protect your clothing, and safety shoes to shield your feet from heavy objects at your DIY workbench.
Equipping yourself with these safety items reduces the risk of injuries and health issues. This gear keeps you safe and lets you focus on your work at the DIY workbench with peace of mind.
FAQ for DIY Workbench Article
How much space do I need for a DIY workbench?
Can I build a DIY workbench with limited woodworking skills?
What materials are best for a durable DIY workbench?
How do I ensure my DIY workbench is stable?
What is the ideal height for a DIY workbench?
Can I modify my DIY workbench later?
How do I maintain my DIY workbench?
What tools do I need to build a DIY workbench?
Are there ways to keep myself safe while building my workbench?
What is the estimated building time for my own DIY workbench?
Conclusion
Building a DIY workbench is a rewarding project that enhances your workspace and supports your creative endeavors. With the right tools, materials, and effort, you can create a functional and personalized workbench that meets your specific needs. Remember to prioritize safety, organization, and proper maintenance to ensure your workbench remains a reliable and efficient part of your DIY toolkit.


