DIY Raised Herb Garden: Affordable 8-Step Project

Last Updated on August 21, 2024 by teamobn

Quick and Easy DIY Raised Herb Garden
There’s something to be said about being able to move your herb garden around to catch the best sun throughout the growing season.

We here at OBN are big fans of raised-bed gardening. We love starting fresh and easy with top-quality soil instead of constant testing, amending, re-testing, and re-amending.

There’s something to be said about being able to move your herb garden around to catch the best sun throughout the growing season. Then there is also the fact that it’s much easier to keep raised beds weed-and-pest free.

We love the aesthetics of raised herb garden beds, too. The charming wooden rows appeal to that part of us that simply relishes shaping order out of chaos.

Building Your Raised Herb Garden

Once you’ve decided to garden on raised beds, you’ll need to choose what kind of materials to use. Then, of course, you’ll have to build your raised bed.

KING BIRD Galvanized Raised Garden Bed with 2 Installation Methods for DIY

This herb garden project brings together an easy DIY raised herb garden that won’t break the bank. If you already have some basic woodworking tools in your shed, this simple DIY build should cost you no more than US $150.

Materials and Tools

  • (6) 6″x2’x3/4″ wood
  • (6) 6″x3’x3/4″ wood
  • (8) 4″x2’x3/4″ wood legs
  • Wood for the upper ledge
  • Clamp
  • Spacer
  • Wood glue
  • Wood pre-stain
  • Wood stain
  • Coarse thread 1.25″ screws
  • Kreg jig
  • Impact wrench or driver
  • Landscaping fabric
  • Staple gun
Land Guard Galvanized Raised Garden Bed Kit

How to Build a Simple Raised Herb Garden

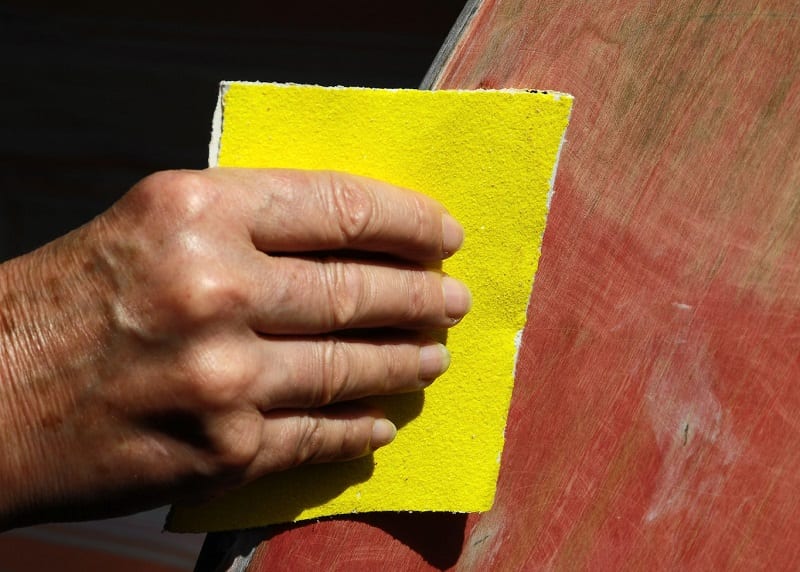
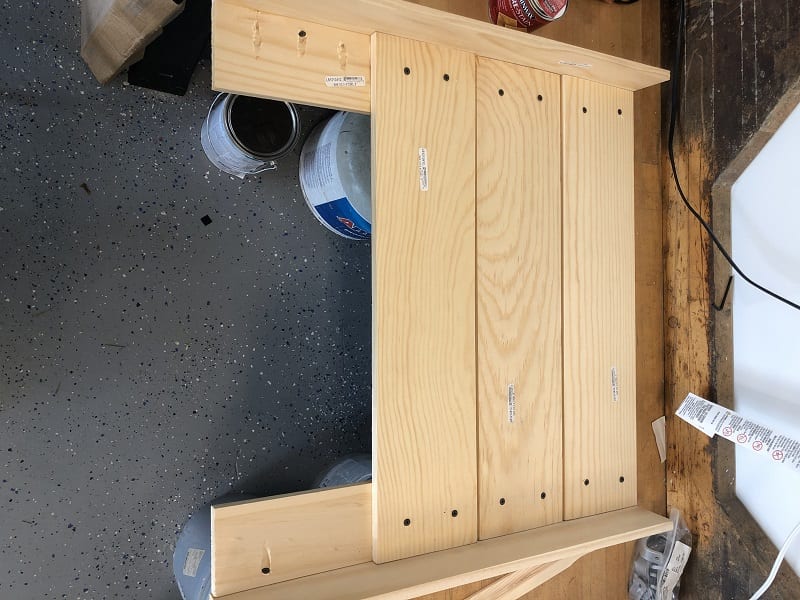
Step 1. Sand all the pieces of wood. Begin with the medium-grit sandpaper (#120). Work your way to a final sanding with the fine-grit sandpaper (#220). Be sure you sand in the direction of the wood grain to avoid leaving unsightly scratches.

 Sand all the pieces of wood.
Sand all the pieces of wood for your DIY raised herb garden as necessary.

Step 2. Using the Kreg jig, create 3 evenly spaced pocket holes in 4 legs. Then add a thin bead of wood glue down the thick edge of one leg directly in front of the pre-drilled holes.

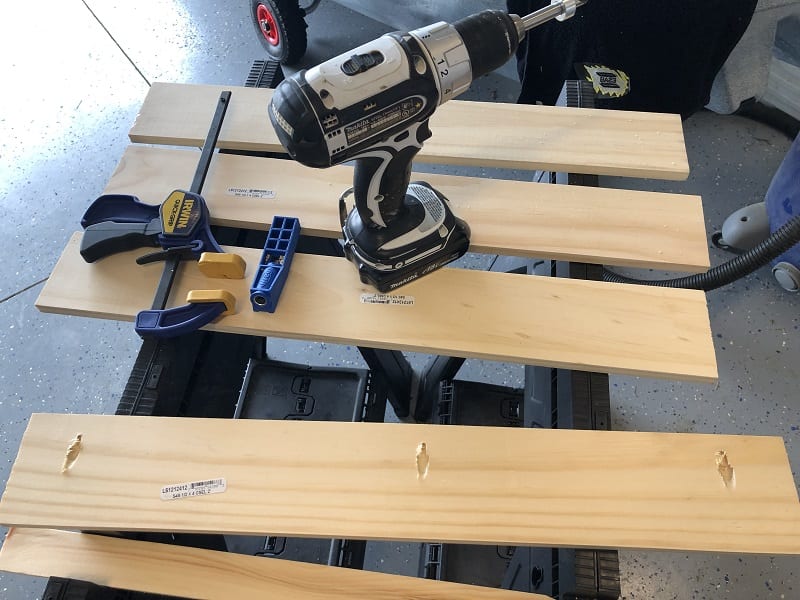
Holding the leg into place, drill screws through the pocket holes into the opposing leg to form an L-shaped joint. Assemble four jointed legs in this manner.

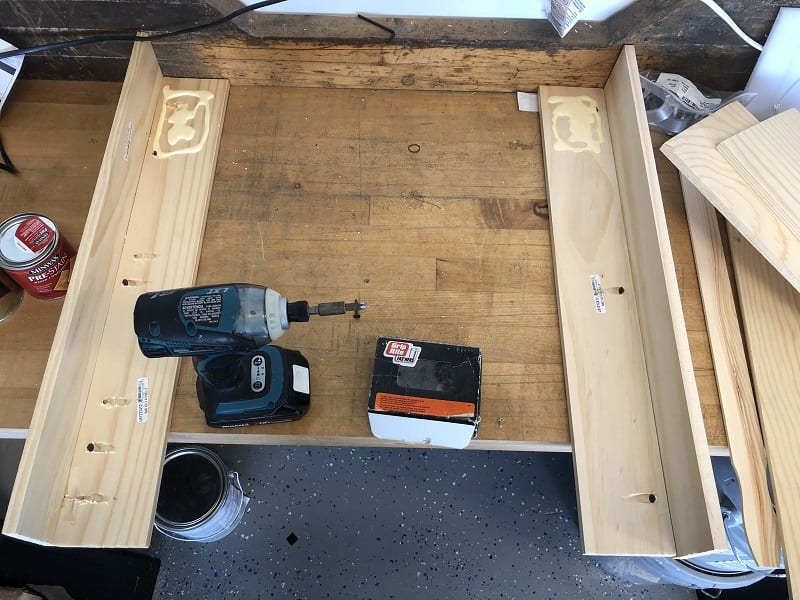
Step 3. Now you can connect the legs. Apply wood glue across the upper 5″ of the leg and set one of the 2′ sections in place. Use the 1.25″ screws to attach the legs to the cross member.

Use the 1.25" screws to attach the legs to the cross member.
Use the 1.25″ screws to attach the legs to the cross member.

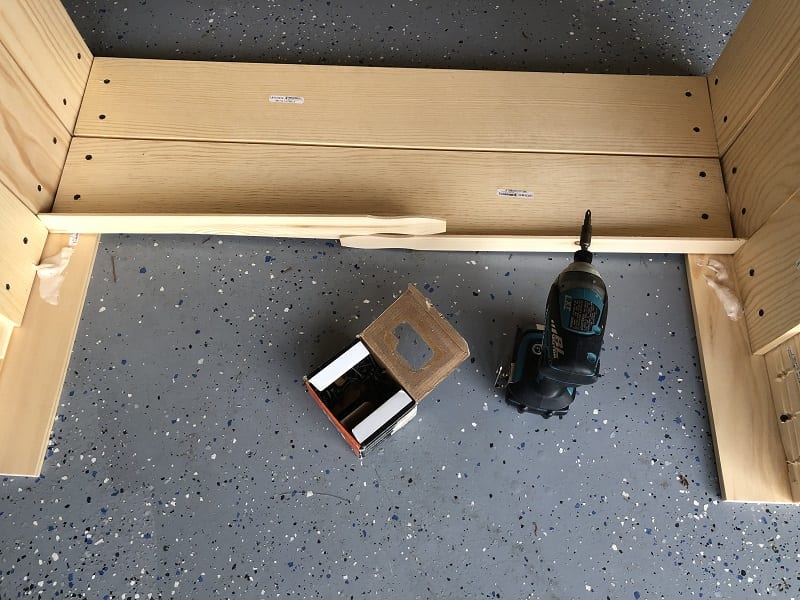
Before adding the next cross member, place a spacer at the bottom of the previous cross member. Align the cross member against the spacer and secure the legs with screws. Repeat the process and then do the same for the opposite side panel.

Secure the cross members to the legs with screws.

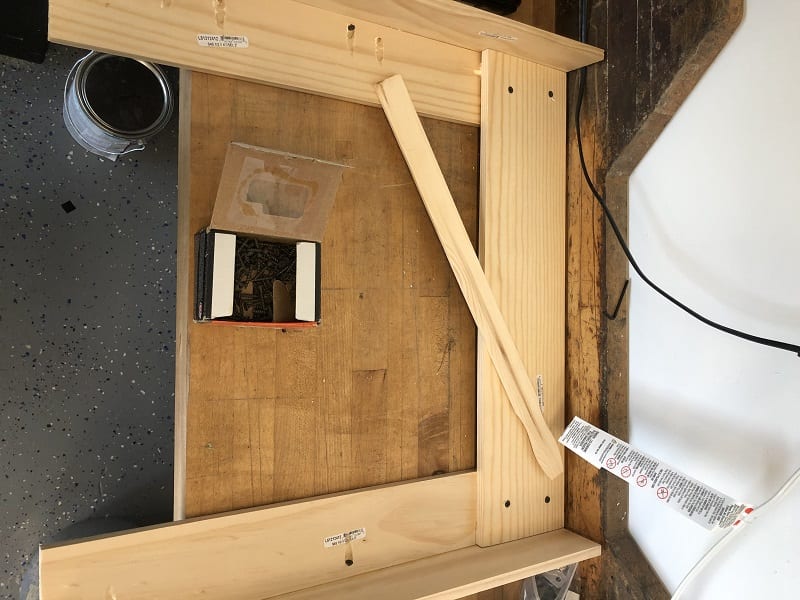
Step 4. Lay the 2 side panels on their sides and add wood glue to the top section. Secure with screws. Before adding the next cross member, place another spacer at the bottom of the last cross member. Align the next cross member against the spacer and fasten to the legs with screws. Repeat for the remaining cross members and the opposite panel.

Before adding the next cross member, place a spacer at the bottom of the previous cross member
Before adding the next cross member, place a spacer at the bottom of the previous cross member.

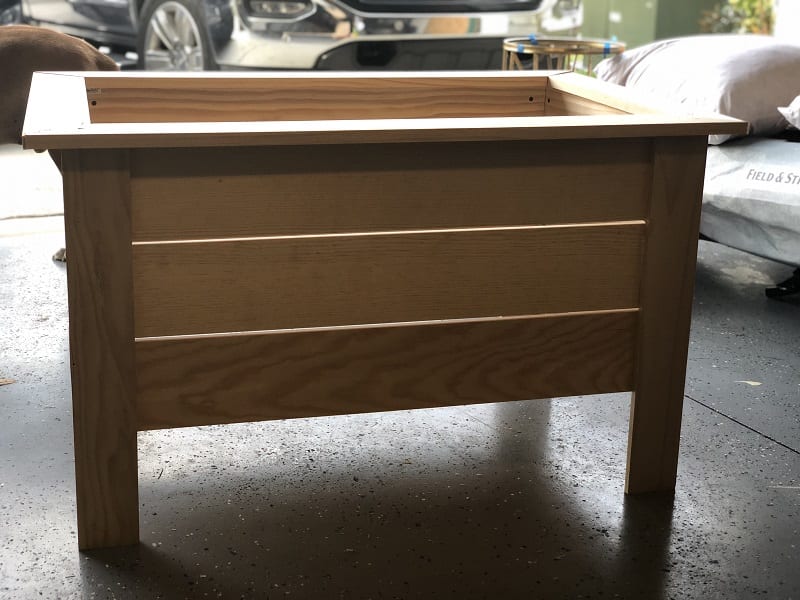
Step 5. This step assembles the ledges on top of the box. Measure and cut 4″x3/4″ wood panels for the ledges. You can either cut at a 45 deg angle or butt ends together along the top edge of the herb garden box. Secure the top edge using screws.

You can either cut at a 45 deg angle or butt ends together along top edge of garden box.
For the ledges, you can either cut at a 45⁰ angle or butt ends together along the top edge of the herb garden box.

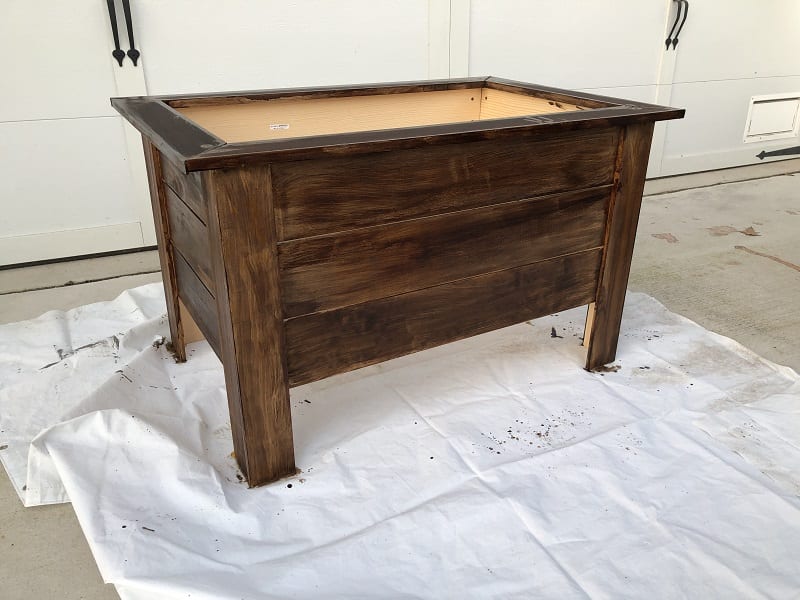
Step 6. Use a brush or cloth to apply a liberal coat of the pre-stain conditioner to all surfaces of the project. Again, work in the same direction as the wood grain. Allow the conditioner to penetrate the wood for 5 to 15 minutes, and then wipe off any excess.

Following instructions on the can, you’ll likely need to apply the stain within two hours of the application of the conditioner. Apply a liberal amount of stain.

For consistent colour, use careful timing. Never allow any stain to dry on the wood surface. This will prevent the clear finish from adhering and cause other issues. Stains are formulated to dry in the wood, not on.

Once the stain dries, apply the polyurethane protective finish.

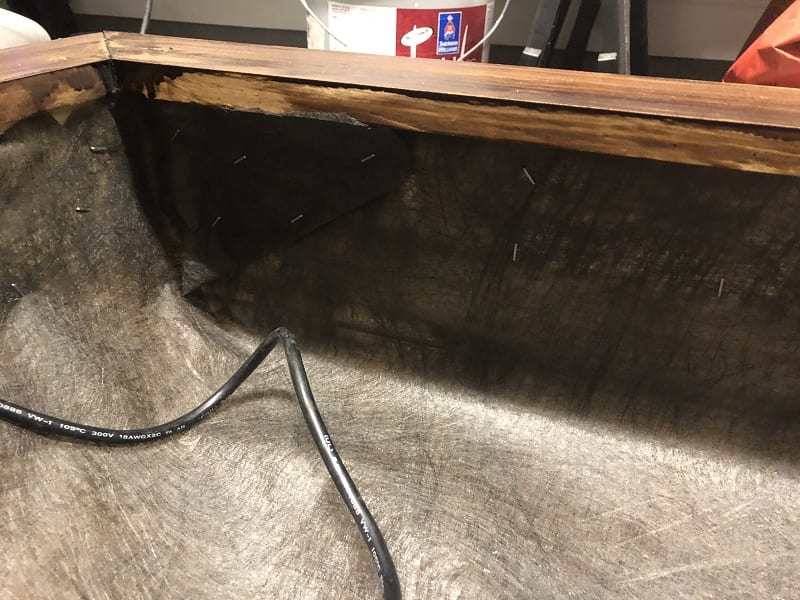
Step 7. You can work on the raised bed’s inner fabric lining once the wood is completely dry.  Using a staple gun, secure the edge of the landscape fabric just under the inner top edge of the box. Then, punch additional staples about 4″ to 6″ down inside the garden box.

Pull fabric straight across the box at an even height and fasten it onto the wood, making sure you staple it under the top edges and inside the garden box.

Using a staple gun, secure the edge of the landscape fabric just under the inner top edge of the box. Then, punch additional staples about 4" to 6" down inside the garden box.
Using a staple gun, secure the edge of the landscape fabric just under the inner top edge of the box. Then, punch additional staples about 4″ to 6″ down inside the garden box.

Step 8. You’re done. Situate the raised bed in a sunny area, fill it with potting soil, and plant your herbs

Situate the raised bed in a sunny area, fill with potting soil, and plant your herbs.
Situate the raised bed in a sunny area, fill it with potting soil, and plant your herbs. 

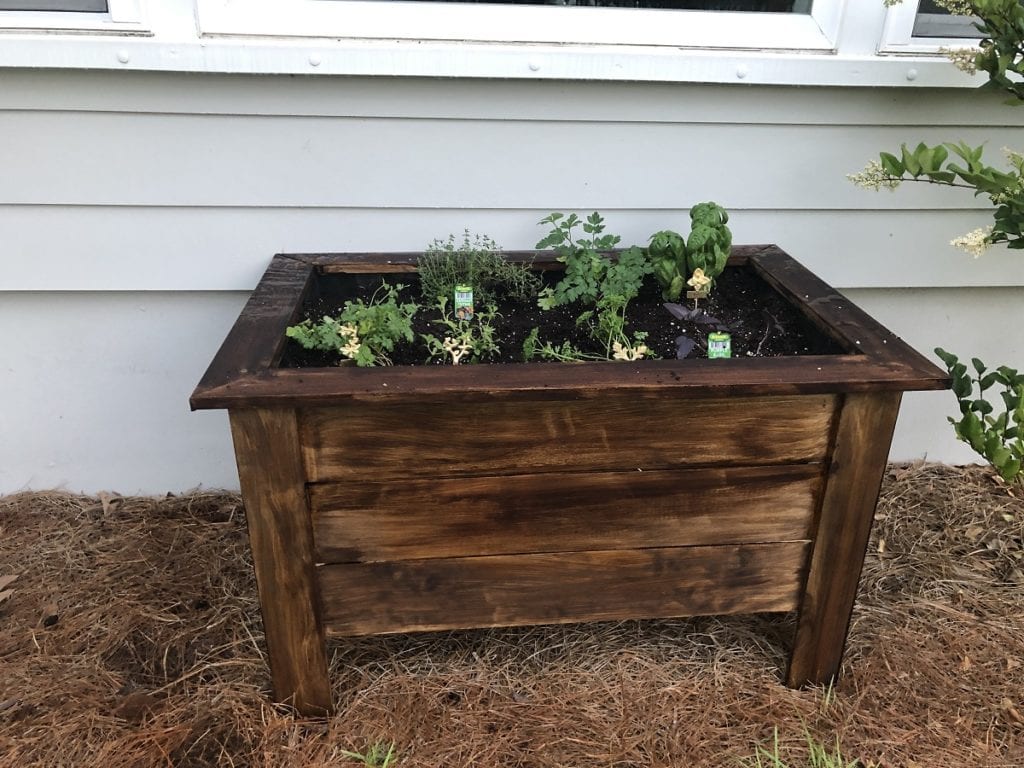
We thank JonM19 for this wonderful DIY project.

Choosing the Right Herbs for Your Climate

Establishing a successful herb garden begins with choosing the appropriate herbs fit for your local environment. Not all herbs have the same environmental preferences, thus careful selection will result in a rich, healthy garden. Here we discuss how to choose the best herbs for different climates, so guaranteeing the vivid and aromatic success of your herb garden.

Understanding Your Climate Zone

Understanding your climate zone is absolutely vital before choosing herbs for your garden. Temperature, rainfall, and season length define the groups of climate zones. Ask local gardening societies or agricultural extensions to find your climate zone. This information will help you select herbs best suited for your particular circumstances.

Best Herbs for Warm Climates

In warm climates, where summers are long and temperatures are high, take into account cultivating herbs that can survive the heat and flourish under lots of sunlight. Herbs that thrive in higher temperatures and demand lots of sunlight are basil, rosemary, and thyme. These herbs not only accentuate your food but also give your herb garden a wonderful scent.

Best Herbs for Cold Climates

If your climate is colder, concentrate on herbs with shorter growing seasons and tolerance for cold. Great choices are chives, parsley, and cilantro since they can withstand lower temperatures and even bounce back from little frosts. Growing these herbs will help to guarantee that, even with declining temperatures, your herb garden stays green and productive.

Herbs for Temperate Climates

For people living in temperate climates, a great range of herbs can be grown since these places usually experience mild temperature. Herbs like mint, sage, and dill are perfect since they can easily manage the little variations in temperature. These herbs not only fit well in cuisine but also give your herb garden a rich appearance.

Selecting appropriate herbs for your environment will help you to maximize the output and health of your garden. Recall, a good herb garden depends on appropriate design and knowledge of the surroundings. First step toward a thriving garden providing fresh, aromatic herbs for your kitchen is choosing suitable herbs for your environment.

Optimal Herb Pairings and Companion Planting

In the craft of herb gardening, choosing the correct allies for your herbs will greatly improve their flavor and growth. Companion planting is the deliberate arrangement of herbs and other plants to maximize their advantages by means of minimum pests and diseases. Here we explore the realm of best herb pairings and companion planting methods to enable you to design a harmonic and successful herb garden.

Benefits of Companion Planting in Your Herb Garden

For your herb garden, companion planting presents a number of benefits. Growing certain herbs together can help to attract beneficial insects, improve soil quality, and even enhance the taste of some herbs. Furthermore, some herbs naturally repel certain pests for others, so lowering the need for chemical treatments and supporting a more environmentally friendly gardening method.

Best Herb Pairings for Companion Planting

  1. Basil and Tomatoes: Planting basil next to tomatoes not only accentuates their tastes in the kitchen but also helps ward against common tomato pests including aphids and tomato hornworms. In your herb garden, this combination improves the yield and general condition of both plants.
  2. Rosemary and Sage: These two robust herbs make excellent companions as they both prefer well-drained soil and full sunlight. Rosemary’s strong aroma can deter pests that might harm sage, while sage can benefit from rosemary’s protective qualities against soil-borne diseases.
  3. Chives and Carrots: Planting chives alongside carrots can improve the carrots’ flavor and growth. Chives deter pests like aphids and carrot flies, which helps maintain the health of your carrot crop in the herb garden.

Companion Plants to Avoid

While companion planting offers many benefits, it’s essential to avoid certain combinations that may hinder growth or cause competition among plants. For example, herbs like fennel and dill can inhibit the growth of nearby herbs due to their allelopathic properties. Similarly, herbs that have different soil or light requirements may not thrive well when planted together in the same herb garden bed.

A raised herb garden bed.
Proper companion planting promotes a healthy growth of your herbs.

Implementing Companion Planting Techniques

To successfully implement companion planting in your herb garden, consider the growth habits, soil preferences, and pest resistance of each herb. Plan your garden layout accordingly, ensuring that companion plants are placed in close proximity to maximize their mutual benefits. Rotate crops annually to prevent soil depletion and maintain the health of your herb garden over time.

By strategically pairing herbs and companion plants in your herb garden, you can create a balanced ecosystem that promotes healthy growth and enhances the flavors of your culinary creations. Experiment with different combinations to discover which pairings work best for your specific gardening environment and enjoy the bounty of a thriving herb garden year-round.

Conclusion

Raised herb gardens give quick access and control over soil quality, so facilitating a practical approach to grow herbs. These raised beds not only improve the look of your outdoor area but also help you to handle weeding and harvesting chores. For gardeners wishing to maximize their growing conditions and savor fresh herbs right at their hands, a raised herb garden is ultimately a sensible and pleasing option.

For more innovative gardening ideas, check out our trellis raised garden bed combo project!

YOU MIGHT ALSO LIKE

|

Search All Projects:

Your details will never be shared with any third party. Unsubscribe at any time with a single click.

The posts on this site sometimes contain an affiliate link or links to Amazon or other marketplaces. An affiliate link means that this business may earn advertising or referral fees if you make a purchase through those links.