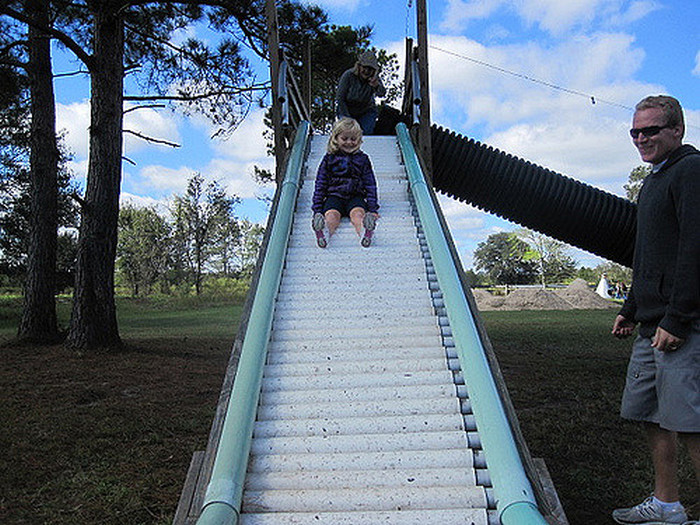
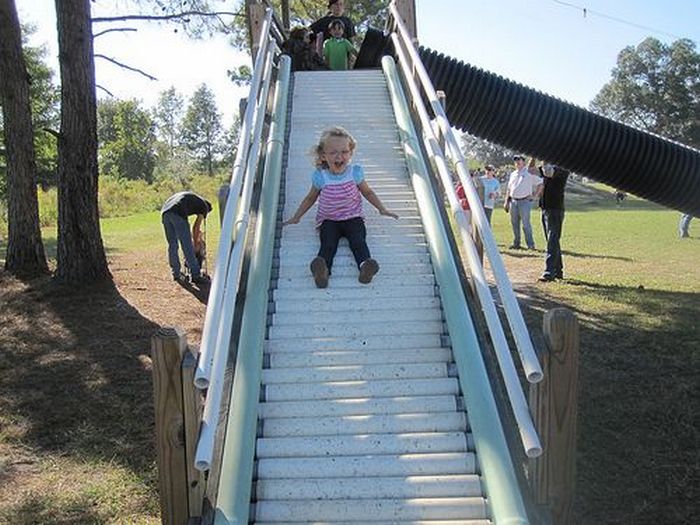
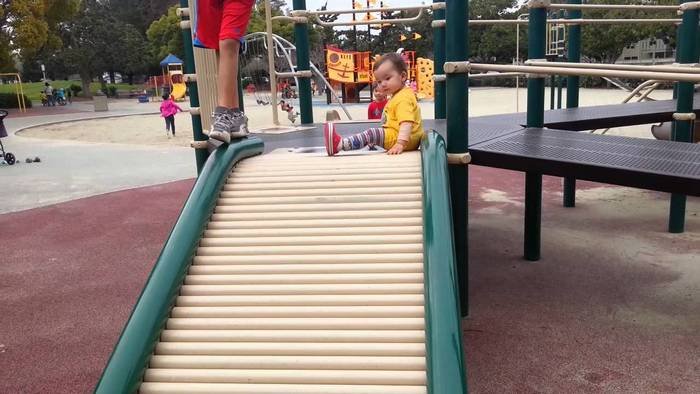
This rolling pipe slide is not the typical slide found in a typical playground, which makes it more fun! Its unique design means that it can be enjoyed by people of all ages, and it’s a great way to add some excitement to your playground.
As a parent, it is always important to find new and interesting activities for the kids. Not only does this help keep them occupied, but it also helps them to learn and grow. There are a lot of great resources out there for finding fun activities for kids, and I’m sure that other parents are always on the lookout for new ideas.
In our backyard, we have a sandpit, a tepee, and two rubber swings. All these were DIY projects my husband and I made two summers ago. My children were happy with them until they got bored. When I noticed that they didn’t play outside as much anymore, I had to do something. I decided to add some new elements to the backyard play area.
Since we didn’t have a slide yet, we knew we had to have one. We knew we needed a slide for the playground since we didn’t have one yet. It would be a great addition that the kids would enjoy for many years, no matter how tall they got. We wanted a slide that was durable and would last through all kinds of weather.
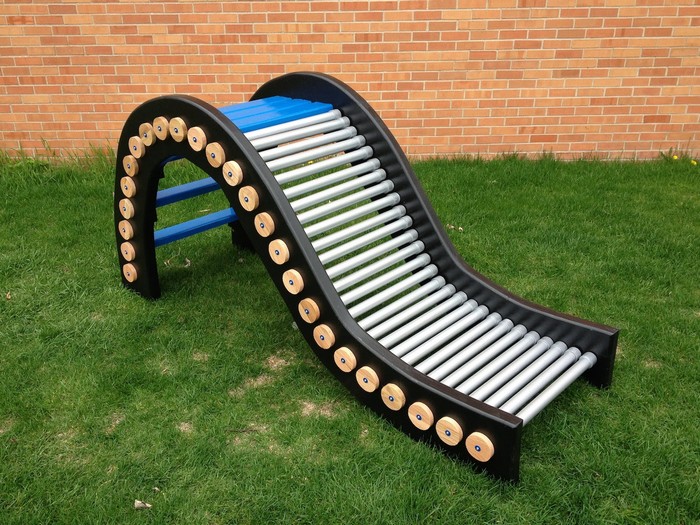
We found this great gem of an idea for a rolling pipe slide. It’s not the typical slide found in a typical playground but that makes it more fun! This particular rolling pipe slide is made out of PVC pipes, which makes it both sturdy and lightweight. It’s easy to set up and take down, which is great for busy families. Plus, it’s a great way to get kids moving and active.
Before beginning any project, it is important to have all of the necessary materials on hand. This is especially true for the rolling pipe slide project, where even a small oversight can cause big problems. To help you get started, we’ve compiled a list of everything you’ll need for the project.
What are you waiting for? Start gathering them now and get started!
Contents
- 1 How to Building Your Rolling Pipe Slide
- 2 Educational Benefits of Physical Play
- 3 Safety Measures for Rolling Pipe Slides
- 4 FAQs About Building and Using a Rolling Pipe Slide
- 4.1 How difficult is it to build a rolling pipe slide?
- 4.2 What is the recommended age range for children using the rolling pipe slide?
- 4.3 Can the slide be modified for smaller children?
- 4.4 How often should the slide be inspected for safety?
- 4.5 What maintenance does the rolling pipe slide require?
- 4.6 Is adult supervision always necessary?
- 4.7 What kind of surface is best to place under the slide?
- 4.8 Can the slide be left outside year-round?
- 4.9 How much space is needed for the slide?
- 4.10 Where can I find the materials needed to build the slide?
- 5 Conclusion
How to Building Your Rolling Pipe Slide
Materials needed to make a rolling pipe slide:
2 pcs 2”x10”x16’ (Main Side Rails)
2 pcs 2”x6”x16’ (Safety Rails)
2 pcs 4”x4”x8’ (Legs – you will need 2 more if not setting the upper end on the platform)
4 pcs 2”x4”x8’ (on 2’ centres between the bottom of main side rails)
2 pcs 2”x6”x8’ (Angle bracing on bottom of slide)
15 pcs 3”x10’ PVC 90 – 3” PVC Domed Caps
23 lengths of ½” electrical conduit (outside diameter is just under 3/4”)
Tools:
¾” wood drill bit
24 pcs 3.5” lag screws to secure main rails and safety rails into the 4X4 posts
Saw to cut wood & PVC
Saw or grinder to cut conduit
5lb box of 3” outdoor wood screws
Click on any image to start the lightbox display. Use your Esc key to close the lightbox.

Instructions
Prepare the Site
- Choose a flat, open area for the slide.
- Clear the space of any debris or obstacles.
Cut and Assemble the Frame
- Use the saw to cut the 4”x4”x8’ legs to the desired height.
- Cut the 2”x10”x16’ boards to form the main side rails of the slide.
- Attach the main side rails to the legs using the 3.5” lag screws.
- Ensure the structure is level and stable.
Install Safety Rails
- Cut the 2”x6”x16’ boards for safety rails.
- Secure these rails above the main side rails with lag screws.
Add Support Beams
- Cut the 2”x4”x8’ boards and space them evenly between the main side rails.
- These beams will support the rolling pipes and should be placed every 2 feet.
- Secure the beams with outdoor wood screws.
Install Angle Bracing
- Cut the 2”x6”x8’ boards for angle bracing at the bottom of the slide.
- Attach them diagonally for additional stability.
Prepare and Install PVC Pipes
- Cut the PVC pipes to the width of the slide.
- Drill holes in the center of each PVC pipe using the ¾” wood drill bit.
- Attach the PVC domed caps at both ends of each pipe.
Install Electrical Conduit
- Cut the ½” electrical conduit to length.
- Thread these through the drilled holes in the PVC pipes.
- Lay the pipes side by side along the support beams.
- Ensure they roll freely and are evenly spaced.
Final Checks
- Inspect the entire structure for any sharp edges or loose screws.
- Test the stability and rolling mechanism of the slide.
Safety Precautions
- Ensure the slide is on a soft surface, like grass or a rubber mat.
- Supervise children while they are playing on the slide.
Educational Benefits of Physical Play
Outdoor play is essential for children’s development. It offers more than just fun; it plays a crucial role in educating young minds. Physical play structures, like a rolling pipe slide, are not only entertaining but also offer several educational benefits.
Enhancing Motor Skills
Motor skills are critical in a child’s growth and development. Using a rolling pipe slide offers a unique way to enhance these skills.
Developing Gross Motor Skills
Gross motor skills involve the movement of large muscles in the body. When children climb up to the rolling pipe slide, they use their legs and arms extensively. This movement builds muscle strength and coordination. As they navigate the slide, their whole body is engaged. This helps in developing core stability and balance.
Improving Fine Motor Skills
Fine motor skills are about smaller movements, particularly involving hands and fingers. Gripping the edges of the rolling pipe slide or holding onto support structures refines these skills. Such activities enhance hand-eye coordination. They also improve dexterity, which is essential for tasks like writing and tying shoelaces.
Long-term Benefits
Regular play on structures like rolling pipe slides has long-term benefits. Children develop a sense of body awareness and spatial orientation. These skills are foundational for sports and other physical activities. Early development of motor skills also boosts confidence and encourages a more active lifestyle.
Boosting Problem-Solving Abilities
Physical play, especially on structures like a rolling pipe slide, plays a crucial role in enhancing problem-solving skills in children.
Enhancing Cognitive Skills Through Play
When children engage in physical play, they’re not just moving their bodies. They’re also exercising their minds. Navigating a rolling pipe slide, for instance, requires them to assess the best way to climb, balance, and slide down safely. This process involves a lot of quick thinking and strategizing, which sharpens their cognitive abilities.
Developing Planning and Decision-Making Skills
Using a rolling pipe slide requires children to plan their actions. They need to decide the best way to approach, climb, and use the slide. This kind of planning and decision-making process is a fundamental skill in problem-solving. It teaches children to evaluate situations, consider possible outcomes, and make informed decisions.
Encouraging Creative Problem Solving
Physical play structures like rolling pipe slides often present unique challenges. Children may need to figure out how to navigate the slide in different ways. This encourages creative thinking and flexibility in problem-solving. They learn that there are multiple ways to approach and solve a problem.
Building Persistence and Resilience
As children encounter challenges while playing, they learn the importance of persistence. Trying different methods to successfully navigate a rolling pipe slide teaches them resilience. They learn that it’s okay to fail and try again. This mindset is crucial in developing a healthy approach to solving problems in life.
These problem-solving abilities gained through physical play are transferable to academic and everyday life situations. They form a foundation for successful learning and adapting in various environments.
Encouraging Social Interaction
Social interaction is a crucial component of a child’s development, and playing on structures like rolling pipe slides provides a perfect opportunity for this.
Developing Communication Skills
When children play together on rolling pipe slides, they engage in various forms of communication. They talk, listen, express their thoughts, and interpret the actions of others. This interaction enhances their verbal and non-verbal communication skills. They learn how to convey ideas, express feelings, and understand others’ perspectives. These skills are essential for effective communication in all areas of life.
Learning to Share and Cooperate
Playing on a rolling pipe slide often requires taking turns and sharing the space with others. Children learn the importance of sharing and waiting for their turn. They also learn to cooperate with others to ensure everyone gets a chance to play. This cooperation is a fundamental aspect of social interaction and is crucial for building strong relationships.
Building Friendships and Social Networks
Interacting with peers on playground structures like rolling pipe slides helps children form friendships. These early friendships are essential for social development. They provide a sense of belonging and help children learn to navigate social networks. Through these interactions, children develop empathy, understanding, and respect for others.
Enhancing Emotional Intelligence
Social play on rolling pipe slides also enhances emotional intelligence. Children learn to recognize and manage their own emotions as well as understand the emotions of others. They experience a range of feelings like excitement, frustration, and joy. Learning to handle these emotions in a social setting is crucial for emotional maturity.
Safety Measures for Rolling Pipe Slides
Ensuring safety is crucial when it comes to backyard play equipment like rolling pipe slides. Here are key safety measures to consider:
Regular Inspection and Maintenance
Maintaining the safety of a rolling pipe slide requires consistent attention and care. Regularly inspect the slide for any potential hazards. Look for loose screws, cracks in the wood, or damage to the PVC pipes. It’s important to check the stability of the slide’s structure. Pay special attention to the areas where the pipes meet the frame and where the slide attaches to the ground.
Tighten any loose screws and bolts during each inspection. If you find cracks or significant wear and tear, replace those parts immediately. Check the rolling mechanism of the PVC pipes to ensure they move smoothly. Lubricate if necessary. Regularly cleaning the slide also helps to spot any hidden damages and prolongs the life of the materials.
Proper Installation
Carefully follow the building instructions for the slide. Make sure every part is used as directed. If you’re unsure about any step, seek professional advice or assistance.
Double-check that all parts are securely fastened. The main side rails, safety rails, and legs should be tightly screwed to prevent wobbling or collapse. The PVC pipes and electrical conduits must be properly aligned and fixed in place to avoid accidents during use.
The slide should be placed on a level, stable surface. If the slide is elevated, ensure the legs are buried or anchored securely to prevent tipping. Test the slide’s stability by applying gentle pressure to different areas before allowing children to use it.
Supervise Playtime
Always have an adult present when children are using the rolling pipe slide. The adult should actively watch the play, not just be nearby. They should be ready to intervene if children play unsafely or use the slide improperly.
The supervising adult should teach and enforce safe play practices. This includes showing children how to use the slide correctly, reminding them to take turns, and ensuring they don’t push or shove each other.
The supervising adult should be prepared for emergencies. They should know basic first aid and have a plan in case of an accident. This includes having a first aid kit nearby and knowing how to quickly contact emergency services.
Safe Play Area
Keep the area around the slide free from obstacles. Remove any toys, garden tools, or other items that could cause tripping or injuries. This ensures a safe entry to and exit from the slide.
Make sure there is enough clear space at the bottom of the slide for children to land safely. There should be no obstructions that children might run into after sliding down.
Install soft landing surfaces like grass, mulch, or rubber mats around the slide. These materials provide cushioning and reduce the risk of injury if a child falls.
Age-Appropriate Use
Choose a slide that matches the age and skill level of the children. Younger or smaller children may find large slides intimidating or difficult to use safely. They might need a smaller, less steep slide.
Younger children often need extra help and guidance when using a slide. An adult or older child should be ready to assist them in climbing, sliding, and landing safely.
If children of various ages are using the slide, adjust the play rules accordingly. Make sure older children understand the importance of being careful around younger ones.
FAQs About Building and Using a Rolling Pipe Slide
How difficult is it to build a rolling pipe slide?
Building a rolling pipe slide is a moderately challenging DIY project. It requires basic carpentry skills and adherence to safety guidelines. The difficulty level depends on your experience with similar projects.
What is the recommended age range for children using the rolling pipe slide?
The slide is generally suitable for children aged 3 to 10 years. However, it’s important to consider the individual abilities and confidence levels of each child.
Can the slide be modified for smaller children?
Yes, the slide can be modified. You can adjust the height and the steepness to make it more suitable for younger children. Always prioritize safety in any modifications.
How often should the slide be inspected for safety?
Inspect the slide thoroughly at least once a month and after any extreme weather conditions. Regularly check for loose screws, cracks, or any signs of wear.
What maintenance does the rolling pipe slide require?
Regular maintenance includes tightening loose screws, replacing worn-out parts, and ensuring the PVC pipes roll smoothly. Also, keep the slide clean and free from debris.
Is adult supervision always necessary?
Yes, adult supervision is crucial, especially for younger children. It ensures safety and helps prevent accidents.
What kind of surface is best to place under the slide?
Install the slide over a soft surface like grass, rubber mats, or mulch. These surfaces provide cushioning and reduce the risk of injury.
Can the slide be left outside year-round?
Yes, but it’s important to use weather-resistant materials. Also, consider additional protection like covers during extreme weather.
How much space is needed for the slide?
Ensure enough clear space around the slide for safe play. Include extra space at the bottom for children to exit the slide without obstacles.
Where can I find the materials needed to build the slide?
Most materials can be found at local hardware stores or home improvement centers. You may also order them online for convenience.
Conclusion
Building a rolling pipe slide is a rewarding project that brings endless joy and developmental benefits to children. By following the steps outlined, using the right materials and tools, and adhering to safety measures, you can create a fun and secure play area in your backyard. Regular maintenance and supervision ensure the slide remains a safe and enjoyable space for children to develop their physical, cognitive, and social skills.