Last Updated on February 22, 2024 by teamobn

Drill (2) 1″ holes in the centre of the two sides of the box. These will end up holding up the box in its final location
Pre-drill and install (2) screw eyes (one on each side) about 2″ off centre. These will be used to hold up the box in order to wire.

I installed 2 electrical junction boxes inside so all wires could be pulled to this location in the next step.

Hanging and electrical wiring: In order to wire the wine bottle chandelier fixture in place, I wanted to first hang the fixture so one did not have to hold it in place (since it is fairly heavy). This would also make it easier to replace a bottle if needed etc.

Pre-drill and screw 2 hooks into the ceiling directly inside the footprint of the box’s final location. Doesn’t necessarily matter where, but I recommend about 2″ off the centre of each side. I was fortunate to have the whole ceiling covered within wall blocking, but you will want to check and ensure you hit something solid when you install these hooks as they will be holding the wine bottle chandelier fixture’s weight.
Using the quick links and chain, attach the hooks in the box, to the hooks in the ceiling.

Let go and test the wine bottle chandelier chain/fixture strength to make sure it holds.
Once the wine bottle chandelier is secure, turn off the power to the circuit and check out the wiring. My wine bottle chandelier fixture was power fed from the ceiling, with wires going to the light switch from there. This is not a normal situation (and one I had to discover through trial and error).
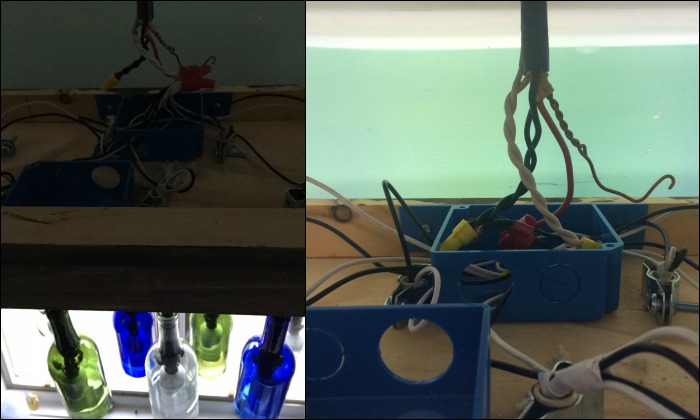
Thread the light sockets through the bottle/conduit so all the wires extend into the box. Pull all the wires into the junction box closest to the wires in the ceiling. Using electrical tape, tape together all of the white wires, and all of the black wires and make sure the wires are all connected.
If some of the bulbs hang down further than desired when pulled to the junction box, pull to the desired height, then overlap the wires and wrap electrical tape around the top to hold it in place.
In my scenario, the black wire was the power, that fed to the switch, and the red wire came from the switch. So for the light switch to operate, all the black wires from the light bulbs had to be attached to the red wire, not the black.
I capped the black wires from the ceiling and attached the white bundle, to the white in the ceiling, and as mentioned before, the black bundle to red using wire nuts. Once the nuts are on securely, wrap electrical tape around them to ensure there are no exposed threads.
If your wine bottle chandelier fixture is not powered from the ceiling, you should just be able to attach black to black and white to white.
For the ground, I wrapped it around a screw I placed inside the box, making sure it could not touch any other metal.
Turn the circuit and switch it on to make sure the wine bottle chandelier fixture works properly.

Installing in a final location: This was another tricky part, that took some serious thought on how I wanted to attach the wine bottle chandelier directly to the ceiling. Many factors came into play.
- Due to the tight nature of my cabinets to the wine bottle chandelier fixture, a dowel that went through the whole length of the wine bottle chandelier fixture was not possible since I would not have been able to get it in/out without jamming into the cabinets
- I live right near a train station, and the house shakes on occasion, so I didn’t want to just use a pin since it could ‘wiggle’ out
In discussing the dilemma with a friend, and a gentleman at HomeDepot, I came up with the following idea use drywall toggle bolts. These can be threaded through the holes in the box, then through hooks on the ceiling, and tightened. The bolt then could not ‘wiggle’ out, but by unscrewing it can come off to access the inside of the box.

Pre-drill and install the (2) screw eyes on the ceiling in the centre of the final location of the sides of the box (should match up perfectly with the existing holes in the side of the box from the previous step).

Measure the distance from the ceiling to the bottom of the eye-opening and from the top of the box, to the bottom of the drilled hole. These dimensions should match up. (I had to add some trim to the top of the box in order for them to line up).
Lift up the box into location, and thread the toggle bolt (adding a washer so the head of the bolt wouldn’t go through the hole as well) through the side of the box, then through the eye. Do the same to the other side, then tighten them down. To remove, simply unscrew the toggle bolts and the box will drop down to the chains again.
Editorial Note:
Please be mindful that electricity is very unforgiving. In some countries, it is illegal to make a mains power electrical connection without an appropriate licence.

And your wine bottle chandelier is done! Enjoy!
Thanks to campbesj7 for this great wine bottle chandelier project!
The Wrap Up
Building your wine bottle chandelier is a fun and creative project that adds a unique touch to any space. By following just three simple steps, you can transform ordinary wine bottles into a stunning lighting fixture that becomes the centrepiece of your room.
Not only does this project allow you to showcase your DIY skills, but it also gives new life to old wine bottles, making it a sustainable and eco-friendly choice. Whether you’re a seasoned crafter or a beginner looking for a fun weekend project, creating a wine bottle chandelier is a rewarding endeavour that will illuminate your home with style and charm.
So gather your materials, roll up your sleeves, and get ready to bask in the warm glow of your handmade masterpiece. Cheers to creativity and innovation!
Frequently Asked Questions
1. What materials do you need to build a wine bottle chandelier?
Basic materials include wine bottles (empty and cleaned), pine trim board, plywood, wood glue, wood stain, acetone, rags, plumbing pipes, plumbing coupling converter, flange/escutcheon, conduit hangers, or the smallest size you can find, screw eyes, and plastic electrical junction boxes. You can also secure any additional decorative elements you desire, such as beads or charms.
2. How do you prepare the wine bottles for the chandelier?
Start by thoroughly cleaning the wine bottles and removing any labels or adhesive residue. Once cleaned, use a drill with a diamond-tipped drill bit to create a hole near the base of each bottle, where the light will be inserted. Take care to drill slowly and gently to avoid cracking or shattering the glass.
Following these steps meticulously will ensure that your wine bottles are cleaned and drilled with precision, ready to be transformed into a stunning chandelier. With each bottle cleaned and prepared, you’re one step closer to creating a captivating lighting fixture that will illuminate your space with elegance and charm.
4. Can you customize the design of your wine bottle chandelier?
Absolutely! Feel free to get creative and personalize your chandelier to suit your taste and style. You can experiment with different bottle colours, shapes, and arrangements, or add embellishments such as beads, charms, or decorative accents to enhance the overall look.
Consider clustering bottles closely together for a dense and dramatic effect, or spacing them out evenly for a more airy and delicate look. Experiment with asymmetrical layouts or geometric patterns to add visual intrigue and complexity to your design.
Add embellishments to your chandelier to enhance its beauty and personality. String beads, crystals, or pearls between the bottles to create a sparkling and luxurious effect. Attach charms, pendants, or decorative trinkets to the necks of the bottles for a whimsical and playful touch. You can also incorporate decorative elements like ribbons, feathers, or foliage to complement the overall theme of your chandelier.
6. Is it safe to use a wine bottle chandelier?
As long as the wine bottles are securely attached to the chandelier frame and the electrical components are properly installed, a wine bottle chandelier can be perfectly safe to use. However, it’s essential to follow all safety guidelines and consult a professional if you’re unsure about any aspect of the installation process.
These FAQs should provide you with a good starting point for building your wine bottle chandelier. Remember to take your time, use caution when working with glass and electricity, and have fun bringing your creative vision to life!