Last Updated on January 29, 2025 by teamobn
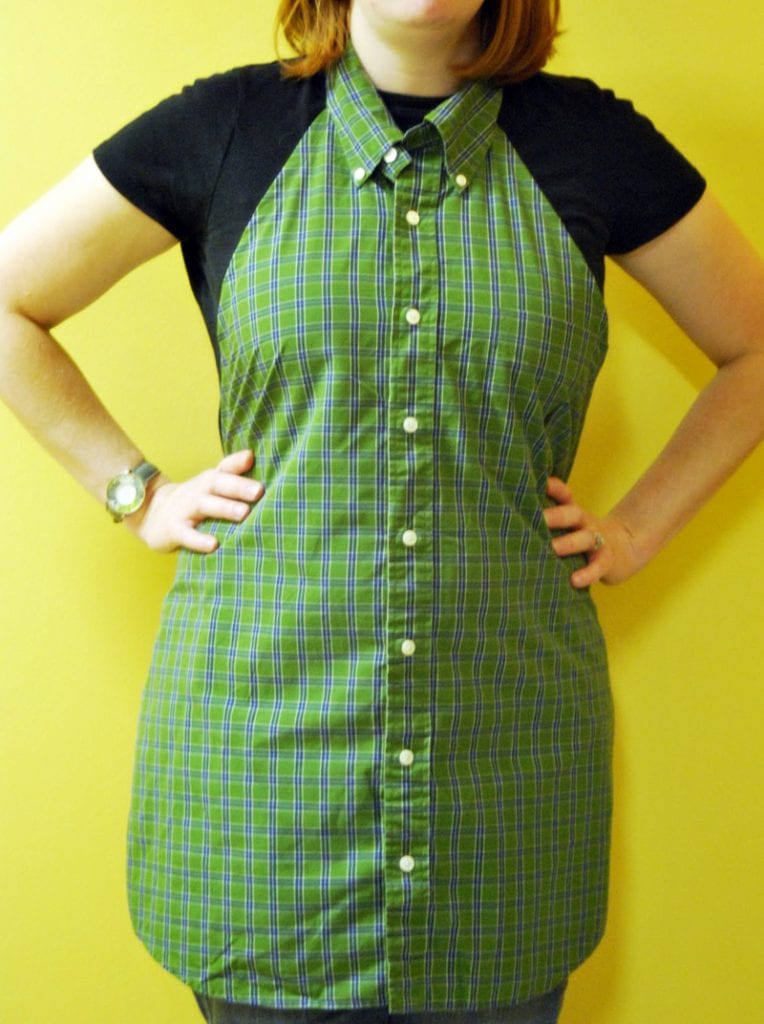
If you have some old pretty men’s shirt in the closet and you don’t know what to do with them, you can upcycle them into aprons.
Contents
How to Craft a Men’s Shirt Apron
Materials:
- Old nice shirt
- Rotary cutter/scissors
- Ruler
- Sewing machine/kit
Steps:
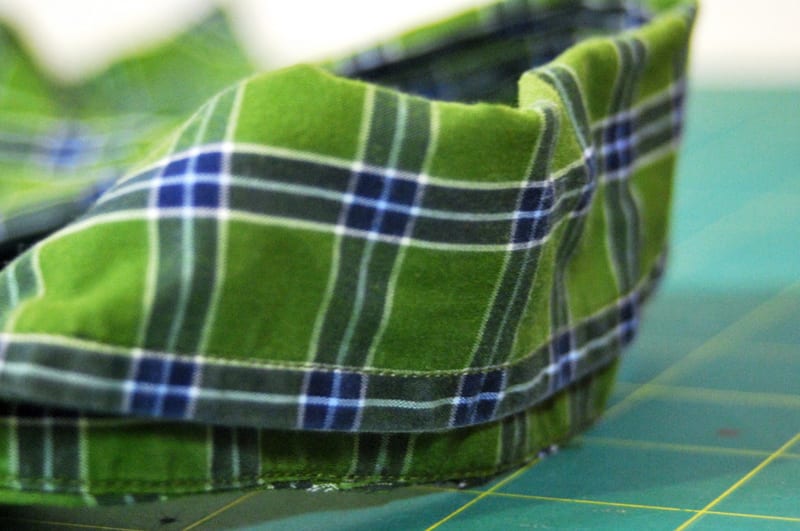
Cut around the collar but leave it intact. Cut it very close to the seam so that you won’t have to hem anything or have any raw edges.
Use rotary cutter and ruler to make a diagonal cut from the armpit to the top of the shoulder. Make sure both sides are even.
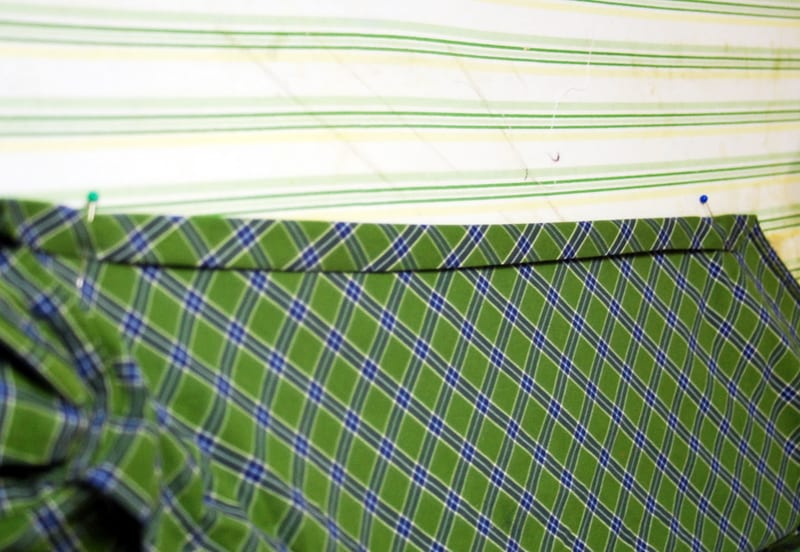
On the edge that you just cut, turn a hem under to conceal raw edges, and sew it down. Do this on both sides.
Then use the excess clothing to make the straps.
Close all raw edges in and sew your straps on to the bottom of your diagonal cut. Be sure to back stitch more than once to secure it.
That’s it!
Source: Gabriel’s Good Tidings Blog
Choosing the Right Shirt for a Men’s Shirt Apron
Upcycling an old men’s shirt into an apron is a simple and sustainable DIY project. However, not all shirts work equally well. The fabric, size, and design of the shirt can affect the final look and functionality of the apron. Choosing the right shirt ensures durability, comfort, and a stylish result. Here’s what to consider before cutting into a shirt.
Best Fabric Choices
The fabric of the shirt plays a crucial role in how well the apron performs. Cotton is one of the best options because it is breathable, easy to sew, and absorbs spills well. A heavier cotton, like oxford or twill, provides more durability and structure. Denim shirts are another great choice, especially for aprons meant for heavy-duty tasks like grilling or gardening. They hold their shape and offer extra protection against stains and spills.
Linen shirts also work, offering a lightweight, breathable option that drapes well. However, they wrinkle more easily, so they may require regular ironing. Flannel shirts create a cozy, rustic apron, perfect for winter baking or crafting. The thickness provides warmth and absorbency, but flannel tends to fray more than other fabrics, requiring careful hemming.
Avoid shirts made from synthetic materials like polyester or rayon blends. These fabrics are often too thin, don’t absorb moisture well, and can be more challenging to sew. They also tend to fray easily, making the finished apron less durable.
Considering Shirt Size
A larger shirt makes it easier to create a full-coverage apron. Men’s XL or XXL shirts provide enough fabric for wider coverage and longer ties, making them ideal for adults of all sizes. If the apron is for a child or a petite adult, a medium or large shirt will still provide sufficient coverage without overwhelming the wearer.
Check the length of the shirt, especially if you want a longer apron. A dress shirt with a slightly longer hemline works well for full-length aprons, while a shorter shirt will result in a waist-length apron, ideal for quick kitchen tasks.
Choosing a Pattern and Color
The ultimate appearance of the apron will rely on the shirt’s design and color. While a solid-colored shirt presents a more elegant and simple style, a traditional striped or checkered shirt looks ageless and informal. Darker hues, including navy, charcoal, or deep green, cover stains better, therefore they are a sensible choice for cooking and gardening.
Choose a shirt with fading, worn-in appearance for a vintage or country-style apron. The apron has a gentler, farmhouse-inspired impression from light pastel hues and flower designs. For a fun, striking design if you want something bold and distinctive, try choosing a Hawaiian or patterned shirt.
Look at a shirt for damage before you commit to it. Look for holes, too strong fading, or weak seams that can compromise durability. Decide if you like to maintain the buttons along the front of the shirt as part of the pattern or cut them off for a sleeker finish. Your apron will endure longer the better the state of the shirt.
Investing care in selecting the appropriate shirt guarantees that your homemade apron is not only fashionable but also durable and useful. Choosing the proper fabric, size, and pattern will make all the difference in the finished product whether your apron is for a craft project, a present, or yourself.
Customization Ideas
Turning a men’s shirt into an apron is a fun and practical upcycling project, but adding custom touches can make it even more unique. Personalizing your apron enhances both its style and functionality. Whether you want extra storage, decorative elements, or a themed design, small additions can turn a simple DIY apron into something special. Here are a few creative ways to customize your men’s shirt apron.
Adding Pockets
One of the easiest ways to enhance an apron is by adding pockets. The front pocket of the original shirt can be repurposed as a storage space for kitchen tools, gardening gloves, or crafting supplies. If the shirt lacks pockets, use leftover fabric from the sleeves or back to create custom-sized pockets. Square or rectangular pockets are the easiest to sew, but rounded or decorative shapes can add a stylish touch.
For a functional upgrade, consider sewing multiple pockets of different sizes. A smaller pocket is great for holding measuring spoons or pens, while a larger one can store recipe cards or hand towels. If you want a secure pocket, add a button or Velcro closure to keep small items from falling out.
Embroidering Personal Touches
Hand embroidery is a great way to make your apron truly one-of-a-kind. You can add initials, a monogram, or a simple stitched design to give the apron a custom look. A floral motif, a favorite quote, or even a small embroidered logo can make the apron feel more special. If you prefer a quicker option, iron-on patches or fabric paint can achieve a similar effect with less effort.
Using contrast thread for embroidery can make designs pop, while a tone-on-tone look keeps it subtle and sophisticated. If embroidery isn’t your style, you can also add a name tag or sew a fabric label onto the apron for a personalized touch.
Decorative Edging and Trims
Adding decorative trims is another way to elevate the design of your apron. Lace or rickrack trim around the edges can give the apron a vintage-inspired look, while pom-pom trim adds a playful element. If you prefer a clean, modern finish, a bias tape border can create smooth, polished edges.
Contrasting fabric strips sewn along the hem or straps can introduce a pop of color. If you want a more rugged look, frayed edges on denim or flannel shirts can add a rustic, worn-in charm. The type of trim you choose can completely transform the apron’s overall aesthetic.
Repurposing Shirt Features
The details of a men’s shirt can become unique elements of your apron. Keeping the button placket intact down the front adds an interesting visual element and makes it easy to adjust the apron’s fit. The collar can be left on as a decorative neckband, or it can be removed and used as a unique pocket detail.
If the shirt has contrasting fabric on the cuffs or inside the collar, use those pieces to make a stylish trim. For an apron with a vintage feel, keep the shirt’s original branding tags or sleeve buttons as subtle accents.
Themed Apron Ideas
If you have a specific purpose in mind for the apron, you can customize it to fit that theme. A barbecue apron made from a sturdy plaid or denim shirt can have leather or canvas details for a rugged feel. A gardening apron can feature waterproof-lined pockets for holding small tools and seed packets. For a baking or kitchen apron, a floral or pastel men’s shirt can be dressed up with lace trim and soft cotton pockets.
If making aprons for gifts, consider choosing shirts in colors and patterns that match the recipient’s personality. Adding a name tag, favorite quote, or themed design makes the apron more meaningful.
Customization doesn’t have to be complicated. Even simple additions like decorative stitching, colorful buttons, or a unique strap style can give your apron character. Whether you’re making a practical work apron or a stylish accessory, these personal touches make it stand out. Upcycling a men’s shirt into an apron is already a creative project, but with a few custom details, you can turn it into something even more special.
Alternative No-Sew Methods
Not everyone has a sewing machine or the time to stitch fabric together, but that doesn’t mean you can’t make a men’s shirt apron. With a few simple tricks, you can transform an old shirt into a functional apron without ever threading a needle. Whether you use fabric glue, hemming tape, or strategic tying techniques, these no-sew methods make the process easy and accessible.
Using Fabric Glue
Fabric glue is a strong and flexible adhesive that works well for making a men’s shirt apron without sewing. After cutting the shirt into the desired apron shape, apply fabric glue to any raw edges to prevent fraying. Use clips or clothespins to hold the glued areas together while they dry. This method works best on cotton and denim shirts, as these fabrics absorb glue well and hold their shape.
For a secure hold, apply glue along the edges where you would normally sew. If you’re making straps from the shirt’s sleeves or excess fabric, glue them to the shoulder area and reinforce the connection with a second layer of adhesive. Fabric glue dries clear, so it won’t affect the final look of your apron.
Hemming Tape for a Clean Finish
Hemming tape is another great option for finishing the edges of a men’s shirt apron without sewing. This iron-on tape bonds fabric together when heated, creating a strong and seamless finish. Simply place the tape along the cut edges, fold the fabric over, and press with an iron according to the package instructions.
Hemming tape is ideal for creating clean hems on the sides of the apron and securing the straps. Since it provides a more polished look than fabric glue, it’s a good choice if you want your apron to have a professional finish without visible stitching.
Tying and Knotting for a No-Cut Apron
For those who prefer an even simpler approach, you can make a men’s shirt apron without cutting or gluing at all. Instead of removing the sleeves, tie them around your back to secure the apron in place. The collar naturally forms the neckline, and the button-down front allows you to adjust the fit.
If the shirt is long enough, you can button it up and fold the lower half to create built-in pockets. This method is perfect for a temporary apron solution, such as for gardening or messy projects, since you can remove the shirt and wear it normally again later.
Using Safety Pins or Clips
For added security, safety pins or fabric clips can reinforce the apron’s shape without sewing. Pinning the straps in place ensures they stay attached, and using small clips along the edges can prevent fraying. This method is great for those who want to make adjustments later or experiment with different apron styles before committing to a final design.
A men’s shirt apron doesn’t have to involve complicated sewing techniques. Whether you prefer fabric glue, hemming tape, or simple knotting methods, you can create a functional apron with minimal effort. These no-sew approaches make upcycling an old shirt easy and accessible, allowing anyone to enjoy a DIY project without needing special tools.
Conclusion
Making a men’s shirt apron is a simple and creative way to upcycle old clothing into something practical and stylish. Whether you sew it, use fabric glue, or try a no-sew method, the result is a unique apron that reflects your personal touch. With the right fabric, customization, and finishing techniques, your DIY apron can be both functional and a fun expression of your creativity.
We have more ways to upcycle old materials to new furnishings. Check out our recycled backyard kitchen guide!