Last Updated on August 22, 2023 by teamobn

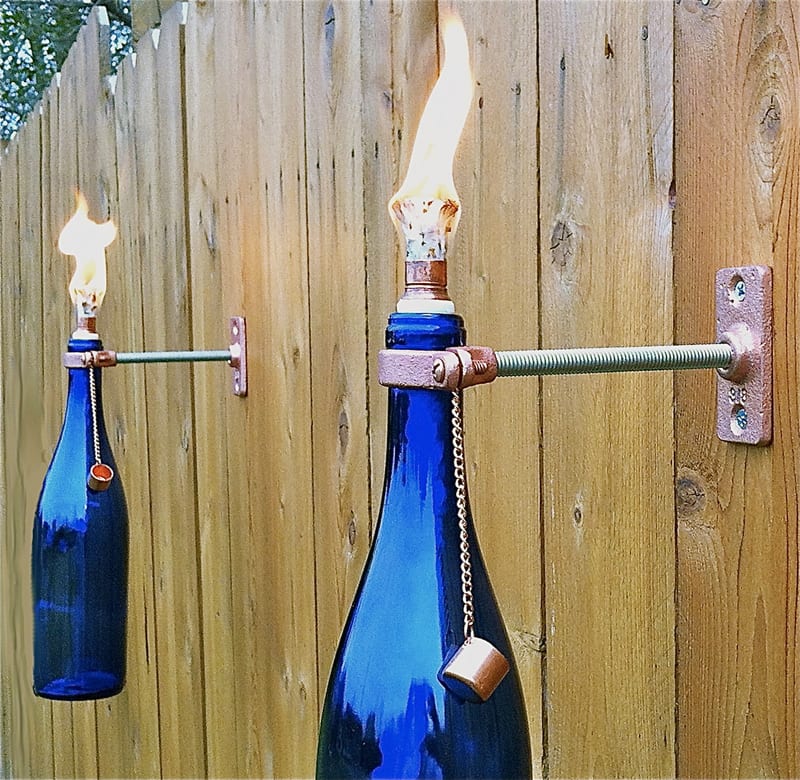
Make good use of those old wine bottles and create your tiki torches at home! Don’t let those beautiful bottles go to waste any longer; instead, turn them into illuminating accents that add warmth and charm to your outdoor spaces.
These glass bottle torches are not only an inexpensive lighting solution, but they can also be customized to match your personal taste. The alternatives are limitless, whether you choose a rustic or futuristic design. Imagine transforming those empty wine or liquor bottles into stunning torches that seamlessly blend with your outdoor decor.
You can choose bottles that resonate with your colour scheme, incorporate different bottle shapes to add visual interest, or even experiment with various torch fuel colours to create a captivating and dynamic lighting display.
The customization doesn’t end with the bottles themselves. You can select or craft torch holders and stakes that perfectly complement your design vision, ensuring that every element aligns harmoniously with your outdoor environment.
Whether your outdoor space is an urban balcony, a cozy backyard garden, or a sprawling patio, these glass bottle torches can be adapted to suit your style, infusing your nights with warmth, personality, and charm.
These DIY glass bottle torches also come with the added bonus of being eco-friendly. By repurposing old bottles and using them as torches, you’re reducing waste and giving new life to something that would otherwise end up in a landfill. So not only will your yard be beautifully illuminated, but you’ll also be doing your part for the environment.
Ready to embrace the art of upcycling and light up your nights with these DIY glass bottle torches?
How to Make a Glass Bottle Torch
In just a few simple steps, you’ll learn how to transform ordinary glass bottles into captivating torches that light up your space with style and flair. Whether you’re looking to add a touch of enchantment to your garden, patio, or outdoor gatherings, this DIY project will not only brighten your nights but also ignite your creativity.
Materials
- Empty Wine Bottle (or any beautiful glass bottles which have necks 1 inch in diameter)
- Teflon Tape 1/2 inch
- Copper Top Plate Connector (threaded for 3/8”-16 thread rod)
- 1” Split Ring Hanger (threaded for 3/8”-16 thread rod)
- 1/2” x 3/8” Copper Coupling
- 1/2” Copper Cap
- Two Hex Nuts (threaded for 3/8”-16 thread rod)
- Two #10 x 1” Zinc Plated Wood Screws (if you’re mounting it to wood)
- 3/8”-16 Zinc Plated Threaded Rod
- Tiki Replacement Wick
- Torch Fuel (use ONLY fuel made specifically for outdoor torches to be safe. i.e. Tiki brand)
Steps
Here are the steps to crafting your very own glass torches that will illuminate your nights with a touch of magic:
1. Decide where you want to put your tiki torch. Screw the Top Plate connector in place.
2. Screw in the 3/8”-16 Rod on the mounted plate until it stops.
3. Thread the two Hex Nuts onto the Rod and tighten one all the way down at the point where the Rod meets the Top Connector Plate. Leave the other Hex Nut at the front end so it can be used to secure the Split Ring Hanger.
4. Thread on the Split Ring Hanger just enough so that the Rod is flush with the inside of the ring. Turn the 2nd Hex Nut counter-clockwise to snug it up against the Split Ring Hanger.

5. Carefully and tightly wrap the 1/2-inch end of the Coupling with your Teflon Tape. Wrap it nice and clean for an even surface. Build up the tape until it fits well in the opening of the bottle and you are sure that it won’t fall inside.
6. Insert the Wick in the Coupling until it sticks out about 1/4-inch or less. The Tiki brand replacement wicks are about 3/8-inch in diameter so they fit really well.

7. Use a funnel to fill the bottle with your favourite torch oil.
8. Insert the Coupling & Wick in the top of the bottle and twist it into place. Let the Wick absorb oil.
9. Loosen up the Split Ring Hanger on one side and position the bottleneck in the ring.
10. Flip the front half of the ring back into place and tighten down the Hanger evenly on both sides. You may need to loosen the other side to make sure both sides are an even tightness. Do not over-tighten the Hanger.

11. You can simply blow out the fire if you want to stop using it. Use the Copper Cap to keep the Wick dry when not in use.
Source: Gerardot And Co.
Expanding on this concept, consider fashioning a fire pit swing set that seamlessly complements your DIY glass bottles. This innovative pairing doesn’t just enhance the visual harmony of your outdoor space; it also creates a captivating focal point where your meticulously crafted glass bottles can find their perfect counterpart.
Crafting Magic!
In this step-by-step adventure, you’ve learned to transform discarded glass bottles into radiant torches that breathe new life into your outdoor spaces. You’ve discovered the joy of eco-friendly crafting as you walked through each uncomplicated stage, transforming recycling into artistry.
These captivating glass bottle torches will not only light up your nights but will also serve as a testament to the power of upcycling. So, create your very own glass bottle torches in just 11 simple steps – an environmentally conscious DIY project that brings brilliance to your evenings.
With each step, you’ll witness the transformation of ordinary items into extraordinary sources of light, illuminating your outdoor spaces with the eco-friendly elegance of glass bottle torches. By choosing to embark on this adventure, you’re not just crafting torches; you will also make a statement about your commitment to a greener, more sustainable world.
Creating your own glass bottle torches means that you’re consciously opting for a DIY solution over purchasing mass-produced, energy-intensive outdoor lighting alternatives. This choice aligns with the principles of sustainability by reducing the demand for new materials and energy resources, ultimately lessening your carbon footprint.
Ready to light up your DIY game? Are these fabulous glass bottle torches your next big project?


