Last Updated on June 19, 2024 by teamobn

If you’re looking for ways to add more storage to your bedroom without taking up valuable floor space, consider using the space under your bed. This lift-top storage bed is a great way to make use of otherwise unused space and can help you to keep your bedroom organized and tidy.
There are a variety of ways to use this space, from adding storage containers to simply placing a few extra pillows or blankets underneath. By getting creative with your storage solutions, you can make the most of your bedroom space with this DIY lift-top storage bed.
This DIY lift-top storage bed can maximize the space in your bedroom! This bed in particular will give you heaps of organized storage.
The lift-top storage bed is completely DIY and will cost you less money compared to store-bought beds with storage. It’s also the perfect solution if you can’t find a bed that fits a small bedroom. By building it yourself you can customize the dimensions to suit the size of your bedroom.
Contents
Building a Lift-Top Storage Bed
Click on any image to start the lightbox display. Use your Esc key to close the lightbox. You can also view the images as a slideshow if you prefer.


Materials
- 4 sheets 1200X2400X18 ply
- 30mm wood screws
- 15mm wood screws
- Varnish 2.5L
- Wool to brush
- 4 sheets 180sandpaper
- 4 sheets 240sandpaper
- 4 sheets 360sandpaper
- 2 pairs of Pneumatic Stem
Tools
- Masks
- Safety Glasses
- Earplugs
- Carpentry electric circular
- Carpentry planing
- square feet
- Carpentry clip
- Pencil
- Sander
- Trimming machine
- Tape measure
- Electric Drill
Steps
To determine the mainframe of your left-top storage bed, measure and cut the bed’s components to the desired dimensions. The mainframe should be cut to size so that it can support the weight of the bed’s mattress and occupants. Other components, such as the headboard, footboard, and side rails, can be cut to the desired dimensions as well.

2-inch wide wood was attached to the short sides of what will be the cover of your storage container. This will create a more sturdy and durable storage container that will be able to withstand more wear and tear.
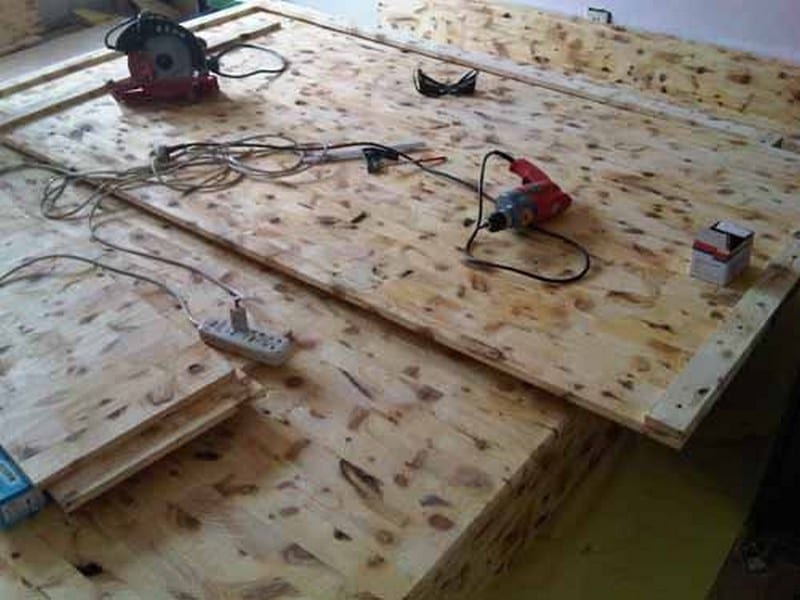
They were also used to strengthen the edges of other parts, which was essential in ensuring the stability and durability of the final product.

Once you have cut all of the parts for your project, it is important to sand them down to create a smooth surface. This will help you achieve a professional look for your finished product. Depending on the type of wood you are using, you may need to use different grits of sandpaper to achieve the desired results. Be sure to sand with the grain of the wood to avoid damaging the surface.

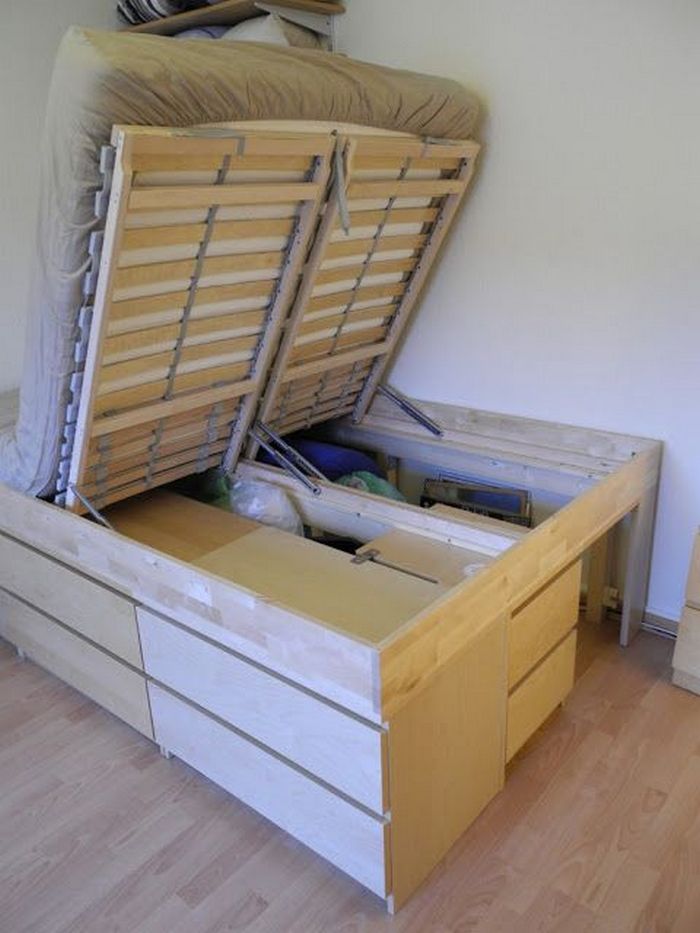
Using a screwdriver, screw the mainframe and middle divider together. Make sure the screws are tight but be careful not to strip them.
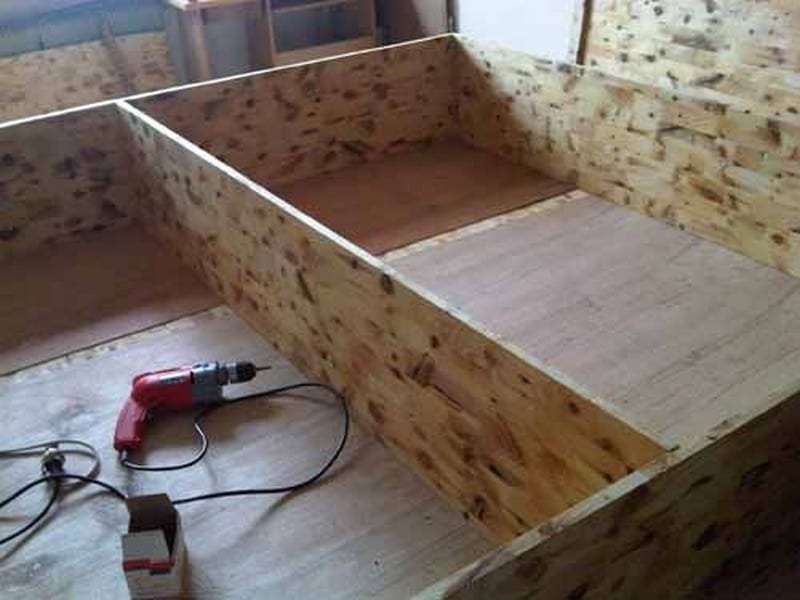

When installing vertical dividers, be sure to measure twice in order to create equal storage areas. This will ensure that your space is divided evenly and efficiently.


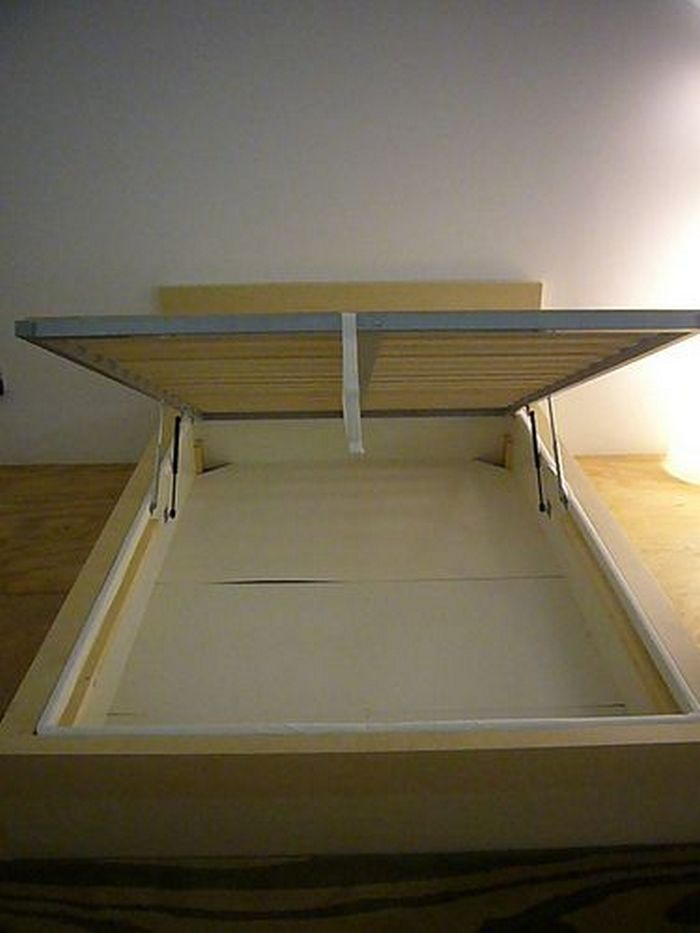
Installing lift-top hardware is a breeze – simply attach them to the vertical dividers and you’re all set! This simple lift-top storage bed upgrade will make it easy to access your stored items, and it’s a great way to add a little extra convenience to your life.

Creating extra storage in the bedroom doesn’t have to be expensive. You just have to create clever storage solutions that are specifically designed for the unique space you have in your home.
Editor’s note: It’s always a good idea to allow for some ventilation from the bed base through the mattress. Standard wall vents can be placed on the sides and the top can be pattern drilled.
Thanks to toni333 for this great tutorial.
Benefits of a Lift-Top Storage Bed
Lift-top storage beds are a brilliant solution for anyone looking to maximize space and organization in their bedroom. Unlike traditional beds, they offer an innovative way to utilize the often-neglected space beneath the mattress. Here, we’ll explore the various benefits of a lift-top storage bed, showing why it’s a smart choice for both functionality and style in any home.
Maximizes Bedroom Space
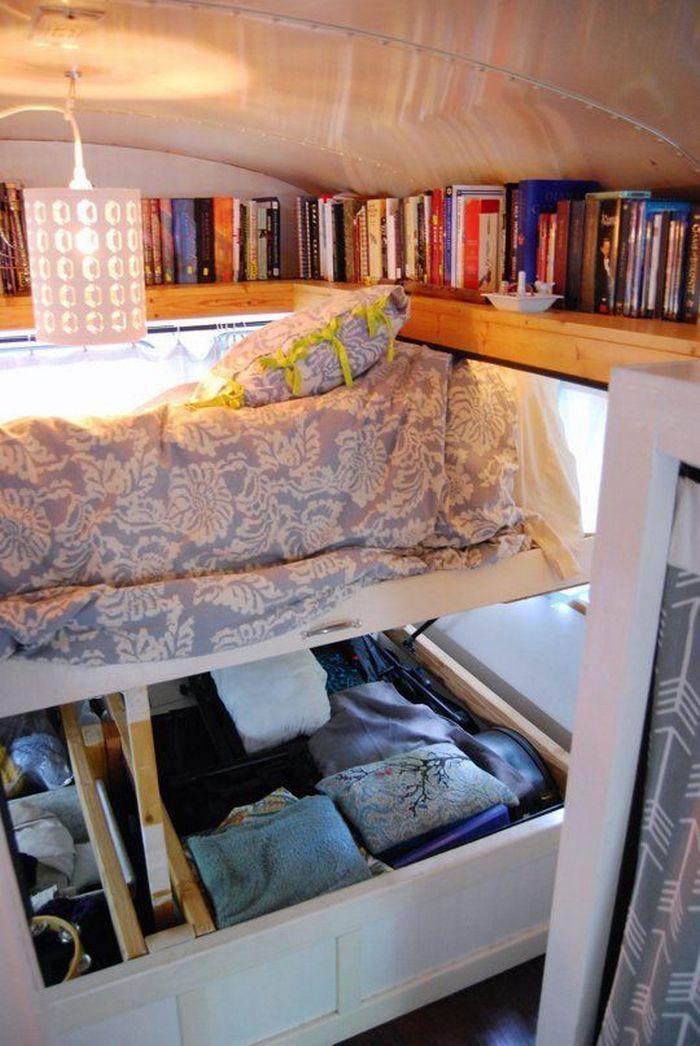
One of the most significant advantages of a lift-top storage bed is its ability to maximize space. In smaller bedrooms or apartments, floor space is a precious commodity. A lift-top storage bed allows you to store items under your bed efficiently, freeing up other areas of your room. This extra storage can be used for bulky items like winter blankets, suitcases, or extra pillows, keeping your living area clutter-free.
Convenient and Easy Access
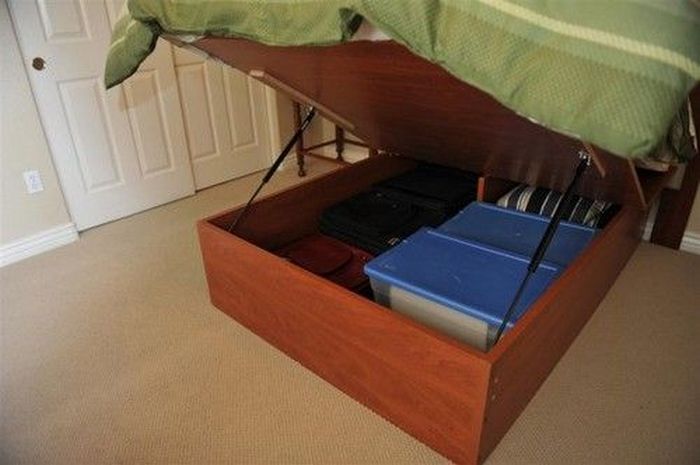
With a lift-top storage bed, accessing your stored items is a breeze. The hydraulic lift mechanism effortlessly raises the mattress, giving you full access to the storage area underneath. Unlike traditional under-bed drawers or bins, which can be cumbersome to reach, the lift-top design lets you retrieve items without bending down or moving the bed. This convenience is especially beneficial for individuals with mobility issues or for anyone who wants a hassle-free storage solution.
Customizable Storage Solutions
Lift-top storage beds offer unparalleled customization options. When you build or choose a lift-top storage bed, you can tailor the storage compartments to suit your needs. Whether you need large open spaces for bigger items or segmented areas for smaller belongings, the flexibility of a lift-top design allows you to organize your storage in a way that works best for you. This personalization makes it easier to keep your bedroom organized and ensures that every inch of space is used effectively.
Enhanced Bedroom Aesthetics
Beyond functionality, lift-top storage beds contribute to a clean and sleek bedroom aesthetic. Since the storage is hidden beneath the bed, there are no visible drawers or bins, which can often disrupt the flow of a room’s design. A lift-top storage bed provides a seamless look, making your bedroom appear more spacious and tidy. Additionally, the bed’s design can be customized to match your décor, from choosing the finish and materials to adding upholstered elements.
Cost-Effective Solution
Opting for a lift-top storage bed can be a cost-effective way to add storage to your bedroom. Instead of purchasing additional furniture or storage units, a lift-top storage bed integrates storage into a piece of furniture you already need – your bed. This integration can save you money and space, making it an ideal solution for budget-conscious homeowners or renters looking to maximize their storage options without breaking the bank.
A lift-top storage bed is more than just a piece of furniture; it’s a versatile and practical solution for any bedroom. By maximizing space, providing easy access to stored items, offering customizable storage options, enhancing your room’s aesthetics, and being cost-effective, a lift-top storage bed proves to be an invaluable addition to any home. Consider these benefits when looking to optimize your bedroom’s functionality and style.
Customization Ideas for Lift-Top Storage Beds
Lift-top storage beds are not only functional but also offer a world of customization options. Whether you want to tailor the look to match your bedroom décor or optimize the storage to fit your needs, the possibilities are endless. Here are some creative customization ideas to transform your lift-top storage bed into a personalized and practical centerpiece in your bedroom.
Finish and Paint Options
Choosing the right finish or paint for your lift-top storage bed can significantly impact the room’s overall aesthetic. Consider these options:
- Natural Wood Finish: Preserve the natural beauty of the wood with a clear varnish or stain. This option works well in rustic or Scandinavian-style bedrooms.
- Bold Paint Colors: Make a statement by painting your bed in a bold color that complements or contrasts with your room’s color scheme. Bright hues or pastel tones can add a playful or serene vibe.
- Distressed Look: For a vintage or shabby chic appeal, consider a distressed paint finish. This technique gives the bed an aged, character-rich appearance.
Upholstered Headboards and Frames
Add a touch of luxury and comfort to your lift-top storage bed by incorporating upholstery. This customization can enhance both style and function:
- Padded Headboards: Create a cozy backdrop for reading or relaxing in bed by adding a padded headboard. Choose fabrics like velvet, leather, or linen to match your bedroom theme.
- Full Frame Upholstery: For a more unified look, upholster the entire bed frame. This approach softens the edges and adds a sophisticated element to the room.
Integrated Lighting Solutions
Lighting can transform your lift-top storage bed into a multifunctional piece of furniture. Consider these lighting enhancements:
- Under-Bed LED Lights: Install LED strips underneath the bed frame to provide ambient lighting. This subtle glow can enhance the room’s atmosphere and serve as a practical nightlight.
- Headboard Reading Lights: Attach adjustable reading lights to the headboard. This is perfect for those who enjoy reading or working in bed without disturbing their partner.
Customized Storage Compartments
Tailor the storage space to your specific needs by customizing the compartments under the lift-top. Here are some ideas:
- Segmented Storage Bins: Divide the under-bed space into different sections using bins or dividers. This helps keep items organized and easily accessible, whether it’s shoes, linens, or seasonal clothes.
- Hidden Safe or Valuables Compartment: Include a discreet compartment for valuables or important documents. This hidden storage adds an extra layer of security.
Decorative Hardware and Accents
Personalize your lift-top storage bed with unique hardware and decorative accents:
- Stylish Handles and Knobs: Choose handles and knobs that complement your room’s style. Whether it’s sleek and modern or vintage and ornate, the right hardware can make a big difference.
- Decorative Trim and Molding: Add trim or molding to the bed frame for an elegant touch. This can elevate the bed’s appearance and tie it into the overall design of your bedroom.
Eco-Friendly and Sustainable Materials
Opt for environmentally friendly materials and finishes to create a sustainable lift-top storage bed:
- Reclaimed Wood: Use reclaimed or recycled wood for a unique, eco-conscious option. Each piece of wood tells a story and adds character to your bed.
- Non-Toxic Finishes: Choose paints and finishes that are free from harmful chemicals. This is especially important for creating a healthy sleeping environment.
Customizing your lift-top storage bed allows you to create a piece of furniture that is both functional and reflective of your personal style. From choosing the perfect finish to adding luxurious upholstery or innovative lighting, the possibilities are vast. These customization ideas not only enhance the bed’s appearance but also optimize its practicality, making it a true centerpiece in your bedroom. Explore these options to craft a lift-top storage bed that perfectly fits your space and lifestyle.
Conclusion
Building a lift-top storage bed is a rewarding DIY project that combines creativity with functionality. It allows you to make the most of your bedroom space while adding a personalized touch to your furniture. With careful planning and a bit of effort, you can create a stylish and practical storage solution that enhances your living environment.