Last Updated on January 8, 2025 by teamobn

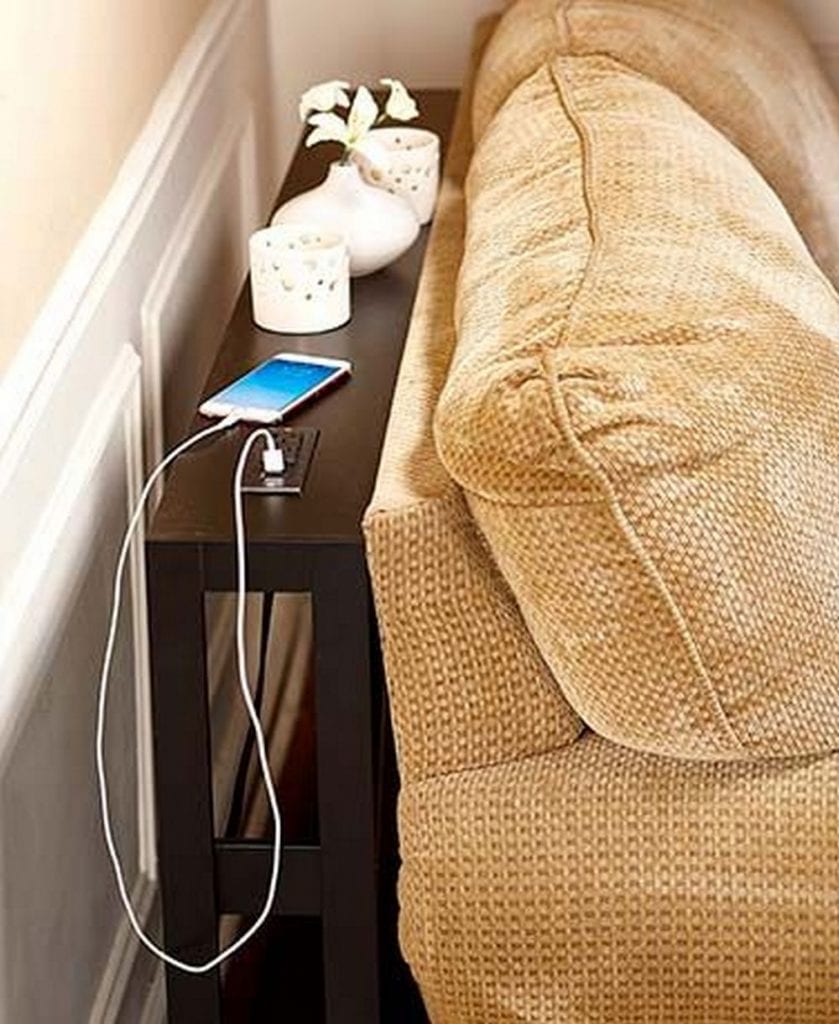
This behind sofa table is not just stylish; it’s super functional, too!
A huge sofa will be a great addition to the living room. It will provide plenty of seating for family and friends and make the room look more inviting. The sofa will also add a touch of sophistication to the room and be a great conversation piece. However, it can also block the sockets on the wall.
Consider a sofa table if you’re looking for a simple way to add more storage and surface area to your living room. Sofa tables are thin, rectangular tables that fit perfectly behind your sofa. They provide the perfect place to set down a lamp, book, or TV remote. Plus, they offer extra storage space for things like coasters, magazines, or blankets. Sofa tables come in various styles, so you’re sure to find one that fits your home’s décor.
Well, the good thing about knowing how to DIY stuff is that you can easily build things that’ll make your life easier. Furniture, for example, is quite expensive when you buy them ready-made. However, if you know how to build it yourself, you can easily save a lot of money. Not to mention, you can also customize your furniture to better suit your needs and taste.
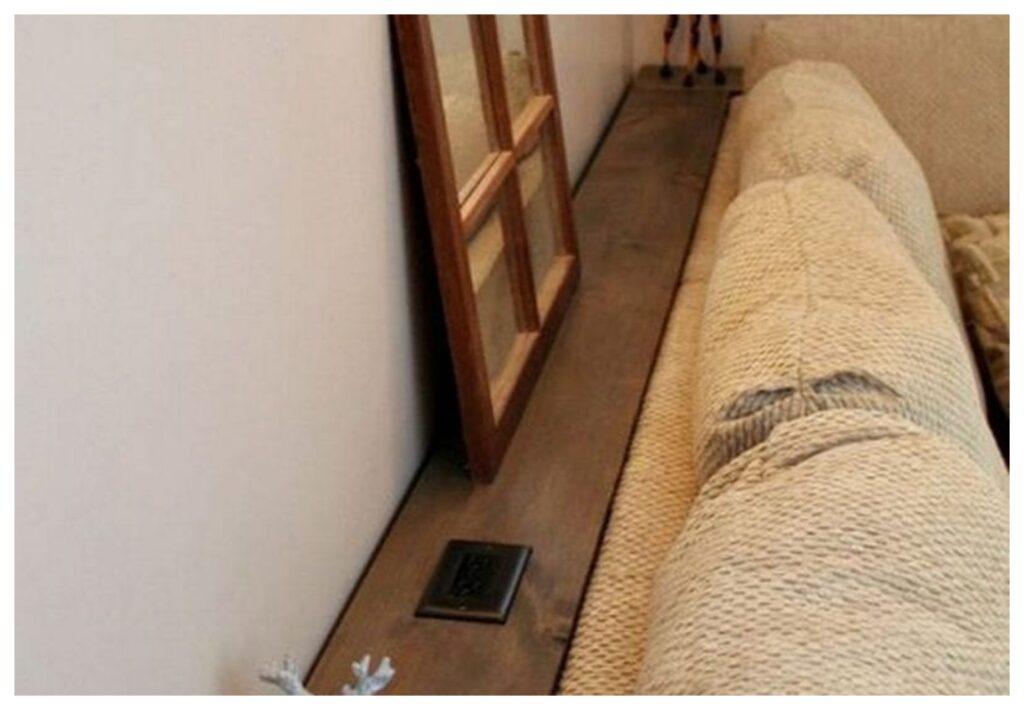
This project is very easy to make and requires only a few tools and materials. For this project, he added some outlets and a mini table at the backrest of the sofa so we could simply plug in our gadgets for easy charging. How convenient! This project is perfect for anyone who loves to be organized and has gadgets within reach. Get started on how to build a sofa table right away and you’ll be sure to love the results!
Contents [show]
How to Build a Sofa Table
A DIY sofa table is a great place to hold various objects while sitting on the couch. Lets go through the couch table plans below:
Materials
- Wood
- Dowel rod
- Wood glue
- Outlet box
- Outlet
- Outlet cover
- 3-prong extension cord
Tools
- Coping saw
- Pencil
- Sanding block
- Drill with a regular bit
- Wire snips
- Phillips head screwdriver
Instructions
Step 1: Planning and Design
- Measure the space behind your sofa to determine the size of your table. Consider the height and length to ensure it fits well.
- Sketch your design, including where the outlets will be placed for easy access.
Step 2: Cutting the Wood
- Use your pencil to mark the wood for cutting, according to your measurements.
- With the coping saw, cut out the tabletop and legs. Ensure your cuts are straight for a stable table.
Step 3: Sanding
- Smooth all edges and surfaces with the sanding block. This step is crucial for a professional finish and to prevent splinters.
Step 4: Assembling the Frame
- Apply wood glue to the ends of your table legs and attach them to the corners of your tabletop.
- For added stability, drill holes and insert dowel rods through the legs and tabletop. Allow the glue to dry according to the manufacturer’s instructions.
Step 5: Installing the Outlet
- Decide on the placement of your outlet box. It should be easily accessible but not interfere with the table’s structure.
- Cut out a recess in the tabletop for the outlet box using the coping saw. Ensure a snug fit.
- Place the outlet box into the recess. Secure it with wood glue or screws if necessary.
Step 6: Wiring the Outlet
- Using the wire snips, cut the end off the 3-prong extension cord. Strip the wires.
- Thread the cord through a pre-drilled hole in the back of the table to your outlet box.
- Connect the wires to the outlet. Ensure the connections are secure and correct. Consult an electrical guide or professional if unsure.
- Screw the outlet into the box and attach the outlet cover.
Step 7: Finishing Touches
- Once the outlet is installed, and the table is assembled, give everything a final sanding.
- Clean off any dust and apply a finish of your choice to protect the wood and enhance its appearance.
Step 8: Setting Up
- Once dry, place your new behind sofa table in its designated spot.
- Plug in the extension cord to a wall outlet to power the table’s outlet.
Click on any image to start the lightbox display. Use your Esc key to close the lightbox.




For a visual guide, check out the video instruction on building your behind sofa table below.
Incorporating Technology Seamlessly
Technology is crucial in enhancing convenience and style in the modern home. When learning how to build a sofa table, incorporating technology can transform a simple piece of furniture into a multifunctional powerhouse. This section explores how to seamlessly blend technology into your behind sofa table, ensuring it complements your living space and caters to your tech-savvy needs.
Planning for Power
- Integrated Outlets and USB Ports: Consider installing outlets and USB ports within the table. This makes charging gadgets, power lamps, or other electronic devices easy, keeping everything you need within arm’s reach.
- Wireless Charging Pads: For a sleeker look and added convenience, embedding a wireless charging pad into the tabletop allows for easy device charging without the clutter of cords.
Cable Management
- Built-in Cord Channels: Incorporate channels or grooves underneath the tabletop or along the legs of your behind sofa table. These can guide and hide power cords, ensuring your space remains tidy and reducing tripping hazards.
- Strategic Outlet Placement: Positioning outlets towards the back or underside of the table can keep plugs and cords out of sight. This thoughtful placement enhances the table’s appearance while maintaining functionality.
Smart Home Integration
- Smart Speakers and Hubs: Reserve a dedicated spot on or within your behind sofa table for smart home devices, like speakers or hubs. This centralizes control of your home’s smart features, from lighting to thermostats, in one convenient location.
- Voice-Controlled Lighting: Incorporate smart, voice-controlled lamps or light strips mounted to the table or placed on its surface. This adds ambiance and functionality, allowing you to adjust lighting without moving from your sofa.
Aesthetic Considerations
- Tech-Friendly Design: When adding technology to your behind sofa table, consider how each element affects the overall design. Choose outlets, USB ports, and other tech features that complement the table’s style and color scheme.
- Discreet Tech Features: Technology should enhance the table’s functionality without dominating its appearance. Opt for flush-mounted outlets and subtle charging pads that blend into the tabletop, preserving the aesthetic appeal.
Ensuring Usability
- Accessible but Unobtrusive: Place technological features within easy reach but ensure they do not obstruct the table’s primary use. Every tech addition should enhance the table’s functionality without compromising its design or usability.
- Flexibility for Future Tech: Design your behind sofa table with the future in mind. Ensure there’s room to add or upgrade tech components as innovations emerge, extending the life and utility of your table.
Incorporating technology into your behind sofa table isn’t just about adding convenience; it’s about creating a piece that’s perfectly adapted to the modern lifestyle. With careful planning and design, your behind sofa table can serve as a stylish, tech-integrated centerpiece that meets the needs of today’s connected home.
Smart Storage Solutions
Maximizing the functionality of your living space often requires clever storage solutions, especially in areas that serve multiple purposes. A behind sofa table offers an excellent opportunity to blend style with utility, providing a discrete yet accessible place to organize everyday items. Here’s how to enhance your behind sofa table with smart storage solutions, making it an indispensable part of your living area.
Utilizing Vertical Space
- Shelves and Cubbies: Add shelves or cubbies beneath the tabletop of your behind sofa table. This space is ideal for books, magazines, and decorative items, keeping them handy yet out of the way.
- Hanging Storage: Consider installing hooks or small baskets on the sides of the table for items like headphones, remote controls, or keys. This keeps frequently used items within reach without cluttering the table surface.
Hidden Storage Features
- Drawers: Incorporating drawers into your behind sofa table design can offer hidden storage for items you prefer to keep out of sight, such as chargers, notebooks, or gaming controllers.
- Lift-Top Mechanisms: A lift-top section on your behind sofa table can hide away larger items while providing a temporary workspace, perfect for a laptop or crafting supplies.
Modular Storage Units
- Basket and Bin Systems: Use baskets or bins that can slide under the table or fit into cubbies. These are perfect for organizing smaller items or concealing blankets and pillows.
- Adjustable Shelving: Installing adjustable shelving under your behind sofa table allows you to customize the storage space to fit your needs, easily accommodating items of varying sizes.
Decorative Yet Functional
- Matching Storage Boxes: Opt for storage boxes that match the table’s style or your room’s decor. These can hold smaller items and look attractive on the shelf, blending functionality with aesthetics.
- Creative Use of Space: Explore unique storage solutions, such as a built-in wine rack or a row of small, decorative drawers for craft supplies. These can turn your behind sofa table into a conversation piece.
Tech-Integrated Storage
- Cable Management Boxes: Use stylish cable management boxes to store and hide power strips and excess cords from your tech devices. This keeps your behind sofa table looking tidy and reduces tripping hazards.
- Ventilated Compartments: Consider adding ventilated compartments to your behind sofa table for tech-heavy storage needs. These can house routers or gaming consoles, keeping them out of sight but cool during use.
Flexible Storage Solutions
- Removable Trays: Incorporate removable trays that fit onto the shelves or within the cubbies of your behind sofa table. These are ideal for organizing smaller items and can be easily removed for cleaning or when you need to access their contents.
- Foldable or Expandable Features: Design your behind sofa table with foldable or expandable sections to accommodate different storage needs. This could include a fold-out desk surface or expandable shelving for additional storage space.
By integrating smart storage solutions into your behind sofa table, you transform it into a multifunctional piece that enhances the organization and aesthetics of your living space. With creativity and thoughtful design, your behind sofa table can balance form and function perfectly, making the most of every inch of your home.
Potential Challenges When Building a DIY Sofa Table
Building your own sofa table can be a rewarding experience, but it does come with its share of challenges. Here’s a breakdown of common hurdles and practical solutions to keep your project on track:
Balancing Components Without Adequate Support
- The Challenge: Without clamps or a stable work surface, it’s tricky to hold pieces in place while attaching them.
- The Solution: Utilize makeshift supports, such as books or boxes, to keep your materials steady. Consider investing in affordable clamps for better stability.
Insufficient Drill Power and Mismatched Tooling
- The Challenge: A weak drill or mismatched drill bits and screw heads can cause frustration and slow progress.
- The Solution: Ensure your drill is charged and opt for a multi-bit set to find the perfect fit for your screws. If power is a persistent problem, renting a more robust drill could be a wise temporary solution.
Reinforcing Wobbly Structures
- The Challenge: Longer pieces of wood may require more reinforcement than initially anticipated.
- The Solution: Use additional screws to secure larger pieces. Countersink them to ensure a smooth surface, which will also allow for a clean finish when filling holes.
Ensuring Precise Measurements and Cuts
- The Challenge: Inaccurate measurements and cuts can lead to ill-fitting components, derailing your assembly.
- The Solution: Double-check measurements before you cut. A measuring tape and a marked carpenter square will greatly improve accuracy. Patience in preparation will save time and trouble later.
Dealing with Imperfections in Wood
- The Challenge: Furring strips and other affordable wood types often have visible imperfections.
- The Solution: Use a dark wood stain to mask minor flaws. In the absence of wood filler, a homemade mix of drywall mud and sawdust can effectively disguise small gaps and blemishes.
Each project comes with its unique set of challenges, but with the right approach and a bit of creativity, you can craft a beautiful and functional sofa table. Happy building!
Conclusion
Building a behind sofa table is an enriching project that combines style with practicality, adding essential functionality and a touch of personal flair to any living space. It offers a creative solution for storage and technology integration, ensuring that comfort and convenience are always within reach. Ultimately, this DIY endeavor not only enhances the aesthetic appeal of your home but also caters to the evolving needs of modern lifestyles.
We have more ways to add functionality to your sofa. Check out our sofa arm table guide next!
FAQ: How To Build a Sofa Table
- How can I build a DIY sofa/console table within budget?
- Creating a stylish and functional DIY sofa or console table within budget is easier than you might think. By using budget-friendly materials like furring strips, a lumber plank, screws, and wood glue, you can craft a custom piece that fits perfectly behind your sofa.
- The process involves measuring and cutting the wood, assembling a sturdy frame, attaching the tabletop, and finishing with sanding and paint or stain. With basic tools like a drill, saw, and sandpaper, plus attention to safety and budget, this project is a simple and rewarding way to enhance your living room decor.
- What tools do I need to build a behind sofa table?
- To build a behind sofa table, you’ll need a coping saw, a pencil, a sanding block, a drill with a regular bit, wire snips, and a Phillips head screwdriver. Some additional tools might include a miter saw for precise cuts and a Kreg Jig for added stability.
- How can I add outlets to my behind sofa table?
- You’ll need an outlet box, an outlet, a cover, and a 3-prong extension cord to add outlets. Cut a recess in the tabletop for the outlet box and wire it by threading the cord through the table. Ensure the connections are secure, and use screws to fix the outlet in place.
- How do I make the table sturdy?
- Wood glue and dowel rods for additional joint support will improve the table’s stability. If needed, brackets can also be used for added reinforcement, especially for longer pieces of wood.
- Can I customize the table’s size?
- You can customize the table size based on the space available behind your sofa. Measure the width and height of the sofa and adjust the woodcuts accordingly. If the table is less than 6 feet, you can eliminate the middle piece for a simpler design.
- What materials should I use for this project?
- The materials you’ll need include wood, dowel rods, wood glue, an outlet box, and screws. Furring strips and a 2×12 board work well for a budget-friendly option. You can also choose a wood stain or paint that matches your home’s decor.
- How do I hide wires for a cleaner look?
- You can add built-in cord channels along the legs or underneath the tabletop to hide wires. This will guide cords discreetly, ensuring a tidy appearance. Position the outlets towards the back to keep cords out of sight.
- What finishing options do I have?
- For a smooth and polished finish, sand the wood with a fine-grit sanding block and apply a wood stain. Dark walnut is a popular choice for a warm look. A layer of shellac or matte wax can protect the surface and enhance durability.
- Can I incorporate wireless charging into the table?
- Yes, embedding wireless charging pads into the tabletop is a sleek option. This feature allows for easy device charging without cluttering the space with cords.
- How stable is the DIY sofa table when placed behind a sofa?
- The stability of a DIY sofa table behind a sofa depends on a few key factors. Solid construction with durable materials enhances overall sturdiness, while ensuring all legs are level is crucial to prevent wobbling. Floor conditions, such as uneven surfaces, can also impact stability, which can be addressed with shims or furniture pads. With proper attention to build quality, leg adjustments, and the floor’s condition, a DIY sofa table can remain stable and functional.
- How can I make the table construction process easier if I’m working alone?
- Building a table solo can be simplified with proper preparation and techniques. Start by clearing a flat workspace to ensure stability and easy balancing during assembly.
- Use clamps to hold pieces in place, acting as a second set of hands for accurate alignment. Invest in quality tools, screws, and glue to streamline the process and ensure a sturdy final product. By planning each step and breaking the project into manageable tasks, you can confidently complete the table on your own.
- What are some alternative DIY projects for beginners on a budget?
- Affordable DIY projects are a great way for beginners to enhance their space without spending much. Create a canvas frame to stylishly display photos or art using minimal materials for an inexpensive upgrade.
- Transform new wood into a rustic, vintage look with simple household items to add character to shelves or picture frames. Try making string light planters for a combination of greenery and warm lighting, or elevate your walls with the board and batten technique for added texture and charm. These budget-friendly projects are easy to tackle and deliver satisfying results.
- What should I do if I don’t have a Kreg Jig for table assembly?
- Assembling a table without a Kreg Jig is simple with a few adjustments. Use 2-inch brackets to provide strong support and stability at the joints. Pre-drill pilot holes to prevent wood from splitting and ensure proper alignment, holding longer pieces steady as you work.
- Secure the joints with wood glue and attach the brackets using screws for a sturdy connection. This approach offers a reliable alternative to specialty tools while maintaining durability.
- How can I ensure the wood doesn’t split when assembling a table?
- Preventing wood from splitting during table assembly requires careful preparation and technique. Use a drill bit slightly smaller than your screws to create pilot holes, which guide the screws and reduce pressure on the wood.
- Clamp delicate or narrow pieces to keep them steady while drilling and ensure even pressure when driving in screws. Handle tools with care and apply slow, steady pressure throughout the process to minimize damage and maintain control. These steps help ensure a smooth assembly and a durable, well-crafted table.

