Last Updated on February 9, 2024 by teamobn

A great wood smoker you can enjoy all year round!
When it comes to smoking meats and fish, size definitely matters. If you’re smoking for a large group of people, you’re going to need a smoker that can accommodate a lot of food. Otherwise, you’ll be stuck smoking in batches, which can be time-consuming and frustrating.
So, if you’re looking for a large smoker that can handle a lot of food, here are a few things to keep in mind. First, you’ll need to decide what type of smoker you want. There are electric smokers, which are easy to use but can be expensive. There are also charcoal smokers, which are less expensive but require more work to use.

You’ll be pleased to learn how easy it is to build your very own mini timber smokehouse. In fact, this DIY project can easily be finished over a weekend with just a few tools and some basic carpentry skills. The resulting smokehouse will be a great addition to your backyard and will allow you to enjoy delicious smoked meats and fish all year round.

If you’re a fan of smoked meats, you’ll love having your own wood smoker right in your backyard. This easy-to-build wood smoker is perfect for backyard barbecue enthusiasts. With just a few modifications, you can turn a simple outdoor storage shed into a fully functional wood smoker.
So if you already have an old storage shed for your gardening tools, this project is perfect for you. With a little bit of work, you can easily turn it into a smoker that will make your friends and family drool.
Want to learn how this timber smoker was built, then read on!
Contents
4 Basic Parts of a Wood Smoker
The Source of the Smoke
The source of the smoke is one of the most important aspects of a smokehouse. This could be a simple wood-fired box or a more sophisticated smoker. The wood used to create the smoke is also important. The most common woods used are hickory, mesquite, oak, and maple. Each of these woods imparts a different flavour to the meat being smoked.
A Place to Hold the Smoke
Now that you’ve got your wood-fired box, it’s time to find a suitable place to hold the smoke. If you’re smoking a large amount of food, you’ll need a shed or other structure that can accommodate the size of your smoking operation.
A wooden shed is a great backyard storage solution and can be built relatively easily with the right tools and instructions. This guide will give you everything you need to know about building a wooden shed from scratch, including what materials you’ll need and where to find the best instructions.
With a little time and effort, you can have a beautiful and functional shed as a wood smoker that will provide years of smoking and enjoyment.
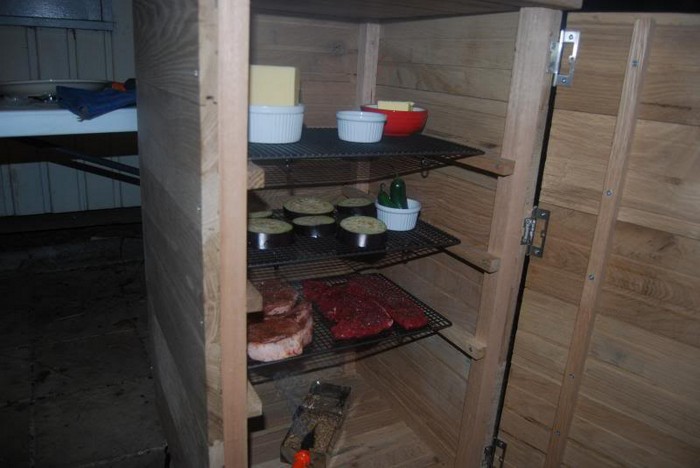
A method to hold the meat in the smoke
There are various ways you can hold the meat in your wood smoker. You can hang them, or you can place them on racks. If you choose to hang your meat, make sure that the hooks are placed properly so that the meat is secured and will not fall. If you opt to place your meat on racks, ensure that they are placed far enough apart so that the heat can circulate properly and cook the meat evenly.
A Draft Regulator
A draft regulator should be installed in your wood smoker because it will help to ensure consistent smoking temperatures. By regulating the amount of air that is able to enter the smoker, you can better control the smoking process and produce more consistent results.
Additionally, a draft regulator can help to reduce the amount of fuel that is required to maintain smoking temperatures, which can save you money in the long run.
Building a Wood Smoker
Materials
- 2 sheets of 1/2″ Plywood
- 12 pcs of 2×4 Timber, 8′ long
- 6 pcs of gate style Hinges
- 2 Handles and Latch
- Galvanized Nails
- Roofing Material
- 2-1/2″ Pocket Hole Screws
- Wood Glue
Tools
- Measuring Tape
- Speed Square
- Kreg Jig
- Cordless Drill
- Circular Saw
- Miter Saw
- Safety Gear
Instructions
Step 1: Design Your Smoker
- Decide on the dimensions of your smoker. A common size is 4 feet tall by 2 feet wide by 2 feet deep.
- Sketch your design, including where the doors will be and where you’ll place the racks inside.
Step 2: Cut Your Materials
- Using the circular saw and miter saw, cut the 2×4 timbers to form the frame of your smoker. You’ll need four pieces for each height, width, and depth.
- Cut the plywood sheets to create the sides, top, bottom, and door of the smoker.
Step 3: Assemble the Frame
- Lay out the cut 2x4s to form the frame. Use the cordless drill and wood glue to secure the corners together with 2-1/2″ pocket hole screws.
- Ensure the frame is square by measuring diagonally across the frame; both measurements should be equal.
Step 4: Attach the Plywood
- Attach the plywood panels to the frame with galvanized nails to form the sides, top, and bottom of the smoker.
- Use the speed square to ensure the panels are aligned correctly as you attach them.
Step 5: Construct the Door
- Cut a piece of plywood for the door. Make sure it’s sized to fit the front opening of the smoker.
- Attach the gate style hinges to one side of the door and then to the frame, ensuring the door opens and closes smoothly.
- Attach the handles and latch to the door.
Step 6: Install Racks Inside
- Inside the smoker, install horizontal supports made from 2x4s at your desired rack heights.
- You can use additional pieces of plywood or metal grates as the actual racks, resting them on the supports.
Step 7: Add Roofing
- Cut the roofing material to fit the top of your smoker.
- Attach the roofing material to the top of the smoker with galvanized nails, ensuring it’s secure and water-resistant.
Step 8: Ventilation and Smoke Source
- Cut a small hole at the bottom of one side for air intake and another at the top for smoke release. You can control the airflow with simple metal plates that slide over the holes.
- For the smoke source, you can create a separate firebox attached to the smoker or place a metal pan inside the bottom of the smoker where you can put the wood chips.
Step 9: Finishing Touches
- Check all joints and seams, ensuring everything is tightly secured and sealed. You may want to apply a non-toxic sealant on the inside to help retain the smoke.
- Install a thermometer in the door or the wall of the smoker to monitor the internal temperature.
Step 10: Safety Check
- Before using your smoker, make sure it’s stable and located in a safe, open area away from any flammable materials.
- Always wear safety gear when operating the smoker, including gloves and eye protection.
Click on any image to start the lightbox display. Use your Esc key to close the lightbox.![]()


Choosing the Right Wood for Your Smoker
Choosing the right wood for your wood smoker is crucial for achieving the perfect flavor in your smoked meats. Different types of wood impart different flavors, and matching the wood to the type of meat can elevate your BBQ to new heights. Let’s explore how to select the best wood for your wood smoker to ensure delicious results every time.
Types of Wood
When selecting wood for your smoker, the choice of wood can significantly impact the flavor of your smoked dishes.
Here’s a detailed look at some popular wood types and how they can enhance your wood smoker experience:
Hickory
Hickory is highly regarded in the smoking world for its strong, yet not overwhelming, sweet and bacon-like flavor. This wood is a versatile choice that complements a wide variety of meats.
It is particularly well-suited for pork and ribs, infusing them with a hearty, rich taste synonymous with traditional American barbecue. Hickory’s robust flavor profile also makes it a good match for beef and chicken, offering a versatile option for those who enjoy experimenting with different types of meats in their smoker.
Mesquite
Mesquite wood stands out for its intense, earthy flavor that can add a bold taste to your meats. It burns hotter and faster than many other smoking woods, making it ideal for shorter smoking sessions.
Mesquite is especially recommended for beef, like brisket, whose strong flavor complements the natural taste of the meat. However, due to its potency, mesquite should be used cautiously to avoid overwhelming the meat’s flavor. It’s often best mixed with milder woods or used sparingly to achieve the desired taste balance.
Oak
Oak is a go-to wood for many smokers due to its medium to strong flavor, which is less intense than hickory but still offers a significant taste profile. Its versatility is one of its strengths, as it pairs well with beef, pork, and fish without dominating the dish.
Oak’s balanced flavor makes it a solid choice for those new to a wood smoker or anyone looking for a reliable wood that can be used across a range of meats. Whether you’re smoking a brisket, pork shoulder, or salmon, oak provides a steady, pleasing smoke that enhances the natural flavors of the food.
Maple
Maple wood offers a more subtle, sweet flavor than the more intense options like hickory or mesquite. This makes it particularly suitable for poultry and small game birds, where its mild sweetness can complement without overpowering the delicate flavors of the meat.
Maple is also an excellent choice for pork in your wood smoker, adding a gentle touch of sweetness that works well with the natural richness of the meat. Its light, sweet smoke can offer a nice contrast to the deeper, more robust flavors of other woods, making it a fantastic option for those looking to add a nuanced taste to their smoked dishes.
Each type of wood brings its unique flavor to the smoking process, allowing for a wide range of taste experiences. By understanding the characteristics of these woods, you can better match them with appropriate meats to create delicious, smoked dishes that are sure to impress.
Matching Wood to Meat
Matching the right type of wood with the appropriate meat can elevate your wood smoker game, ensuring each dish is perfectly flavored.
Here’s a more detailed guide to help you make the best choices for your wood smoker:
Beef
Beef, with its robust and hearty flavor, pairs well with woods that have a strong profile. Mesquite, known for its intense, earthy flavor, enhances the natural taste of beef, making it ideal for cuts like brisket and steaks for your wood smoker.
However, its potent flavor means it should be used judiciously. Oak is another excellent choice for beef, offering a medium to strong flavor that complements the meat without overpowering it. Oak is particularly versatile, suitable for a variety of beef cuts, providing a smoke that’s both rich and subtle.
Pork
Pork benefits from a balance of sweetness and intensity, which can be achieved with woods like hickory and maple when cooking them in your wood smoker. Hickory adds a sweet, yet strong flavor that’s particularly good for pork ribs and shoulders, enhancing the meat’s natural juiciness.
Conversely, Maple imparts a milder, sweeter smoke, making it perfect for pork loin or tenderloin in your wood smoker. Where you might seek a subtler smoked taste, these woods ensure that the pork’s flavor is enhanced, not masked.
Poultry
Poultry’s lighter flavor requires wood that won’t overwhelm the meat when cooking in your wood smoker. Maple and various fruitwoods (such as apple, cherry, and peach) are ideal choices for chicken, turkey, and other birds.
These woods provide a mild, sweet smoke that complements the delicate flavors of poultry. Fruitwoods especially lend a slightly fruity undertone that can make poultry dishes unique and memorable. Whether you’re smoking a whole chicken or turkey breasts, these lighter woods can add depth without dominating the taste.
Fish
Fish requires a delicate touch when it comes to smoking, as its flavors are often subtle and easily overpowered. Alder is a classic choice for fish, offering a light, slightly sweet smoke that enhances rather than masks the taste of the fish.
Fruitwoods also work well with fish, adding a hint of sweetness that pairs nicely with the natural flavors of salmon, trout, and other seafood. These milder woods ensure the fish remains the star of the dish, subtly accented by the smoke.
By carefully matching the wood to the meat, you can ensure that each smoked dish you prepare is flavorful, balanced, and delicious. Experimenting with different wood and meat combinations can also lead to exciting and unique culinary creations, expanding your smoking repertoire.
Experimenting with Flavors
Experimenting with flavors by mixing different types of woods is a creative way to customize the taste of your smoked meats. This approach allows you to blend the unique characteristics of various woods, creating a nuanced smoke that can enhance your dishes in unexpected ways.
Here’s how you can dive into the art of wood blending and discover new flavor profiles for your smoking projects:
Start with a Base Wood
Choose a base wood that provides the primary flavor you want with your wood smoker. For example, oak or hickory can serve as a strong foundation due to their versatile and robust flavors. These woods are excellent starting points because they offer a consistent smoke that complements a wide range of meats.
Add a Secondary Wood for Complexity
Incorporate a secondary wood with a different, perhaps milder for your wood smoker, flavor profile to add complexity. Maple or apple can introduce sweetness, while cherry might add a hint of fruitiness. The secondary wood should complement the base wood without overwhelming its flavor, creating a balanced and layered smoking experience.
Consider the Meat
Think about the type of meat you’re using on your wood smoker. Beef and pork can handle stronger, more intense smoke flavors, so pairing woods like mesquite with cherry can elevate these meats. Poultry and fish, being more delicate, might benefit from lighter combinations, such as alder and apple, which won’t overshadow the meat’s natural flavors.
Experiment with Ratios
The proportion of each wood type for your wood smoker can significantly affect the flavor of the smoke. Start with a higher ratio of the base wood and gradually increase the amount of the secondary wood until you find the perfect balance. For instance, a 3:1 ratio of hickory to apple wood can offer a strong smoke with a hint of sweetness, ideal for pork shoulders or ribs.
Keep Notes
Document your wood smoker experiments, including the types of wood used, their ratios, and the results. Noting the characteristics of the smoke and how well it paired with different meats can be invaluable for refining your smoking techniques and developing your signature flavor profiles.
Share and Get Feedback
Share your wood smoker creations with friends and family for their opinions on the flavor profiles. Feedback can provide insights into how others perceive the smoke and meat combination, helping you fine-tune your wood blends.
Mixing different woods allows you to create a range of subtle to complex flavors that elevate your smoked dishes beyond the traditional. This experimental approach not only broadens your smoking skills but also makes the process more enjoyable and tailored to your taste preferences. Don’t hesitate to explore and play with different wood combinations to discover the unique flavors they can bring to your smoker.
Conclusion
Building your own wood smoker is a fulfilling project that enhances your DIY skills and opens up a whole new world of culinary possibilities. Following the step-by-step guide, you can construct a durable, efficient wood smoker using basic materials and tools. This smoker will serve as the centerpiece for many gatherings, allowing you to experiment with different smoking techniques and flavors.
An outdoor island as your workstation is a great companion to your wood smoker. Check out our outdoor grill island next!