Set window bucks on the wall when you reach windowsill height. You can pre-build the bucks while your threshold is drying. Use standard carpentry techniques to brace the bucks square, and to keep the buck plumb and level.
We use double 2×4 bucks instead of wide lumber, and we use poles for braces instead of milled lumber to cut costs. It’s often a good idea to pound ½” rebar down through the bags on either side of door and window openings if you have lots of openings like we do.

It’s easiest to build a bond beam immediately above windows and doors so you don’t have to build lintels. This method saves hundreds of dollars and one whole step. Reinforced concrete or wood bond beams are both acceptable. You’ll want to read up on these building steps since the subject is too involved to summarize in a few sentences.
We used concrete due to the prevalence of termites in our area. We used two layers of ¼” plywood as forms, ½” rebar pins pounded in the tops of walls, and ½” horizontal rebar. Pour the concrete nonstop so you don’t have any joints. Embed hurricane ties in the concrete for securing roof poles. Allow drying for several days before stripping the forms and building the roof. Any voids in the concrete can be patched when you plaster.

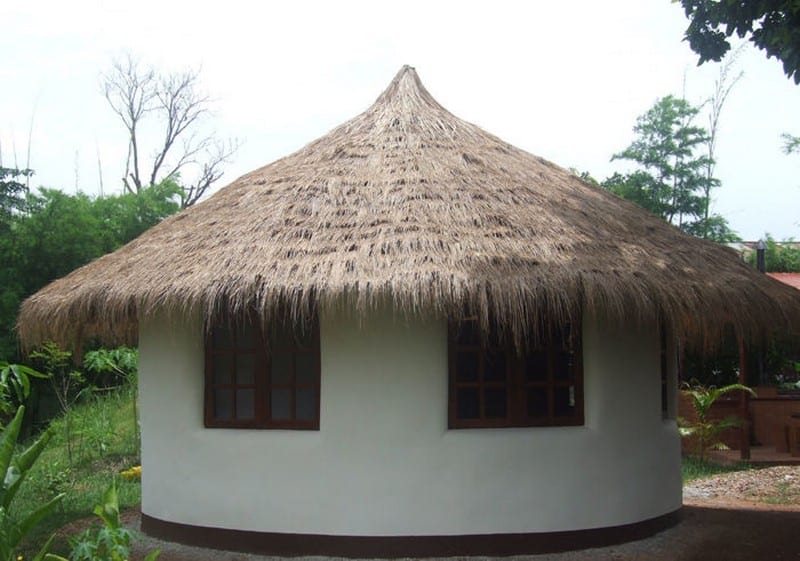
Build the roof after the bond beam is finished. Any type of roof is possible, and space doesn’t allow a lengthy discussion. We used a metal compression ring with radiating wood poles covered in thatch. Create large roof overhangs of approximately 30”-36” to protect walls from moisture damage. The exact size will depend on your climate.
The roundhouse has a super strong feeling due to the concrete bond beam, thick walls, sturdy poles, and round shape. You could probably have a dozen workers on the roof with no visible effect. The roof frame went together almost like clockwork. The compression ring worked perfectly. The roof was all bolted together in about 4 hours, in part because the poles were precut and prefinished in advance.
Thatching is usually very slow and laborious, but we thatched our roundhouse in just one day and for only $100 using pre-made thatch panels. That’s why I love thatch panels – they’re very inexpensive and all the tedious work has already been done.
And they work great on round (conical) and organically shaped roofs because they’re flexible. Just bend them into position and nail them in place. We installed the panels using 8″ spacing. Plan on rethatching every 3-5 years or so, depending on the quality of your thatch. Some thatch will last 10 years or even longer.
In cold climates, you’ll want a thick roof with lots of insulation. This can be achieved with trusses or TJIs (engineered truss joists). Wide dimension lumber could also be used, however, this requires cutting old-growth forests.

Use standard carpentry techniques to install doors and windows. This boils down to simply screwing the door and window frames to the buck so they are plumb and level. Add shims as necessary. Remove the doors after they are fitted to prevent damage. Mask off windows with plastic to reduce cleanup later.

Here’s a brief summary of the cement plastering process we used on the exterior of our earthbag roundhouse:
Step 1: Put cement between the bags in the recesses.
Step 2: Add a thin coat of cement over the bags.
Step 3: Add more cement.
Step 4: Add more cement.
Step 5: Trowel the plaster smooth and use a sponge float to smooth out the finish.
As you can see, the process is quite simple, although labour-intensive. It boils down to adding a little plaster at a time. Leave each coat rough so the next coat will better adhere. No plaster mesh is needed – the plaster sticks to the earthbags, no problem. Resist the temptation to overwork the plaster or you’ll lose adhesion to the bags. The total process took about five days of work for two workers spread out over a little more than a week. A third worker helped on the last day. Use best practices in your area. Always prevent the plaster from freezing. Keep plaster moist and allow to dry slowly for best results.

Earthen plaster is the lowest cost, and the easiest type of plaster to work with. Many people find earthen plaster very enjoyable work. They’re often pleasantly surprised at how incredibly simple it is. After all, the main process is basically smearing mud on the walls. Follow one of the free recipes on the Internet. Experiment with small patches to help determine the optimum mix for your materials. Add more sand or less water if the plaster cracks. Add more clay if the plaster doesn’t stick to the walls.
The first step is to fill the recesses between bags and apply plaster around doors and windows. Plaster mesh is recommended around all windows and doors to help prevent cracking. You can apply earthen plaster with your hands or with a hawk and trowel.
Allow each coat to thoroughly dry before adding additional coats. Leave each coat rough so the next one will more readily bond. Add more coats of plaster until your walls are finished. Smooth the final coat until you’re satisfied with the results.


At this point, you can finish your electrical and install plumbing fixtures. You can also install doors, trim, shelving and cabinets, and then stain and varnish any woodwork, and paint your home. But plastered earthbag walls don’t require painting or trim. Many builders plaster right up to windows, doors and floors. This is another major time and cost-saving advantage of building with bags.
Finishing details turn a house into a home. It’s what people really notice. If you want a really nice home, be sure to plan accordingly and give this some extra thought. Finishing work does require extra time and effort, but the results are definitely worthwhile.
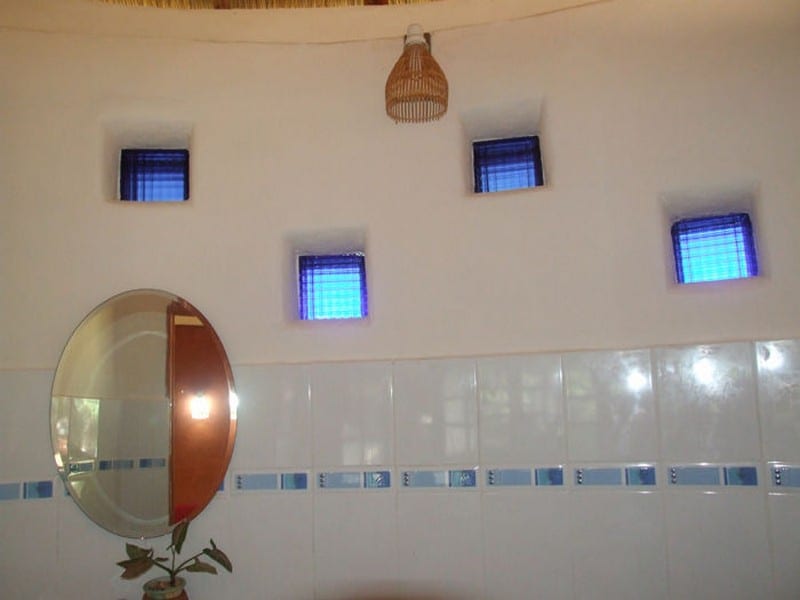
Interior view showing the natural colour of earthen plaster, recycled windows and yellow concrete floor. For the floor, we troweled natural iron oxide pigment on the surface before the concrete set up. The pigment is sprinkled by hand and troweled into the top ¼” as the concrete sets up. A little more colour was added later during final troweling to even out the colour. We were careful to moisten the sand and gravel under the floor to slow drying and prevent cracking.


Although made from unusual materials, earthbag homes look good aesthetically. Their fluid, organic shapes blend nicely into the environment. These homes are very easy to personalize to suit the owners’ aesthetic needs.
Could you live in this earthbag roundhouse?
Thanks to Owen Geiger for this great tutorial!