Has the summer heat got you daydreaming of spending all day in a pool? You can go to a beach resort and do exactly that but it would most likely cost a lot of money. Also, a frequent trip would not be practical if you are working like the rest of us.
Well, we found a great solution – why not build your inexpensive pool? If backyard space and maintenance are a concern, here’s a very simple DIY above-ground plunge pool that you can enjoy for years!
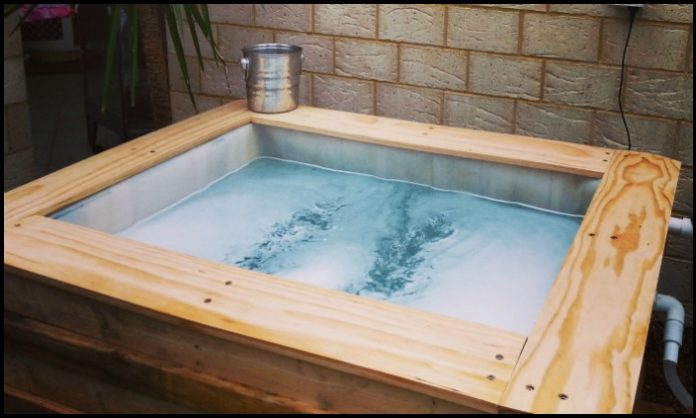
This DIY pool is simply made of a bulk container and some pallets. You can find secondhand parts to keep the total cost at around $100. But if you need or want to purchase new materials, this DIY project would cost around $500 which is a very low amount considering this plunge pool will last a long time!
You don’t need a very large yard to build it. It’s easy to maintain and the best part is that you can cool yourself down during the summer anytime you want!
Click on any image to start the lightbox display. Use your Esc key to close the lightbox. 😎
You’ll need these materials:
- 1000L IBC (Intermediate Bulk Containers)
- Pallets
- Wood Trim Material (optional for decor)
- 2″ Wood Screws
- 12G Stainless Hex Drive Screws
- Pool/Spa Suction
- Provision Jets
- PVC Pipes with appropriate fittings
- Pool Pump
And these tools:
- Reciprocating Saw
- Circular Saw
- Cordless Drill (with Holesaw that fits provision jets)
- Heat Gun
Steps:
Contents
How to Build a Plunge Pool with Pallets and an IBC!

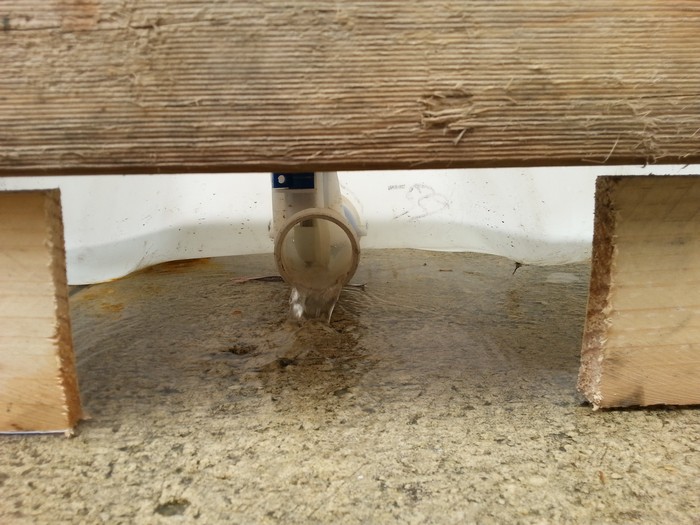
1. Fitting jets and initial pipework: Ensure things are aligned with the gaps in your pallets, cut the holes, and then install your jets.
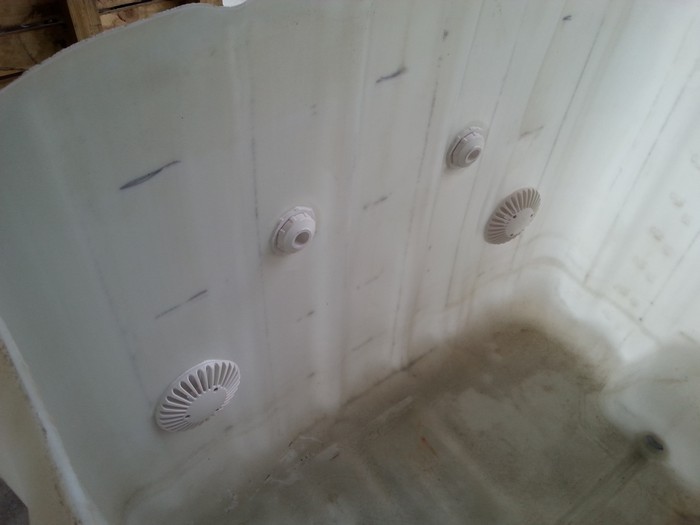
Make sure you tighten them up nicely. Follow the fitting instructions specific to your chosen kit.
Once the jets are in you can begin plumbing up your PVC pipework, make sure to use the appropriate PVC cement.
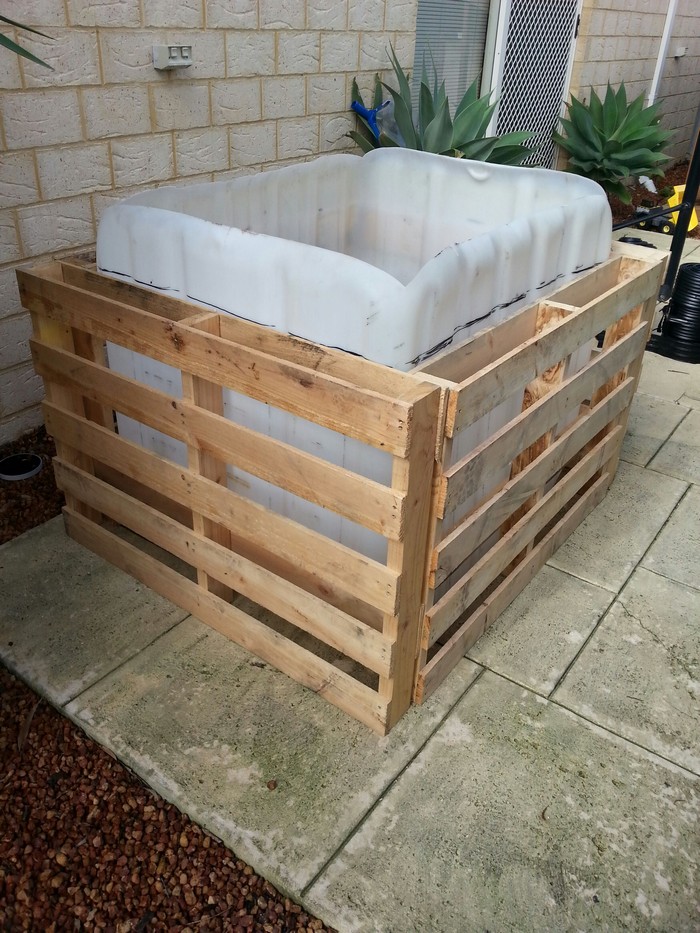
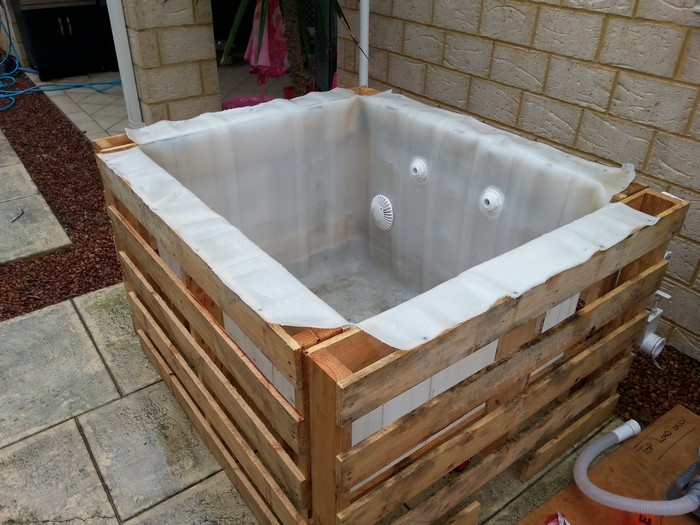
2. Constructing the frame and fixing the edges of the liner: Your IBC will be rectangular so arrange your pallets as shown in the pics. The pallets should be almost the same length as the long side of the IBC. This means the pallets on the short sides will sit with just the right amount of overlap for you to be able to fasten them together without having to shorten or cut them another way.
Use your drill driver, then screw the pallets together. The backside of one pallet overlaps perfectly with the end of another.
The gaps should be sufficient enough for the nosecone of your drill to get through.

Once this is done, you can cut the top off your IBC (if you haven’t already) and cut vertically each of the corners down to the level of the top of the frame.
Using the heat gun, heat the plastic. Allow it to be folded over and screwed down onto the frame.
If you look at the finished product, you will see why this gives a much more professional look.
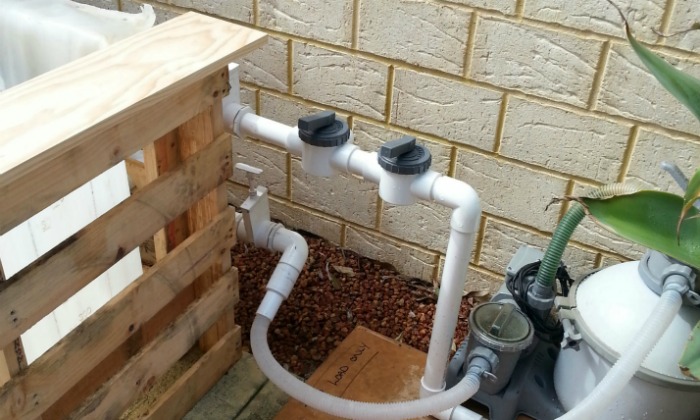
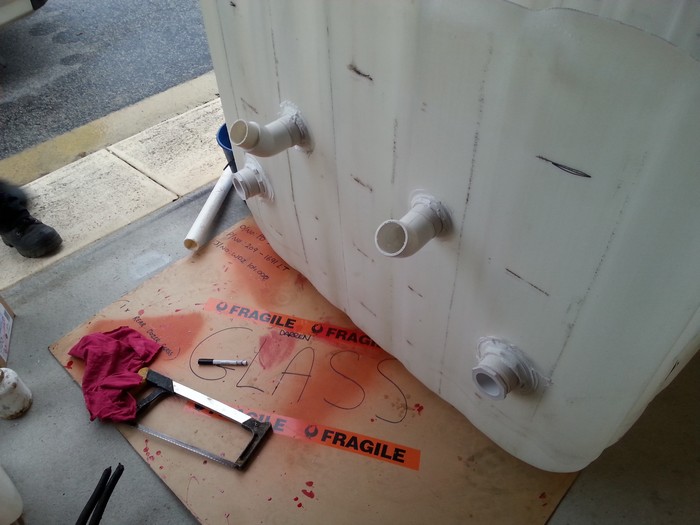
3. Connecting your pump: Small pool pumps are, for the most part, fairly portable. So just find some flat, even ground for it where it is reasonably well protected. Ideally, place it close to an all-weather outdoor power outlet. Mine came in its cradle, so all I had to do was put it where I wanted it.
I recommend the flexible hose connections just because they give a little bit of breathing room if you need to reposition or replace the pump.
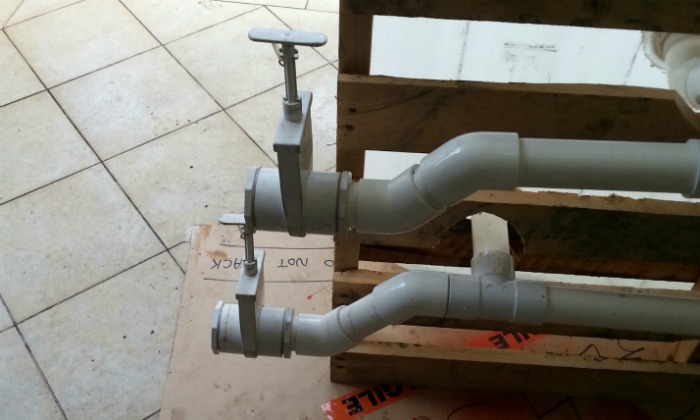
I have fitted isolation valves, in case the pump needs to be replaced at any point. Those can be shut off and no water needs not be lost from the tub.
If you do wish to change the water, the IBC has a dispensing valve at its lowest point, which is just perfect. I recommend leaving a cut-out in your pallet/ frame for easy access to this 🙂
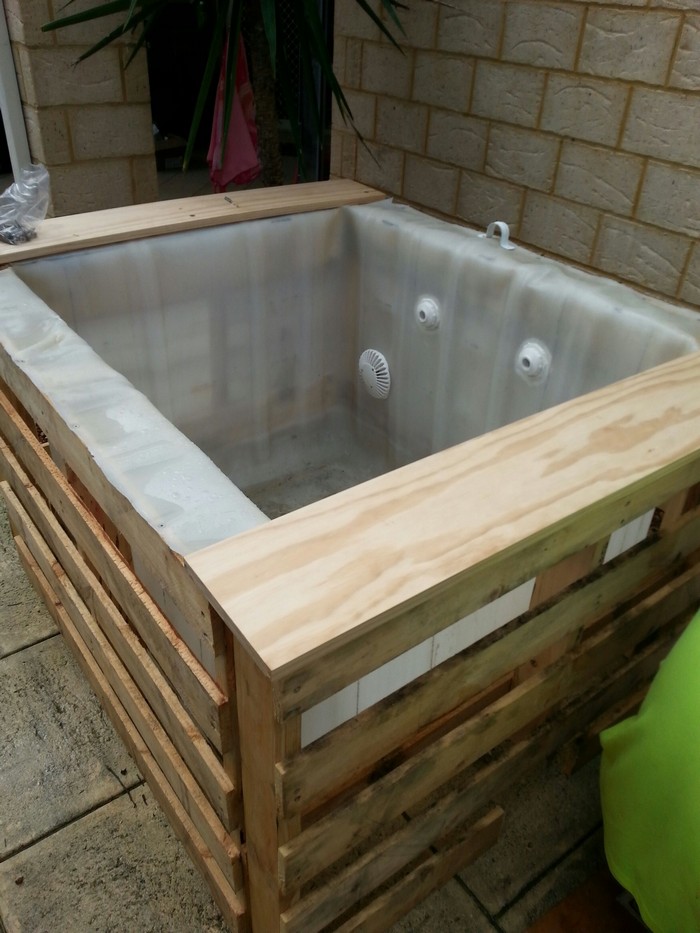
4. Capping it off: This bit is as simple as cutting your wood to size and screwing it down so that you have an even amount of overhang around the outside. Avoid too much inner overhang if you don’t want to encroach on the already small area.
Pallets are not generally engineered to exact standards. Hence, you may find yourself packing certain parts up with thin slivers of wood to make the capping nice and level.
I fixed mine down with 12G stainless hex drive screws. Not only because they look limp, but also because it’s the one area where the screws are likely to get splashed with water. And rust is U.G.L.Y.
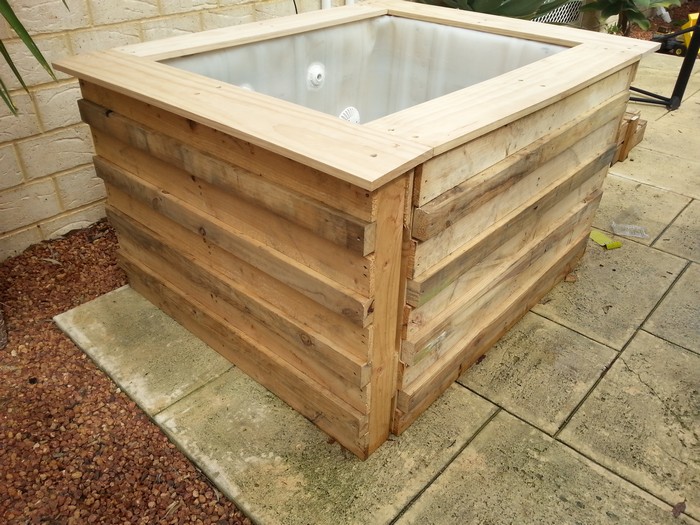
5. Finish cladding exterior: Cut your lengths of “gap-filling wood” to size. And using more of your 50 million timber screws, fasten them into place.
The wood I used was “whatever I could get my hands on”, so it turned out to be thicker than the slats of the pallet. I quite liked the effect as I think it added some dimension.
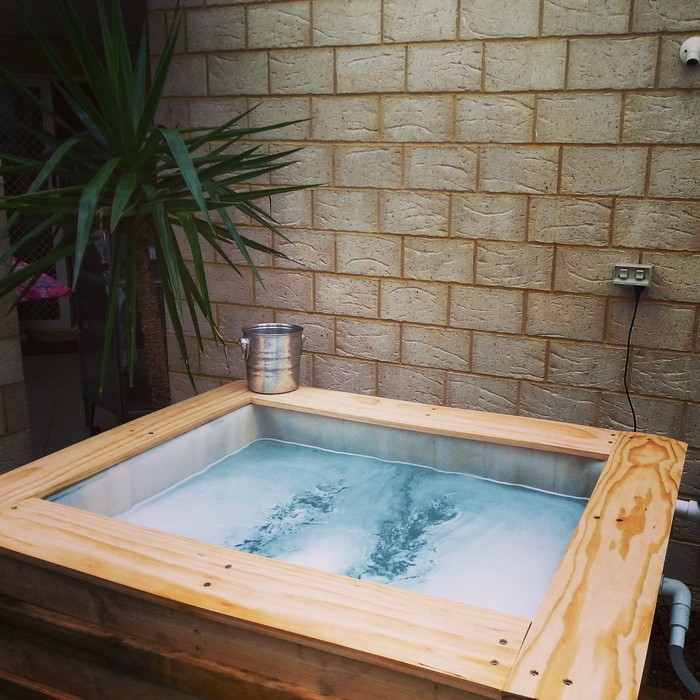
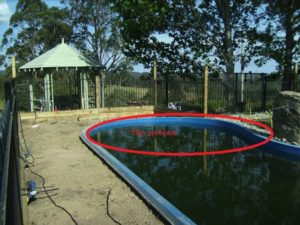
6. Fill and enjoy: Once you have the water level above your suction jets, it is safe to switch the pump on.
You will need to decide what water treatment strategy you are going to take. I am using chlorine tablets in a floater because by far, it’s the easiest, with really no fuss.
The challenge I set myself here was to keep costs down but not compromise the quality of the end product. I am in the fortunate position of being able to get my hands on a lot of these materials for free. The pump was my only cash outlay at $100 for a good second-hand unit.
If you had to fork out for every single part, then this is probably a $500 project (assuming you already have tools).
Thanks to therealorson for this great project!
Dive Into Paradise: The Advantages of Plunge Pool From Pallet and IBC
Ready to turn your backyard into a resort-style retreat? Say hello to pallets and IBCs – your secret weapons for creating the ultimate plunge pool paradise! Let us uncover the unbeatable advantages:
1. Budget Bliss: Want luxury but not a hefty price tag? Pallets and IBCs have got your back! Say goodbye to expensive pool installations and hello to affordable elegance. Transform your outdoor space into a haven of relaxation without emptying your wallet.
2. Easy-Breezy Setup: Do not let complicated construction projects dampen your pool party dreams! With pallets and IBCs, installation is a breeze. No need for heavy machinery or expensive contractors – just roll up your sleeves and get ready to dive in!
3. Space-Savvy Splendor: Got a tiny terrace or a compact courtyard? No problem! Pallet and IBC plunge pools are perfect for small spaces. Maximize every square inch of your backyard and create a refreshing oasis that fits perfectly into your lifestyle.
4. Customizable Coolness: Personalize your plunge pool and make it uniquely yours! With pallets and IBCs, the design possibilities are endless. Whether you are a fan of sleek and modern or rustic and charming, you can create a backyard retreat that reflects your style and personality.
5. Eco-Friendly Excellence: Go green while you soak up the sun! Pallets and IBCs are a sustainable choice for eco-conscious homeowners. By repurposing these materials, you’re reducing waste and minimizing your environmental footprint. It is a win-win for you and the planet!
6. Portable Paradise: Want to take your plunge pool on the road? With pallets and IBCs, you can! Whether you’re moving to a new home or just rearranging your backyard layout, these lightweight options make relocation a breeze. Your relaxation zone goes wherever you go!
7. Year-Round Enjoyment: Don’t let the changing seasons put a damper on your aquatic adventures! With the right setup, you can enjoy your plunge pool all year long. From summer splashes to cozy winter soaks, there is never a bad time to take the plunge.
Get ready to elevate your backyard game with pallet and IBC plunge pools. Affordable, adaptable, and oh-so-enticing, they’re the ultimate upgrade for any outdoor oasis!
The Wrap Up
As you stand back and admire the shimmering waters of your newly completed plunge pool, it’s hard not to feel a swell of pride and satisfaction. In just six simple steps, you’ve transformed ordinary materials into a backyard oasis that’s as stylish as it is refreshing. Let us take a moment to bask in the glory of your accomplishment and reflect on the journey you’ve taken to get here.
It all began with a simple idea—a desire to bring the luxury of a plunge pool into your backyard. Armed with little more than determination and a vision, you set out on a journey to turn that dream into a reality.
With a clear goal in mind, you gathered the necessary tools and materials to bring your vision to life. From pallets to IBC containers, every item was carefully chosen to ensure both functionality and style.
With hammer in hand and determination in your heart, you set to work constructing the frame of your plunge pool. Piece by piece, plank by plank, you built a sturdy foundation upon which your aquatic paradise would soon rest.
While the frame provided structure, it was the IBC container that would hold the key to your plunge pool’s success. With meticulous care, you cleaned, prepared, and positioned the container, ensuring that it would serve as the perfect vessel for your watery retreat.
With the container in place, it was time to ensure that your plunge pool would hold water—and hold it well. With careful attention to detail, you sealed any gaps or seams, guaranteeing that your oasis would remain leak-free for years to come.
Also, add finishing touches. With the practicalities taken care of, it was time to add those special touches that would transform your plunge pool from a mere construction project into a true work of art. Whether it was a coat of paint, a splash of colour, or a few carefully chosen accessories, you added your flair to every aspect of your creation.
Finally, the moment of truth arrived. With a mixture of excitement and anticipation, you filled your plunge pool with water, watching as it glistened and sparkled in the sunlight. As you dipped your toes in for the first time, you couldn’t help but smile—knowing that your hard work had paid off most spectacularly.
As you sit back and relax by the side of your plunge pool, it’s clear that this is more than just a backyard addition—it is a symbol of your creativity, resourcefulness, and determination. So go ahead, dive in, and enjoy the fruits of your labour. After all, you have ve earned it!
Frequently Asked Questions
1. What materials do I need to build a plunge pool with pallets and an IBC?
You will need pallets, an IBC (Intermediate Bulk Container), basic tools such as a saw, drill, and hammer, waterproof liner, screws, nails, and waterproof sealant. By ensuring you have all these materials on hand, you’ll be well-equipped to embark on your DIY plunge pool project with confidence and ease.
2. Are pallets and IBC containers safe to use for a plunge pool?
Certainly! Let us expand on the process of cleaning and preparing pallets and an IBC container for use in building a plunge pool:
Cleaning and Preparing Pallets:
- Before using pallets for your plunge pool, it’s critical to ensure they are clean and free from any contaminants or debris.
- Start by inspecting each pallet carefully for signs of damage, such as splintered wood or protruding nails. Discard any pallets that are structurally compromised.
- Next, use a brush or broom to remove any dirt, dust, or debris from the surface of the pallets. Pay particular attention to the spaces between the wooden slats.
- Depending on the condition of the pallets, you may need to sand down rough or uneven surfaces to create a smooth finish. This will not only improve the appearance of the pallets but also reduce the risk of splinters.
Heat Treatment of Pallets:
- It is essential to use pallets that have been heat-treated rather than chemically treated. Heat-treated pallets are less likely to contain harmful chemicals that could leach into the water.
- Look for pallets marked with the International Plant Protection Convention (IPPC) logo, which indicates that they have been heat-treated to meet international standards for phytosanitary measures.
- Heat treatment involves heating the wood to a specific temperature to destroy any pests or pathogens present. This process is considered safe for use in applications where the wood will come into contact with water, such as building a plunge pool.
Cleaning and Preparing the IBC Container:
- When acquiring an IBC container for use in your plunge pool, ensure that it is food-grade and suitable for holding water.
- Thoroughly clean the interior and exterior of the IBC container to remove any residues, contaminants, or odours. Use a mild detergent and water solution, along with a scrub brush or sponge, to scrub the surfaces thoroughly.
- Rinse the container with clean water to remove any soap residue, and then allow it to dry completely before use. This will help prevent any lingering odours or flavours from affecting the quality of the water in your plunge pool.
By following these steps to clean and prepare both the pallets and the IBC container, you can ensure that your DIY plunge pool is safe, sanitary, and ready for use.
3. How do you build the frame for the plunge pool?
Begin by selecting pallets that are in good condition and free from damage or rot. Look for pallets with solid, intact wooden planks. Lay the pallet flat on the ground or another sturdy surface. Use a pry bar or a hammer and a crowbar to carefully remove the boards from the pallet.
Work systematically, starting from one end of the pallet and gradually working your way across. Apply gentle pressure to avoid splitting or damaging the wooden planks. If nails are protruding from the boards, use a hammer to knock them out from the back of the plank. Alternatively, use a saw to carefully cut through the nails.
Once all the usable planks have been removed, set them aside for use in constructing the frame of your plunge pool. Dispose of any damaged or unusable pallet components responsibly.
4. How do you prepare the IBC container?
Clean the IBC container thoroughly to remove any residue or contaminants. Consider painting the exterior with outdoor-grade paint for durability and aesthetics.
5. How do you insert the IBC container into the frame?
Carefully place the cleaned and painted IBC container into the frame, ensuring it fits snugly. Cut an access hole in the top of the container for entry and exit.
6. How do you waterproof and seal the plunge pool?
Line the interior of the container with a waterproof liner, ensuring it extends over the edges and is securely fastened. Seal any gaps or seams with waterproof caulk to prevent unwanted leaks.