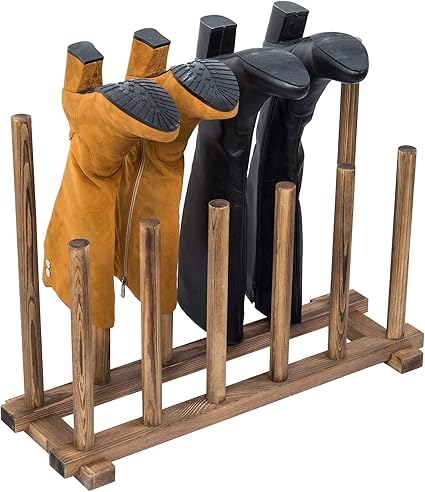
Organizing your home can be a daunting task, but with the right tools, it can be a breeze. A boot rack is an essential tool for every home. Not only does it keep your boots organized and out of the way, but it also helps to protect your floors from dirt and mud. There are a variety of boot racks on the market, so finding the right one for your home is easy. If you have a smaller home, a wall-mounted boot rack is a great option. For larger homes, a freestanding boot rack is a way to go.
When choosing a boot rack, it is important to select one that is made from sturdy materials that can support the weight of your boots. This is especially important for welly boots and leather boots, which can be quite heavy. A boot rack is a great way to keep all your boots organized and in one place and can help prevent them from getting damaged or scuffed.
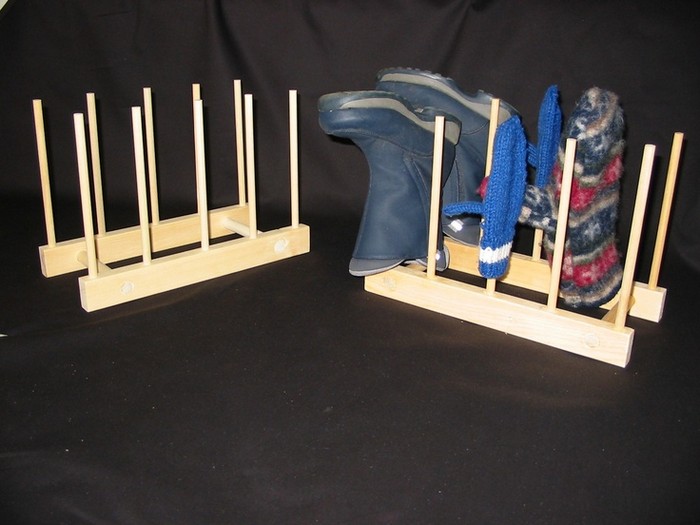
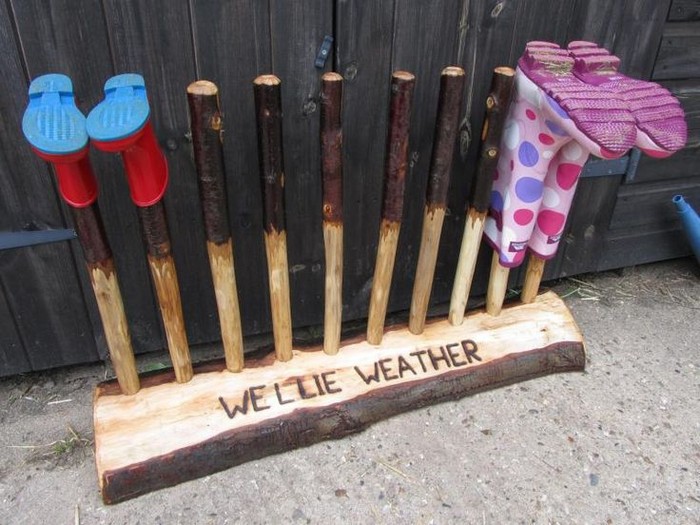
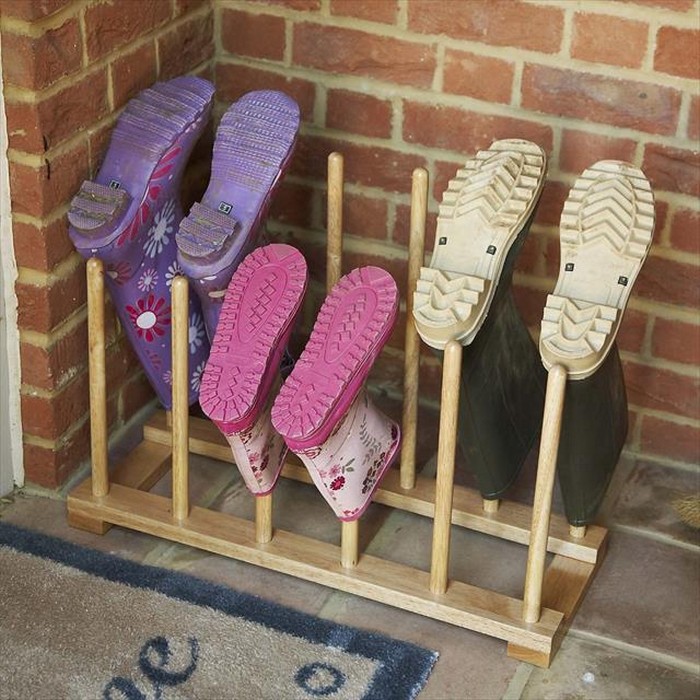
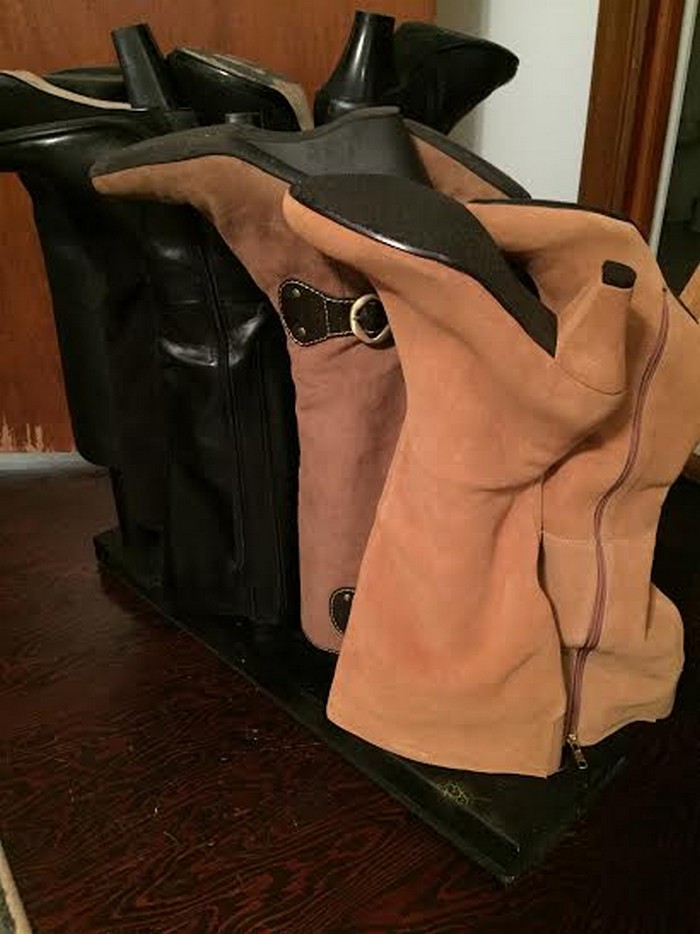
Storing boots upside down keeps boot shafts straight to prevent wrinkles and creases, allows for boots to quickly air dry.
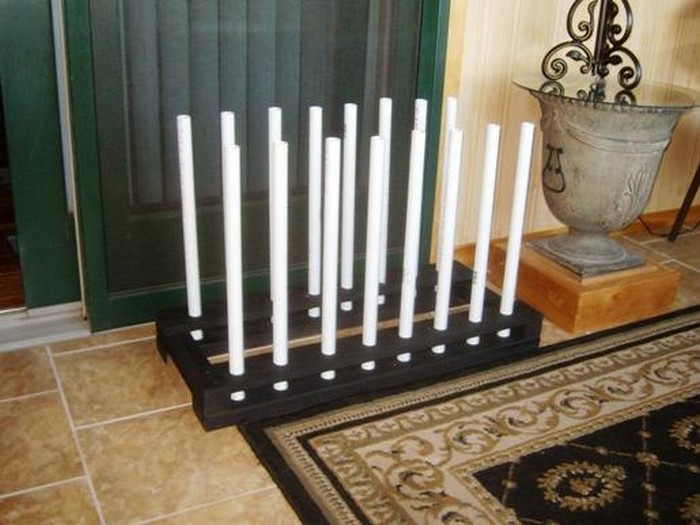
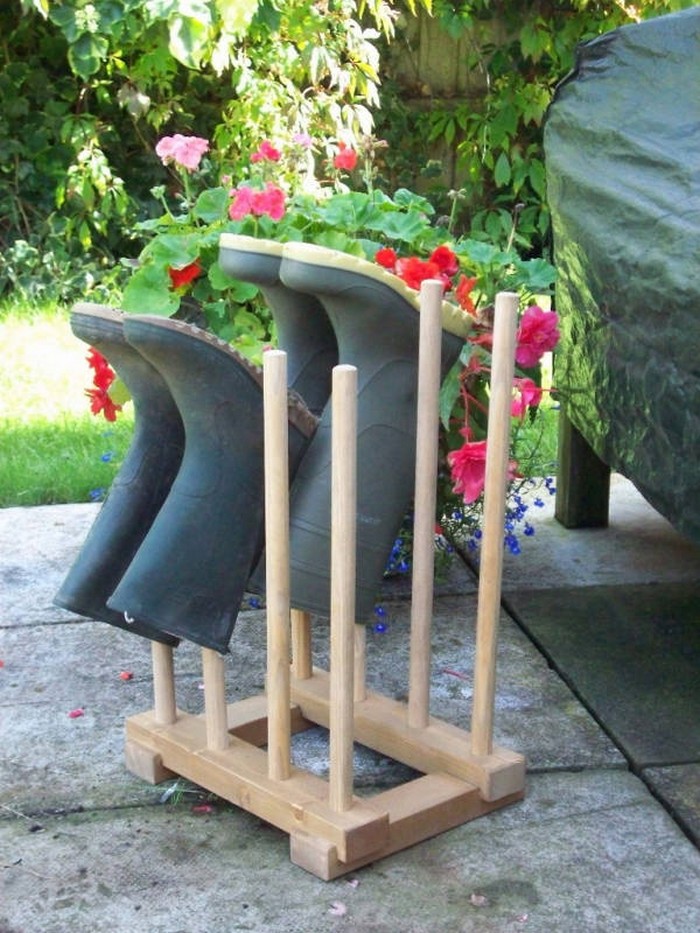
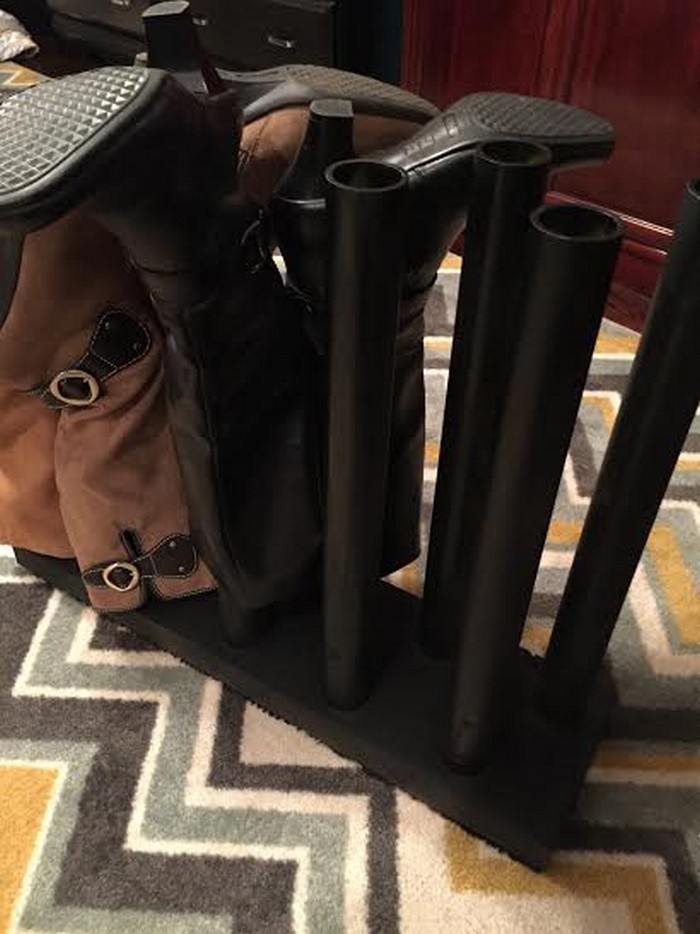
There are a few things to consider when building a boot rack. First, you’ll need to decide what material you want to use. PVC pipes or wooden dowels are both popular choices. Second, consider how many boots you need to store.
If you have a lot, you may want to build a rack with multiple levels, or with dowels of different lengths so that all of your shoes can be stored properly. Finally, think about where you’ll be placing your boot rack. If it will be in a mudroom or entryway, you may want to build it with a slanted surface so that water and mud can drip off of your boots before they hit the floor.
With a little planning and the right materials, you can easily build a boot rack that will help keep your home organized and your boots in good condition.

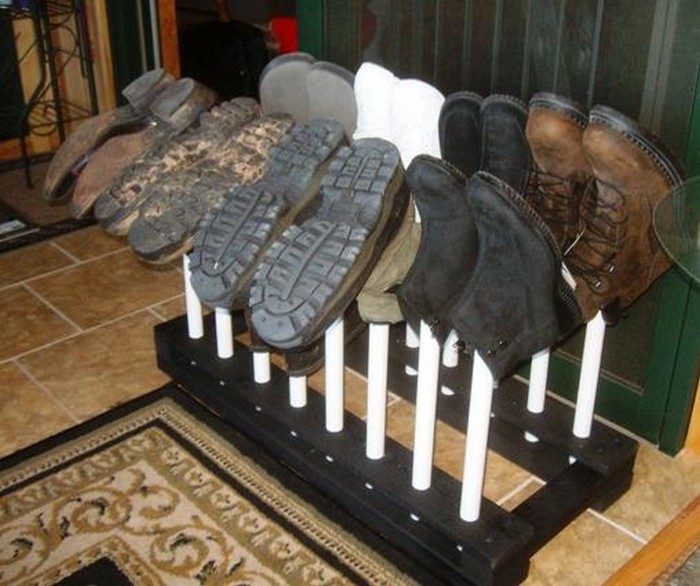
Is this boot rack the kind of shoe storage you need at home?
Contents
- 1 Building a DIY Boot Rack
- 2 Benefits of a Homemade Boot Rack
- 3 Maintenance and Care Tips
- 4 Space-saving Boot Rack Solutions
- 5 FAQ on DIY Boot Rack
- 5.1 How can I customize my boot rack?
- 5.2 What are the benefits of making my own boot rack?
- 5.3 How do I maintain my boot rack?
- 5.4 Can the boot rack handle heavy boots like welly boots and leather boots?
- 5.5 Are there any space-saving solutions for boot racks?
- 5.6 How long does it take for the paint to dry on the boot rack?
- 5.7 Is it difficult to build a boot rack?
- 5.8 Where can I place my DIY boot rack?
- 6 Conclusion
Building a DIY Boot Rack
Materials
- (2) 2 x 4 x 96″
- (2) 1 x 4 x 64″
- 8 pcs 1.5″ Wood Screws
- 16 pcs 3 1/8″ Wood Screws
- (1) Exterior Spray Paint
- (16) PVC or Dowels 1-Foot Long
Tools
- Table Saw
- Tape Measure
- Pencil
- Miter Saw
- Drill Press or Power Drill with 1 1/8″ Paddle Bit and a 1/8″ Drill Bit
- Screw Gun
- Two Gripping Clamps
- Hammer
Steps
Step 1. Measure and Cut
- Frame Cutting: Use the miter saw to cut the 2x4s into four 32″ lengths. These will serve as the rack’s outer frame.
- Shelf Trimming: Next, cut the 1x4s into four 32″ lengths for the boot rack shelves.
- Pole Prep: If your PVC or dowels are longer than 1 foot, trim them to 16 even 1-foot sections.
Step 2. Drill and Sand
- Frame Notches: On each 2×4, measure and mark the drill points 8″ apart, starting 2″ from the edge. With the 1 1/8″ paddle bit, drill about 1/2″ deep.
- Smooth Edges: Sand all wooden pieces, especially the dowel holes, to remove splinters.
Step 3. Rack Rod Slots
- Small Bores: Grab your 1/8″ drill bit and the 1×4 pieces. Drill two holes 3/4″ from both long edges, 2″ from the ends. Space other holes evenly, matching up with the notches in the 2x4s.
Step 4. Frame Attachment
- Pre-Securing: Secure your 32″ 2×4 shelf-top pieces to the same-sized 1×4 base plates using the two gripping clamps.
- Drill in Rod Space: Align and screw the large 3 1/8″ screws through the pilot holes you created in the 2×4 into the 1x4s.
- Secure Floor Grip: Adjust the pressure from the drill or drill press to ensure that when you push the longer screws in, they tighten the plank to the insole of the shoe or boot rack without punching through the shoe.
Step 5. Assemble
- Pole Place: Press your cut PVC or dowel poles into the 1/8″ holes in the 2×4 structures with the drill’s low-speed option or manually, with a hammer.
- Upright Screws: Pass the eight 1.5″ screws to finalize the rail frame. Use a bubble level to make sure everything is perpendicular.
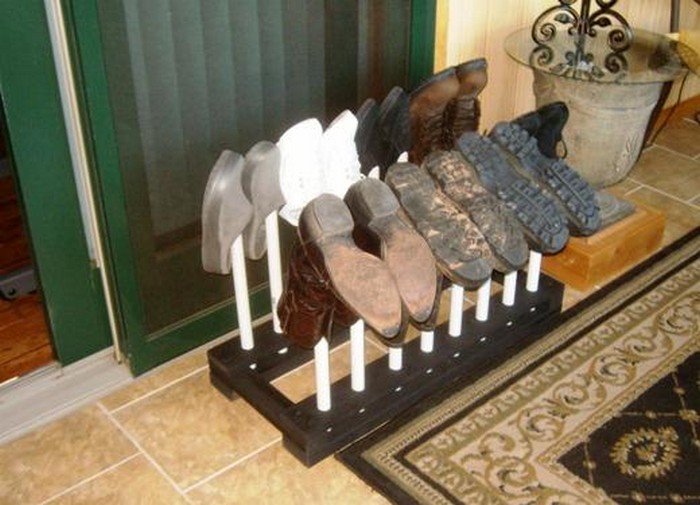
Step 6. Finishing Touches
- Paint and Protect: Lay down a tarp or newspaper, then evenly spray the boot rack with the exterior spray paint. Outer protection means the paint should stand for a 24-hour hand touch.
- Dry Time: Wait at least 24-48 hours for the paint to fully cure before you place the rack in its final spot and load it with your boots.
Your DIY boot rack is now ready, making for a streamlined, snap-in, and clean game plan to dealing with muddy or grainy soles. This new boot sale rack is not just a one-trick pony—it’s built to handle the build, wear, and tear of every day on and off the floor. Happy DIY-ing!
Benefits of a Homemade Boot Rack
Creating a homemade boot rack is a practical and rewarding project. It not only helps keep your home organized but also offers a personalized touch to your entryway or mudroom. Let’s explore the benefits of taking on this DIY task.
Custom Design
Creating a boot rack from scratch offers an unparalleled opportunity to customize every aspect of its design to seamlessly integrate with your home’s aesthetic. This personalization extends beyond mere functionality; it allows you to imbue the piece with a sense of your personal style and the unique character of your living space. Whether your home exudes a modern, minimalist vibe or a cozy, rustic atmosphere, crafting your boot rack means you can select materials and finishes that echo these themes.
For instance, if your home features industrial accents, you might opt for materials like reclaimed wood and metal piping. Alternatively, a cottage-style home could be complemented by a boot rack fashioned from whitewashed wood. The customization possibilities are virtually limitless—down to the rack’s size and shape. This means you can design a piece that not only fits perfectly in the intended space, whether that’s a compact corner by the front door or a more expansive area in your mudroom, but also one that addresses specific storage needs, accommodating everything from ankle boots to taller winter boots.
Cost Savings
Making the effort on a DIY boot rack project can lead to significant cost savings when compared to purchasing a pre-fabricated model. Retail options often come with a hefty price tag, reflecting not just the materials and labor, but also the brand and the retailer’s markup. By taking the DIY route, you’re able to bypass these extra costs, investing instead in the raw materials which are often much cheaper.
This economical approach does not require sacrificing quality or durability. With the right materials and a bit of craftsmanship, your homemade boot rack can rival or even surpass the quality of many store-bought alternatives. Basic woodworking tools, some screws, and your choice of finish are typically all that’s needed to construct a sturdy and attractive rack. Furthermore, this project presents an opportunity to repurpose materials you may already have, such as leftover wood from previous projects, which can further reduce your expenses.
Fun and Fulfilling
Taking on a DIY project like building a boot rack can be a fun and rewarding experience. It gives you a chance to work with your hands and enjoy a sense of accomplishment once you see your completed project in use. Plus, it can be a great weekend activity to share with family or friends.
Eco-friendly Option
Making your own boot rack gives you the opportunity to use recycled or sustainable materials. By repurposing wood or using eco-friendly supplies such as reclaimed wood, you contribute to reducing waste and promoting sustainability. This approach not only benefits the environment but also adds a unique story to your home decor.
Click on any image to start the lightbox display. Use your Esc key to close the lightbox.![]()


For more detailed instructions, you can check out the step-by-step instructions from Rods’ Woodworking Shop over here…
Maintenance and Care Tips
Keep your boot rack in top shape to ensure it lasts long and stays sturdy. Here’s how to maintain and care for your rack, from simple cleaning to spot checks for damage.
Wipe it Down Regularly
Keeping your boot rack clean is vital for its longevity. To do this, regularly use a clean, dry cloth to remove any dust or dirt from the surface. This step ensures that grime does not build up over time, which can degrade the material.
In some instances, you might encounter more challenging, sticky, or caked-on dirt. Here, a damp cloth comes to the rescue. Lightly moisten the cloth to tackle these tenacious areas. Remember to always follow up with a dry wipe. This action helps in preventing moisture from seeping into the wood, a leading cause of water damage and warping.
Spot Cleaning
Your boot rack can occasionally fall victim to random droplets or even smears of dirt and other conditional grime. Spot cleaning allows you to tackle these mishaps on the boot rack the moment they occur. Vigilance in cleaning such spots or spillovers as they happen is the first defense against stains.
Storage and Organization
Proper storage and organization are key to maintaining the structure and appearance of your boot rack. Make it a rule to avoid overloading the rack with more boots than it’s designed to hold.
Every pair of boots should have a designated place or position on the rack. This arrangement not only keeps the surface clutter-free but also ensures that there is no strain on one spot for your boot rack.
Safety and Checkups
To ensure the safety and longevity of your equipment or furniture, it’s crucial to perform regular inspections and maintenance. Start by meticulously checking all screws, bolts, and fasteners, making sure to tighten any that have become loose over time. This step is vital for preventing accidents and maintaining structural integrity.
Additionally, inspect the surface and edges for any signs of splinters, cracks, or other damage. These issues can not only compromise safety but also worsen over time if not addressed. Taking proactive measures to identify and repair any damage early can help avoid potential safety hazards and extend the lifespan of your item.
Weatherproof Again
Exposure to the elements can gradually erode the protective coatings on outdoor equipment and furniture, leading to fading and reduced weather resistance. To combat this, it’s advisable to regularly assess the the condition of the item’s exterior. When you notice the color starting to fade or the protective layer wearing thin, reapplying exterior spray paint or a suitable weatherproofing sealant is a recommended course of action.
This not only revitalizes the appearance of your item but also reinforces its defense against rain, sun, and other environmental factors. Regular maintenance of this sort ensures that your outdoor items remain durable and visually appealing for years to come.
Simple steps to maintain your boot rack can extend its life and keep it looking new. Prioritize care and enjoy the value it brings to your space.
Space-saving Boot Rack Solutions
When looking to organize your living spaces, finding efficient ways to store boots and shoes is a common challenge. Boots, with their bulkier size compared to other footwear, demand more thoughtful storage solutions. Space-saving boot racks offer a practical and stylish answer to this dilemma.
These racks are designed to maximize storage in minimal spaces, keeping boots accessible and in good condition. Below, we explore various space-saving boot rack solutions that cater to different needs and living spaces.
Over-the-Door Boot Racks
Over-the-door boot racks are a brilliant solution for those who are short on floor space. These racks hang over the door and can accommodate several pairs of boots, utilizing the often overlooked storage space behind doors. They’re easy to install and remove, making them ideal for renters or anyone looking to add storage without permanent fixtures.
Under-Bed Boot Organizers
For those who prefer out-of-sight storage, under-bed boot organizers are perfect. These flat storage solutions slide under the bed and can hold multiple pairs of boots, protecting them from dust while keeping them easily accessible. They’re a great option for keeping seasonal boots stored away during the off-season.
Wall-Mounted Boot Racks
Wall-mounted boot racks utilize vertical space, freeing up floor area. These racks can be installed at any height, making them versatile for storage in closets, mudrooms, or entryways. They provide a neat display for your boots and can be customized to hold as many pairs as needed.
Stackable Boot Boxes
Stackable boot boxes offer a modular approach to boot storage. Made from clear plastic or durable cardboard, these boxes protect boots from dust and damage while allowing for easy visibility. Stackable designs make it easy to build upward, optimizing vertical space in closets or corners.
Boot Hangers
Boot hangers are an innovative solution for hanging boots in closets. These specialized hangers clip onto the tops of boots, allowing them to hang from a rod, similar to clothes. This method keeps boots off the floor, prevents creasing, and maximizes closet space.
Retractable Boot Racks
Retractable boot racks are designed for flexibility, with panels that slide out or fold away when not in use. This feature makes them ideal for small spaces, as they can be extended for access to boots and retracted to save space when needed.
Choosing the right space-saving boot rack depends on your specific needs, the amount of space available, and the number of boots you need to store. Whether you opt for an over-the-door rack, an under-bed organizer, or a wall-mounted solution, the goal is to keep your boots organized, accessible, and in good shape. With the right storage solution, you can free up valuable space and keep your living area clutter-free.
FAQ on DIY Boot Rack
How can I customize my boot rack?
You can customize your boot rack by choosing different materials, adjusting the size to fit your space, selecting a color of paint that matches your home decor, and deciding on the number of levels or dowel lengths based on your boot storage needs.
What are the benefits of making my own boot rack?
Benefits include cost savings compared to buying a pre-made one, the ability to customize the design to fit your home decor, the satisfaction of a DIY project, and the option to use eco-friendly or recycled materials.
How do I maintain my boot rack?
Regularly wipe it down with a clean, dry cloth, use a damp cloth for tougher dirt, perform spot cleaning as needed, ensure proper storage and organization to prevent overloading, regularly check and tighten screws, and reapply weatherproof coating as necessary.
Can the boot rack handle heavy boots like welly boots and leather boots?
Yes, when choosing materials, ensure they are sturdy enough to support the weight of heavier boots such as welly boots and leather boots.
Are there any space-saving solutions for boot racks?
Yes, space-saving options include over-the-door racks, under-bed organizers, wall-mounted racks, stackable boot boxes, boot hangers, and retractable racks, each offering a way to maximize storage in minimal spaces.
How long does it take for the paint to dry on the boot rack?
It is recommended to wait at least 24-48 hours for the paint to fully cure before placing the rack in its final location and loading it with boots.
Is it difficult to build a boot rack?
With the right tools and materials, along with detailed instructions, building a boot rack is a manageable DIY project that can be completed over a weekend.
Where can I place my DIY boot rack?
Your boot rack can be placed in mudrooms, entryways, or any other area where you typically remove boots, depending on the design and your personal preference.
Conclusion
A DIY boot rack is an efficient and cost-efficient way of organizing everyone’s foot gear. Using our comprehensive guide ensures a rack that can last for a long time while bearing your own style.
For more ways to organize your home, check out our DIY diagonal bookshelf project!