Steampunk iPhonograph Portasound: Decorative Sounds

Last Updated on February 7, 2025 by teamobn

by bricabracwizard (Michael Greensmith)
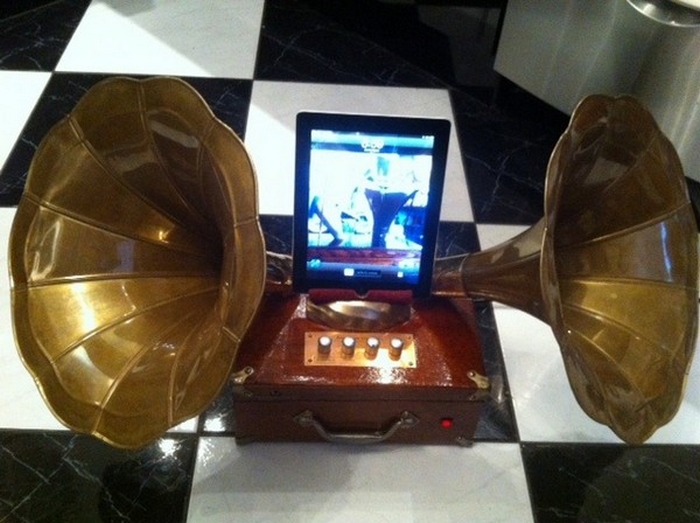
Steampunk iPhonograph Portasound

Building a Steampunk iPhonograph

Steampunk came about in the late ’80′s. Basically coined as Victorian science fiction. With that in mind I decided to create an old fashioned music player with new fang dangled equipment. The first step was finding a box to encase the equipment in. I found this old indoor bowls case by the side of the road being thrown away. The picture does it more justice than it’s worth… the case was in very bad shape.

Steampunk iPhonograph Portasound
The case had seen better days!

I dismantled the box and carefully sanded/polished all the components, stained, varnished and reassembled the case. This wasn’t a particularly well made box… ahhh the nostalgia!

Looking good now! At this point I started playing around with a few ideas to see what would and wouldn’t work…

Steampunk iPhonograph Portasound
Testing ideas…

These are just two ideas from about 12 ideas I had, unfortunately I didn’t take pictures of all the ideas I had. One idea was to have the speakers come out of the side of the box but this made them too low and the whole thing too wide.

[adinserter block=”11″]

Next came the drilling of holes in the case to accommodate the speakers, control knobs and power socket.
Steampunk iPhonograph Portasound
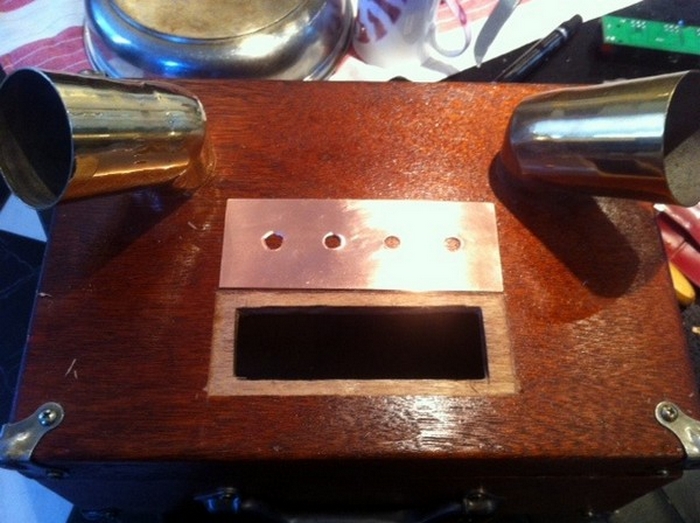
The cut-out for the dials

Here you can see the square hole I cut for the control knobs. The wood is too thick to just drill holes for the control stems and poke them through. The copper rectangle is about 1mm thick. Using a  carving tool I cut out just enough wood to lay the copper insert in so that it is level with the top of the case. The amplifier I used was from Jaycar which also has an input for a microphone. At 25 watts per channel, this is a sweet sounding amp! Of course you can use whatever amp you have on hand.

Steampunk iPhonograph Portasound
Connecting things up…

In order for the controls to be where I wanted them a lot of wires had to be extended. As you can see from the last picture, it was a bit of a nightmare! When rewiring or remounting electronics make sure everything is secured with no chance of movement. Do not do this if you are not comfortable with electronics….get someone who knows.

After extensive testing to make sure everything worked, time to create the holder for the iPhone/iPad/iPod. I managed to find an old dented brass vase. I cut off one side of the vase using a rotary drill with a metal cutting disc attached. The copper plate was cut in the same way.
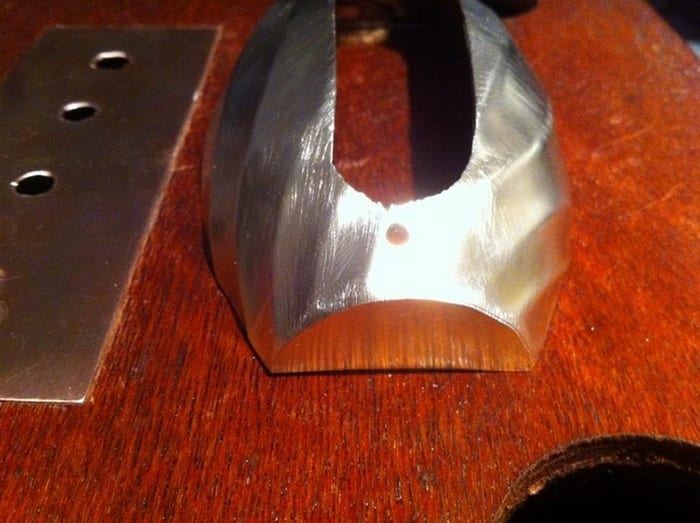
Steampunk iPhonograph Portasound
What was once a chandelier part…

Next I managed to find an old chandelier upright brass pipe looking like entwined rope. This would hold the device upright. The connector (30 pin) can be bought off ebay with an audio out. I cut this connector in half to fit the chandelier pipe and then soldered on new wire to the two halves. To make sure the wire didn’t come off hot glue was used…..in abundance.

Steampunk iPhonograph Portasound
Getting serious now!

Then it was time to split the chandelier pipe, open it up and glue a protective cloth over it,

Steampunk iPhonograph Portasound
Glue – if in doubt, use lots!

To attach the cradle to the case and to secure the connector to the pipe I cut some wood and hot  glued it in with the connector. The picture below shows how snuggly it fits together. A half moon has been cut out of the pipe so as to be able to operate the centre button on the iPhone.

Steampunk iPhonograph Portasound

Steampunk iPhonograph PortasoundSteampunk iPhonograph Portasound
Almost done…

The control panel lettering was achieved with a label lettering machine using a transparent tape. The knobs I finally ended up with are guitar knobs which were purchased on ebay. Now all that is left is to create the power inlet point. Again a hole was cut in the back for the power point and a copper sheet cut to fit the hole. Unfortunately a fuzzy picture.

Steampunk iPhonograph Portasound
The power supply

Now all we need to add are the brass horns. The ‘elbows’ were inserted into holes cut in the top of the case, glued (with 2 part epoxy) and screwed. Then the horns were epoxied into the brass elbows.

Earlier on you may remember I said that I thought of putting the speaker holes in the side
of the case….well, I did cut the holes and then decided the horns looked better coming out of the top of the case. Now I had to cover the holes in the side. This turned out to be a blessing in disguise. These holes allowed the bass notes to come out and the brass horns worked better with the treble tones. The holes were concealed with mesh and a speaker grill from another project. Cut the mesh & grid with the rotary cutter.

Steampunk iPhonograph Portasound
A fortuitous error = better bass

You will see in the next picture the speakers were screwed to the underside of the case lid.

Steampunk iPhonograph Portasound
Attaching the speakers

Thanks for joining me. I hope I’ve inspired you to do better than buy a mass produced phone or tablet sound system. If it all gets too much I have been consigned to make them for other people. They come with a 2 year warranty and can be ordered on my blog at www.steampunkwayoflife.blogspot.com.au . You can also order our catalogue and
choose from a variety of Steampunk audio players.

Questions? Ask away. Suggestions? I’m listening. Have you ever tackled a project like this? How did it turn out?

Update:  13th of january, 2014

Thought you might like to see this latest toy ?
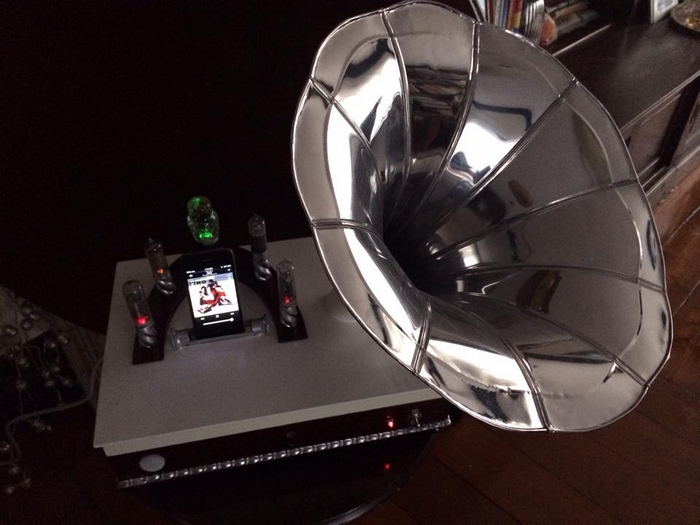
Steampunk iPhonograph Portasound
Chromatone with colour changing radio valves.

Customizing the Sound: Choosing the Right Amplifier and Speakers

Building a steampunk iPhonograph isn’t just about aesthetics. The sound quality matters just as much as the brass horns and polished wood casing. Whether you want deep, rich tones or a more vintage, crackling sound, selecting the right amplifier and speakers makes all the difference.

Understanding Amplifiers for Steampunk Audio

The amplifier is the heart of any audio project. It determines the overall power output, sound clarity, and compatibility with various input sources. For a steampunk iPhonograph, a few amplifier options stand out.

Tube amplifiers offer a warm, vintage sound that perfectly matches the steampunk aesthetic. They use vacuum tubes to amplify the audio signal, giving it a softer, richer tone than modern digital amplifiers. Many steampunk enthusiasts prefer them because of their old-world charm and glowing tubes, which add a fantastic visual effect. However, they require more maintenance and tend to be bulkier.

Solid-state amplifiers are a practical alternative. They use transistors instead of vacuum tubes, making them smaller and more efficient. A solid-state amp works well if you’re looking for a balance between sound quality and convenience. Some even come with built-in equalizers to fine-tune the sound.

Class D amplifiers are compact and energy-efficient. While they lack the warmth of tube amps, they deliver high power output with minimal heat. This makes them a great choice if space is limited inside your iPhonograph enclosure.

If you’re repurposing an old speaker system, consider salvaging an amplifier from an existing device. Many vintage radios or record players have amplifiers that can be repurposed with a little modification.

Selecting the Right Speakers

Speakers shape how the audio is projected. Their size, placement, and type all contribute to the overall experience.

Full-range speakers are a simple solution for a steampunk iPhonograph. They handle both high and low frequencies without the need for additional components. If you want a straightforward setup, look for a quality pair of full-range speakers that fit your enclosure.

Component speakers break the sound into separate parts. A woofer handles bass, while a tweeter focuses on higher frequencies. This setup provides a more dynamic range, making music sound richer and more detailed. Component speakers are the way to go if you’re aiming for top-tier sound quality.

Brass horns as tweeters can enhance the steampunk aesthetic while improving sound projection. Since brass naturally amplifies higher frequencies, pairing a small tweeter with a brass horn directs the treble outward, creating a more authentic phonograph experience.

Proper Speaker Placement for Optimal Sound

Where you mount the speakers affects how the sound travels. If you place them too deep inside the enclosure, sound waves can become muffled. Positioning them close to openings or using brass horns as amplifiers improves clarity.

Bass tones require proper airflow. If your design includes a sealed wooden box, consider adding small openings or vents to allow the bass frequencies to escape. This prevents the sound from becoming trapped inside, improving overall depth.

If space allows, experiment with speaker angles. Slightly tilting them upward or outward directs sound more effectively, creating a fuller, room-filling experience.

Balancing Aesthetics with Performance

The challenge of building a steampunk iPhonograph is merging function with design. Large, modern speakers might produce excellent sound, but they can clash with the vintage look. Finding the right balance between period-accurate materials and high-quality components ensures the final product is delivered visually and acoustically.

A well-designed sound system transforms a steampunk iPhonograph from just an art piece into a fully functional and immersive audio experience. Whether repurposing vintage equipment or integrating modern technology, customizing the sound is key to bringing the device to life.

Integrating Modern Tech into a Steampunk Design

A steampunk iPhonograph isn’t just about aesthetics. It’s a fusion of Victorian-era craftsmanship with modern technology. The challenge is incorporating today’s tech without losing the old-world charm. You can hide modern components with the right approach while maintaining the steampunk feel.

Concealing Wires and Circuit Boards

One of the biggest challenges in steampunk projects is hiding modern wiring and circuit boards. Exposed electronics can break the illusion, so careful planning is key.

Wooden compartments or brass enclosures can house circuit boards, keeping them out of sight while ensuring they remain accessible for maintenance. If using a wooden box, carve out a hidden compartment beneath or behind the control panel. Brass tubes or vintage conduit pipes can disguise power and speaker cables, making them look like part of the design rather than an afterthought.

When routing wires, avoid plastic zip ties. Instead, use fabric-wrapped electrical tape or leather cord for a more period-accurate look. Braiding wires with copper or brass thread also enhances the steampunk aesthetic while keeping them organized.

Upgrading with Bluetooth Connectivity

A true blend of past and present involves modern features like Bluetooth. While a visible Bluetooth module may look out of place, hiding it inside a brass box or an antique radio casing preserves the design. Many small Bluetooth receivers can be wired directly into the amplifier, allowing wireless music streaming without disrupting the vintage style.

A toggle switch labeled as “Wireless Transmission” or “Ether Flux” can activate Bluetooth without clashing with the old-world aesthetic. Using Victorian-inspired labels adds charm while keeping the function intuitive.

Repurposing Antique Parts for Modern Controls

Modern touchscreens and plastic buttons don’t belong in a steampunk build. Instead, repurposing antique parts for controls keeps everything period-accurate.

Brass toggle switches, rotary dials from old radios, and repainted typewriter keys can serve as volume and playback controls. Some builders even modify telegraph keys to function as power switches. Guitar knobs or clock gears can replace modern buttons while still allowing full control over the audio system.

If the project includes an iPhone or tablet dock, disguise it with a brass cradle or a modified book cover. An old leather-bound book can serve as a hidden compartment for an iPad, making the technology blend seamlessly into the steampunk aesthetic.

Enhancing the Display with Edison Bulbs and Vacuum Tubes

Nothing says steampunk like glowing vacuum tubes and Edison bulbs. While some prefer actual tube amplifiers, LED-based replicas can give the same effect without the heat and power requirements. These can be wired to light up when the device is powered on, creating the illusion of an old-world energy source.

Using old voltmeters or pressure gauges as functional volume indicators adds another layer of authenticity. Many modern meters can be modified with vintage-style faces, allowing them to reflect real-time audio levels.

Balancing Functionality and Aesthetics

Blending modern tech into a steampunk build requires balancing usability and design. While vintage components enhance the look, they shouldn’t compromise performance. Thoughtful integration ensures that the final product looks like it belongs in the Victorian era while offering the convenience of modern sound systems.

With careful planning, even the most advanced technology can feel like it belongs in a time of steam, brass, and innovation.

Conclusion

Building a steampunk iPhonograph is more than just assembling a sound system—it’s about merging vintage aesthetics with modern technology in an artistic and functional way. Every detail, from brass accents to hidden wiring, contributes to a design that looks like it belongs in an alternate history where steam power and electricity coexist. With creativity and craftsmanship, a simple music player transforms into a unique statement piece that delivers rich sound and timeless style.

BTW – why not make your own cigar box guitar as well. You’ll find Daniel’s step by step guide here

YOU MIGHT ALSO LIKE

|

Search All Projects:

Your details will never be shared with any third party. Unsubscribe at any time with a single click.

The posts on this site sometimes contain an affiliate link or links to Amazon or other marketplaces. An affiliate link means that this business may earn advertising or referral fees if you make a purchase through those links.