Sewing the curtain panels together:

Sew the very top edge 1/4″ away from the edge.

Then sew below on the bottom of the loophole seam line which should be about 2 inches parallel to the top edge. You will be creating the hole for the curtain rod to go in. If you have curtains that have grommet holes don’t fret, simply sew the curtains together right below the grommet line. Cut any excess batting that is above the line. The grommets should line up and work on the curtain rod as it normally would.
Now sew the left edge and the right edge. Be careful on the the velcro side. You should be sewing on the 3/8″ seam allowance on the side of the velcro.
Repeat with the two panels for the other side. When you are finished you should have 2 thicker, two-sided curtain panels. The velcro side of the panels will face the wall and cannot be seen.
*Some curtains are larger than the width of the batting, if you make sure they are the same size it would make things a lot easier! If you have the same size then simply sandwich the batting between curtain panels front and back. One of them will have the velcro, one will not. Make sure the curtain panel wrong sides are touching the batting.
The next step is attaching the curtains to the wall. This will seal the curtains lowering your heat loss significantly.

First you will attach your soft velcro to the 1″ wide wood stake, by using a staple gun. Each staple should be about 4 inches away from the wood. Make sure that the velcro is flat and taut as you go.

After the velcro stakes are done you will attach it to the velcro on the curtain. This will help you get perfect placement.

Place it onto the wall exactly where you want the velcro to go. About 1 inch away from the edge would be good. Mark it with a pencil. Remove the wood velcro piece from the curtain and nail it to the wall where you marked the placement.
Now stick the curtain panels to the velcro on the wall and make sure they are exactly where you want them. You should not be able to see the wood velcro pieces when the panels aren’t attached. They should be perfectly hidden all the time.
*This is the best option for sticking the curtains to the wall – easy removal without a ton of holes in the wall was one of them, cheap and effective.
Your curtains are finished and sealed nicely to the wall but we still have a gap at the top that drafts will come through. To solve this, make a curtain valence that covers the holes at the top and snugly fits over the curtain.

First you will use brackets and attach them to the wall about 1/2″ above the curtain rod. Cut your wood the same length as the curtain rod but 1″ wider.

The wood in this tutorial measured 4″ wide x 79″ long. Screw your wood down on the brackets.
*You can use very thin wood because it will only have light fabric attached to it. Molding, or even thick foam would work just fine also.

Now you will cut out your fabric for the valence. For your length you measure the side edges and front edge of the wood and add them all together(4″ + 4″ + 79″ = 87″). Then decide how long you want the valence to drape, add the width of the wood and times that by 2. Here, the valance drapes 12″, so 4″ is added to the width of the wood, multiplied by 2 so that the fabric could be folded in half ((12″ + 4″) x 2 = 32″). Folding makes the fabric thicker and also makes it so you don’t have to hem the edge. Measurements here were 32″ wide x 87″ long.
For the batting measurement you will use the same 87″ length. The width of the batting will be your desired length plus the width of the wood minus 1 inch(12″ + 4″ -1″ = 15). This batting measured 15″ wide x 87″ long.

Once you have everything cut out you are ready to attach the batting to the wood. Lay the batting onto the wood with the edge hitting the wall.

You are going to wrap the corners exactly like a present. Staple the batting corner edge and the top back edge next to the wall.
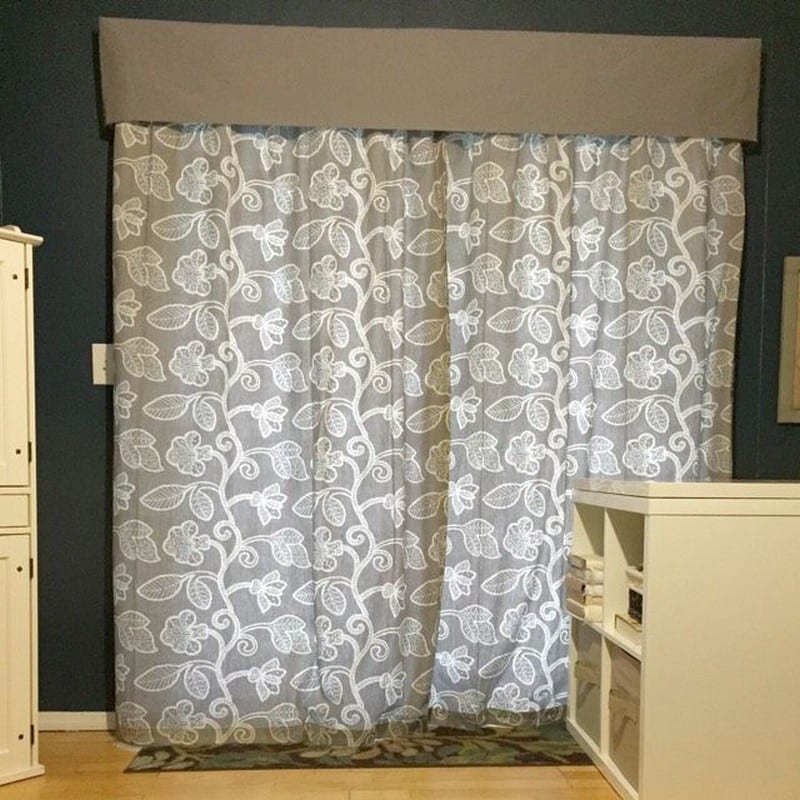
For the fabric you need to fold it in half and iron it very well. Then attach it the same way you did the batting just make sure the raw edges are touching the wall and the fold is hanging.
After that you are done! 🙂 By now if you followed the tutorial you should have two sided insulated curtains that not only function well but look great too!
These are definitely a great help to your room heaters. You would feel a significant temperature difference by touching the inside of the curtain and comparing it to the outside. Did we mention that these are great for the summer as well? They will keep your room cool on those hot summer days.
Could this be your next weekend project?