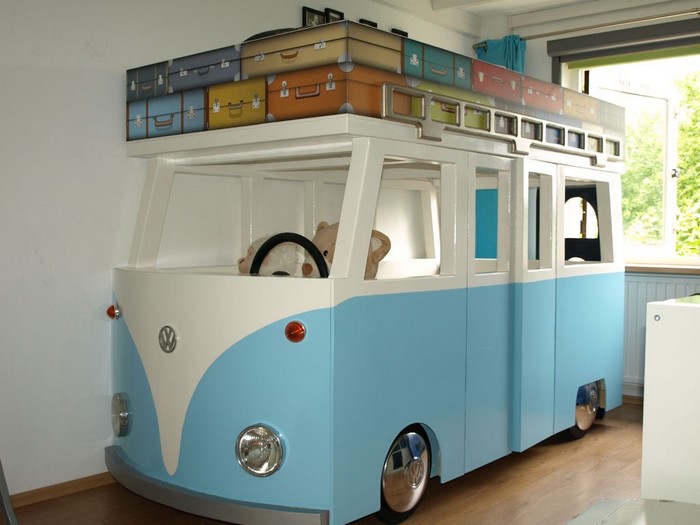
Calling all VW fans (or just people who love clever ideas)! We have an incredible VW micro-bus bunk bed idea for your kid’s bedroom. Whether you use this as a bunk bed or a loft bed with a playhouse underneath, it’s a great project to do for your children.
The VW micro-bus bunk bed is a gift to a three-year-old nephew whose father is a mega VW fan. The idea was easy but finding suitable plans wasn’t! Sure there were VW bunk bed plans online but they failed to meet the standards required. The big decision was made… design and build from scratch!
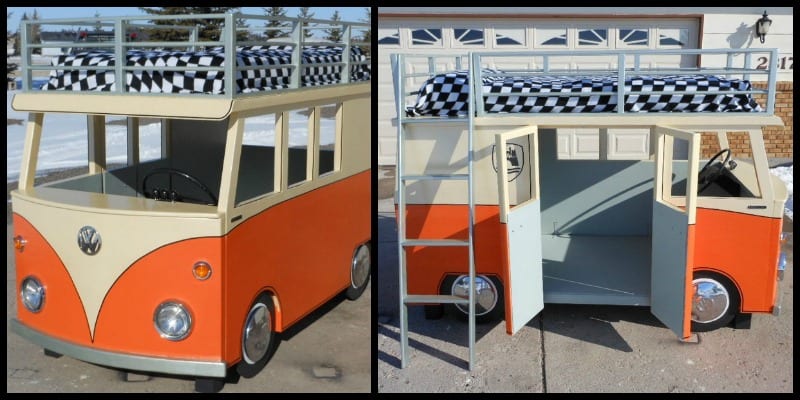
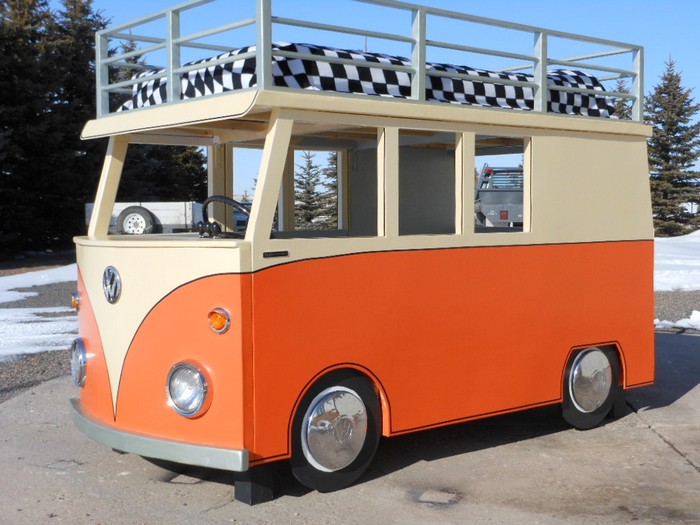
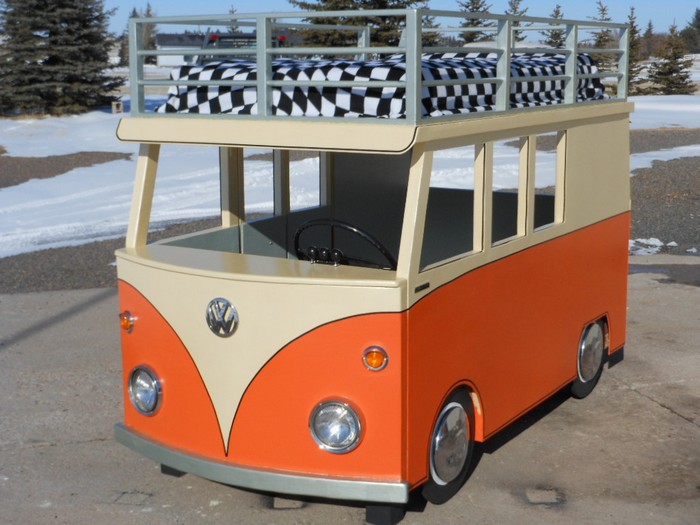
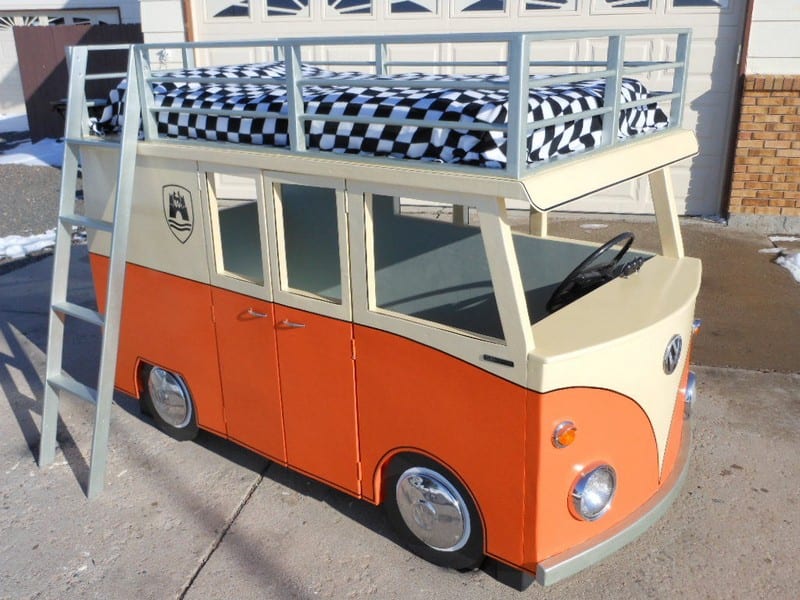
The result is this fabulously detailed VW micro-bus bunk bed complete with working headlights and turns indicators. It also has a steering wheel and fully functioning doors. Both top and bottom areas take a full-sized single mattress giving plenty of space for sleepovers or just use the top as a bed and the bottom as a fabulous play area. Is there a child anywhere who would not love this project?
Building a VW Micro-Bus Bunk Bed
Materials
All materials for this VW micro-bus bunk bed can be purchased from your local hardware store with the exception of the VW accessories, These can be sourced online, at auto parts stores or better yet, from your local auto wrecker.
Timber:
- 5 sheets of 4’x8′ 1/4 inch plywood for the outer skin
- 2 sheets of 4’x8′ 3/4 inch MDF or plywood for the top and bottom bases
- 11 sticks of 3/4″x4′ dowels for the safety railing/faux cargo rack
- 7 pieces of 1″x2″x8′ furring strips for safety railing/faux cargo rack
- 3 pieces 1″x3″x8′ furring strips for the ladder
- 9 pieces of 2″x2″x8′ furring strips for the frames of doors and safety rail/faux cargo rack
- 2 pieces of 2″x6″x8′ studs for ribs of curved front end
- 12 – 14 pieces of 2″x3″x8′ studs for most of the framing – dependent on how much bracing you’re comfortable with
- 1 piece of 4″x4″x4′ post. Some hardware stores will cut this for you. If not, a full 6 or 8-foot stick may need to be bought
- 4, pre-cut 16″ diameter, 3/4 inch thick plywood circles. Some hardware stores sell these else you will have to cut your own
- 1 piece of 3/4″x12″x44.5″ pine board. Try to get a nice knot-free piece here
Hardware:
- 1 box of drywall screws
- 1 box of 2″ deck screws
- 1 box of 2.5″ deck screws
- 1 small box of 3.5″ deck screws
- 4, 1/4 inch x 3″ carriage bolts
- 4, 1/4 inch washers
- 4, 1/4 inch nuts
- 4 hinges for the doors
- 12 “L” brackets 4″x4″ – found in the door and hinge section of your local hardware store
- 12 “L” brackets 1″x1″ – found in the area that contains framing hardware, such as hurricane straps
Tools:
- Jigsaw and/or band-saw if available
- Power drill
- Countersink bit
- Compound mitre saw
- Table saw, if available
- Hand sander and sandpaper
- Wood filler
- Paint
- Clamps for when you need that 3rd or 5th hand to hold pieces up.
Accents
- Hubcaps
- Steering Wheel
- Headlights
- Pinstriping
- Little decals and stick-on
Instructions
This bed is designed to knock down to help facilitate moving. It is easier to start from the bottom and work your way up. I have pre-drilled and countersunk every screw used.
You will need the following size pieces of lumber for this step…
2, 41 inch 2″x3″s
2, 79 inch 2″x3″s
3, 38 inch 2″x3″s
4, 8.5 inches long 4″x4″ legs
82″x41″ sheet of 3/4″ MDF or Plywood.
Assemble the frame as shown in the picture. Space the 3 inner braces 18 5/8″ apart.
Attach the 4, 4″ x 4″ to the inside corners using 3.5″ screws as shown here.

This picture shows the frame with the 82″ x 41″ cut piece of 3/4″ MDF attached.

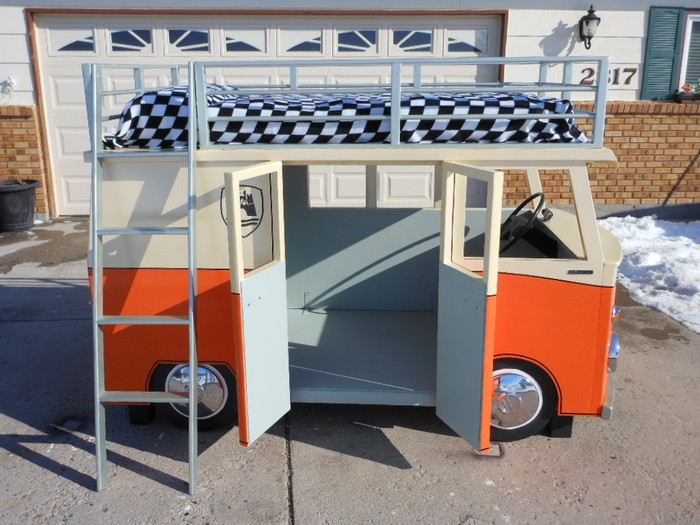
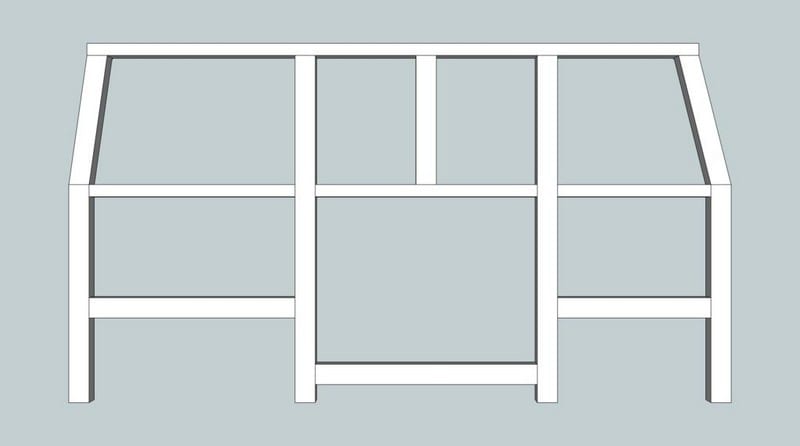
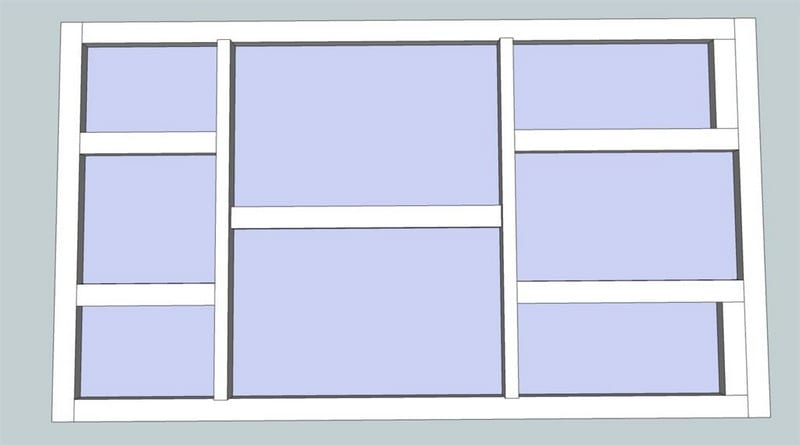
There are 5 parts to the left and right walls of the VW micro-bus bunk bed. One side is a continuous piece. It’s the side with no doors. The side with the doors consists of the front, back, and two doors. Now depending on where you plan on putting the bus in the room, this is the step you decide which side is which. This instructable shows the build with the doors being on the “passenger” side of the bus.
The pre-cut lumber needed here for the VW micro-bus bunk bed is…
4 pieces of 41.5 inch 2″x3″
4 pieces of 27-inch 2″x3″
2 pieces of 25.5 inch 2″x3″
1 piece 27.5 inch 2″x3″
2 pieces of 19-inch 2″x3″
1 piece of 14.5 inches 2″x3″
2 pieces 14.5 inches long 2″x3″ with the end cuts being parallel 82 degrees.
2 pieces 15 inches long 2″x3″ with the end cuts being parallel 76 degrees.
1 piece of 75.75 inches 2″x2″
2 pieces of 19-inch 2″x2″
2 pieces of 25.5 inch 2″x2″
4 pieces of 40-inch 2″x2″
4 pieces of 13.5 inch 2″x2″
2 pieces of 10.5 inch 2″x2″
The pictures explain the layout of these pieces of timber. Remember to pre-drill and countersink your screws.


The main aspect of this build that determines the uniqueness of the VW Micro-bus bunk bed is the rounded front end. This is actually not too hard to accomplish. I did my curve-free hand. If you can find a compass large enough or something to use as a pattern, please feel free.
Cut 3, 44-inch length pieces from the 2″x6″ studs. see the first picture to show how to draw the arc.
Use a jigsaw and cut the arc out of this wood. Use the arc to trace onto the remaining two 44″ pieces. Clamp the 3 pieces together and sand the curves until each is identical to the other. Use one of these as a template also to trace the same arc on the piece of 3/4″x12″x44″ piece to be used later as the top cap of the front end.
Pre-cut materials are…
3, 44 inches long 2″x6″
2, 39 inches long 2″x2″
2, 23.75 inches long 2″x3″
1, 44 inches long 2″x3″
2, 10 7/8 inches long 2″x3″ for bracing the arcs
Use the pictures provided for the layout of the VW micro-bus bunk bed and assemble it. Place screws anywhere you feel is appropriate for strength.


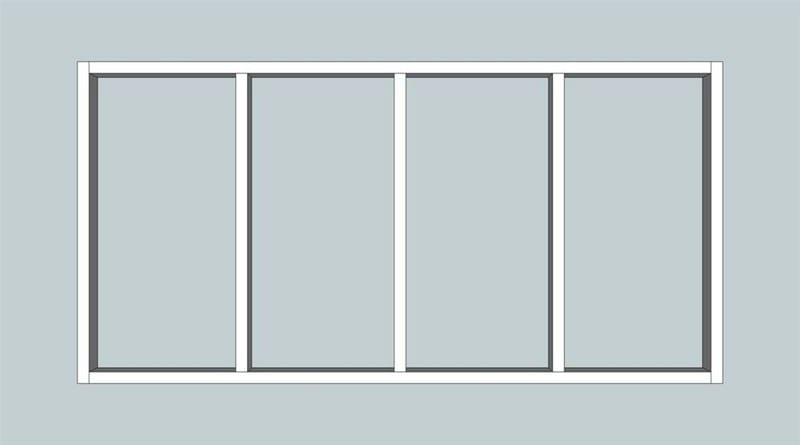
Rear frame of the VW micro-bus bunk bed: This is one of the more simple frames to assemble. The only difficult part is the angles of the upper pieces. They are cut at 82 degrees.
The pre-cut list is:
2, 27 inches long 2″x3″
2, 14.5 inches long 2″x3″ with parallel cuts at 82 degrees. The angle cuts are on the wide part of the 2″x3″
2, 39.25 inches long 2″x3″
1, 44 inches long 2″x2″


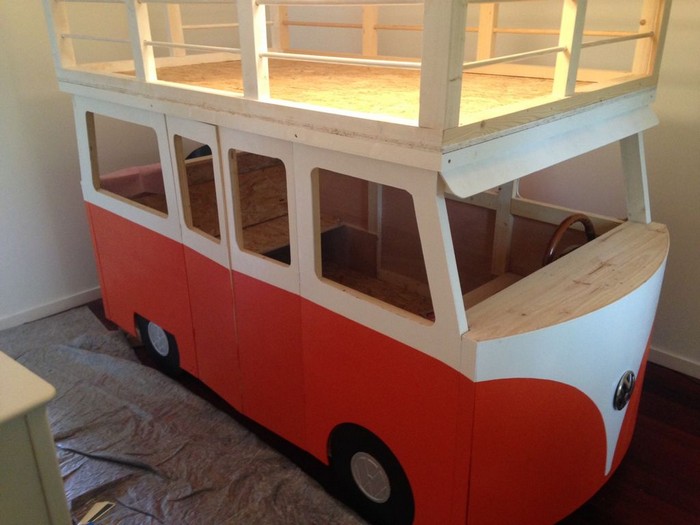
The top frame of the VW micro-bus bunk bed is a little bigger than the top of the bus, due to the size of a single mattress. I don’t think it takes anything away from the finished project though. You’ll also notice a couple of the 2″x3″ braces inside are on end instead of flat like the outside border is. I did this to help brace and space the middle area of the side walls.
The pre-cut list material of the VW micro-bus bunk bed is…
81″x46″ sheet of 3/4″ plywood
2, 46 inches long 2″x3″
2, 76 inches long 2″x3″
2, 41 inches long 2″x3″ (Pay special attention to how these pieces are positioned in pictures.)
2, 16 inches long 2″x3″
2, 26 inches long 2″x3″
1, 31 inches long 2″x3″
2, 10.5 inches long 2″x3″
Assemble as seen in the pictures.

The following should be some of the last illustrations for the VW micro-bus bunk bed. I decided to use colours in these illustrations to better differentiate the frames from the base. From here on out I will try to use real photos. Thank goodness, right? Pictures are so much more helpful.
Assemble all the frames of the VW micro-bus bunk bed. Another person is very helpful here. If going at it alone during this step, clamps will do. Start with the wall containing no doors. Attach this wall with 4 of the 4″x4″ “L” brackets in the positions shown in the first picture.
The wall of the VW micro-bus bunk bed will support itself after the brackets are installed. You now can move on to installing the two walls on the side with the doors. Use 4 more 4″x4″ “L” brackets here.

Then move on to the rear section. Install with the smaller brackets as shown in the pictures.


Time to place the 4 tires for our VW micro-bus bunk bed. See illustrations for placement. You might want to sand and paint the tires before installation.

Rip one of the 1/4 inch plywood pieces to make it 83.5 inches long and 43 inches wide. Use the clamps and place them on the frame with no doors. Using a pencil, trace around the frame where the windows of your VW micro-bus bunk bed need to be cut out, the front and back angles, and also around the wheels for wheel wells.
Use the jigsaw and cut out the pieces not needed. For the rear wheel well, measure up 8 inches on both sides of the drawn line. Make a straight line to give you the guide to cut the flat top of the wheel well. (See Illustration.) You will repeat this on the other side’s rear wheel.
Apply wood glue along the outside of the frame of the VW micro-bus bunk bed where the plywood skin will attach and clamp the skin to the frame to hold it while using drywall screws to attach.
Measure the areas to be skinned on the remaining walls and doors, cut them out accordingly, and attach them with glue and screws.

Attach the front frame with 4 small brackets; two at the top corners and two at the MDF base.

Use a tape measure and measure the front surface of the curved ribs on the VW micro-bus bunk bed front frame. Take this measurement as well as the height of bottom to top and this will be the size of the front skin.
Apply wood glue to the surface of the VW micro-bus bunk bed’s three ribs. Now starting from either the left or right side line up the skin to the edge of the ribs. Place some screws in to begin the wrap-around attachment. Once you have a few screws in, start to push the skin in against the ribs and place more screws in. Continue this process all the way to the other side until you have attached the skin. The 1/4 plywood should be pliable enough to wrap well.
You now have two narrow strips left to skin. The two sides where the ribs attach to the frame. Should be 1.5 inches wide by 27 inches long. Finish this and you are now done with the outer skin.
Take the piece of 3/4″x12″x44.5″ and cut the pre-traced arc out. Now you will have to notch the two inner sides to fit around the wall frame. See the illustration for a final look at the top cap.
Attach this piece to the top of the front end with about half inch overhang. This is the dashboard.

Measure, horizontally, across the front of the skinned front end of the VW micro-bus bunk bed. Add 1 inch to this length and cut a 2″x3″ this length, this gives you about half an inch of overhang on each side. This will be the bumper of the VW micro-bus bunk bed. About every 1.5 to 2.5 inches you will be making cuts approximately 1″ in depth. (See picture.) This will allow you to bend the 2″x3″. Find the centre on the front end and the piece of 2″x3″. Use these centre marks to line up the bumper. Glue and screw the bumper in place.

Get some help here, unless you are He-Man/She-Ra. Lift the top frame up and set it onto the walls. You’ll now notice the two 41-inch 2″x3″s you set on end fit nicely between the left and right walls.

This is the junction you will place the “L” brackets to help secure the top to the bus. 4 small brackets in the front and back will finish securing the structure. You will now find this bunk bed to be extremely sturdy and stable.

Security rail/faux cargo rack and ladder.
Material to pre-cut…
Rails
10, 12″ pieces of 2″x2″
2, 79″ pieces of 1″x2″
2, 60″ pieces of 1″x2″
4, 42.5″ pieces of 1″x2″
8, 20.5″ pieces of 3/4″ dowel
6, 25″ pieces of 3/4″ dowel
4, 29.5″ pieces of 3/4″ dowel
Ladder
2, 66.5″ pieces of 1″x3″
4, 14.5″ pieces of 1″x3″
I have the railing spaced one inch inside from the edge of the bunk bed. See the pictures for spacing and placement of uprights. To install the dowels a drill press is handy and more precise, but not necessary. On the 2″x2″ pieces make two lines 4 inches apart and one line down the middle of the wood. These intersections mark where you need to drill out the 3/4″ holes to glue dowels in. (See pictures)
The pictures of the bunk bed will better explain the process.

The ladder of the VW micro-bus bunk bed is best to actually build piece by piece onto the rail. The measurements are just generalized. The angle I chose seemed to be the best for strength. Your angle may vary.

Inside Skin.

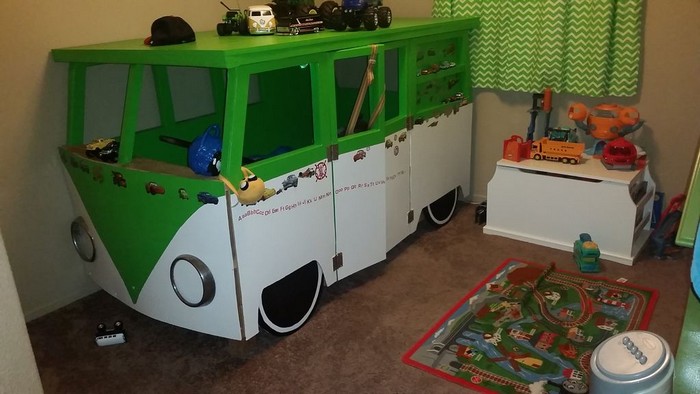
Accents and paint.

Add your accents, and take a deep breath. You are finally done with this DIY VW Micro-Bus Bunk Bed and Playhouse. This project is time-consuming and can be frustrating at times, but when you stand back and look at your finished project, ah. Such a good feeling!
Here the bunk bed is broken down into eight component parts:

Thanks to Uptonb for this great project.
Conclusion
Building a VW Micro-Bus bunk bed is a rewarding project that combines creativity with functionality. It offers a unique play area and sleeping solution that sparks children’s imaginations and makes bedtime fun. The process requires patience and precision, but the end result is a durable and charming piece of furniture. This DIY endeavor not only provides a sense of accomplishment but also creates lasting memories for both parents and children.
Still looking for incredible beds? Check out our Star Wars AT-AT loft bed project!